Skip to content

Waterproof Shoe Glue for Rainy Weather: A Resilient Guide
Your trusted adhesives glue & cleaner manufacturer

Rain has a way of exposing shoe repairs that looked perfectly fine indoors. A loose sole may appear firmly attached after a quick evening fix, yet start peeling again during the next wet commute because rain is only one part of the problem. Every step bends the forefoot, compresses the heel, twists the outsole, and repeatedly pulls against the repaired joint. When moisture, road grit, muddy ground, and temperature changes are added, a repair made with the wrong adhesive or poor preparation can fail much sooner than expected.
For reliable rainy-weather repairs, use a flexible shoe adhesive that matches the materials being bonded, clean and dry both surfaces thoroughly, apply an even layer across the actual damaged area, hold the parts in alignment, and allow the adhesive to reach its full recommended cure before exposing the shoe to rain. Waterproof performance depends on the adhesive, surface preparation, repair geometry, curing conditions, and the condition of the footwear itself.
This is where many otherwise sensible repairs go wrong. A shoe may feel firm after several hours, but initial grab is not the same as full cure. Some dedicated shoe-repair adhesives are intended to cure overnight, while others may require one to three days to reach maximum strength depending on formulation, layer thickness, temperature, and humidity. A few extra hours indoors can make the difference between a dependable repair and a sole that starts lifting halfway through a rainy walk.
What Makes Shoe Glue Waterproof and Rain-Ready?
A rain-ready shoe glue needs more than simple water resistance. It should bond securely to the footwear materials, remain flexible as the shoe bends, seal small gaps, and retain useful strength after repeated wet-to-dry cycles. Even a high-quality waterproof adhesive can perform poorly if it is applied over dirt, loose old glue, trapped moisture, or badly deteriorated shoe material.
Waterproof Performance
In footwear repair, “waterproof” is best understood as the ability of the cured adhesive layer to keep performing when exposed to rain, wet pavement, splashes, and occasional puddles. It does not automatically mean that the entire shoe becomes waterproof after one area has been repaired. Water may still enter through stitching, worn mesh, cracked uppers, damaged seams, or another untreated section of the outsole, so the finished repair should be judged as one part of the shoe’s overall weather protection.
The bond line itself should also be continuous. If adhesive is applied only along the visible outside edge while a deeper cavity remains unbonded, moisture and grit can work into the hidden opening and gradually enlarge it. This is especially common around the toe, forefoot, and outer edge of the sole, where repeated bending places more stress on the joint than it would experience while sitting on a workbench.
| Performance Factor | Importance in Rain | Practical Effect |
|---|---|---|
| Water resistance | High | Helps the repaired joint tolerate rain and splash exposure |
| Flexibility | Very high | Reduces cracking during repeated bending |
| Gap sealing | High | Limits water entry through small separations |
| Material compatibility | Very high | Improves adhesion to rubber, leather, vinyl, canvas, and related materials |
| Abrasion resistance | Medium to high | Helps exposed toe and sole-edge repairs survive wear |
| Clear finish | Medium | Keeps visible repairs cleaner and less noticeable |
No single property should be treated as the whole answer. A waterproof glue that does not adhere well to the actual shoe material is still a poor choice, while an extremely hard adhesive can create a rigid stress point that becomes vulnerable after repeated walking. The most reliable rainy-weather repair usually comes from a balance of adhesion, flexibility, water resistance, and correct application.
Flexibility Matters
Shoes are demanding adhesive applications because almost every step creates movement. The forefoot bends during push-off, the heel compresses during landing, and the outsole twists when the wearer changes direction or walks across uneven ground. Running shoes, children’s sneakers, work boots, and hiking footwear can experience particularly frequent flexing, so a repair that feels strong while stationary may still fail once the shoe returns to real use.
A flexible adhesive helps spread that movement through the repaired area instead of concentrating stress at one hard edge. This is one reason dedicated shoe-repair adhesives are often better suited to separating soles than brittle general-purpose instant glues. Useful strength in footwear is not simply maximum hardness. It is the ability to maintain contact while the shoe repeatedly bends, twists, compresses, and returns to shape.
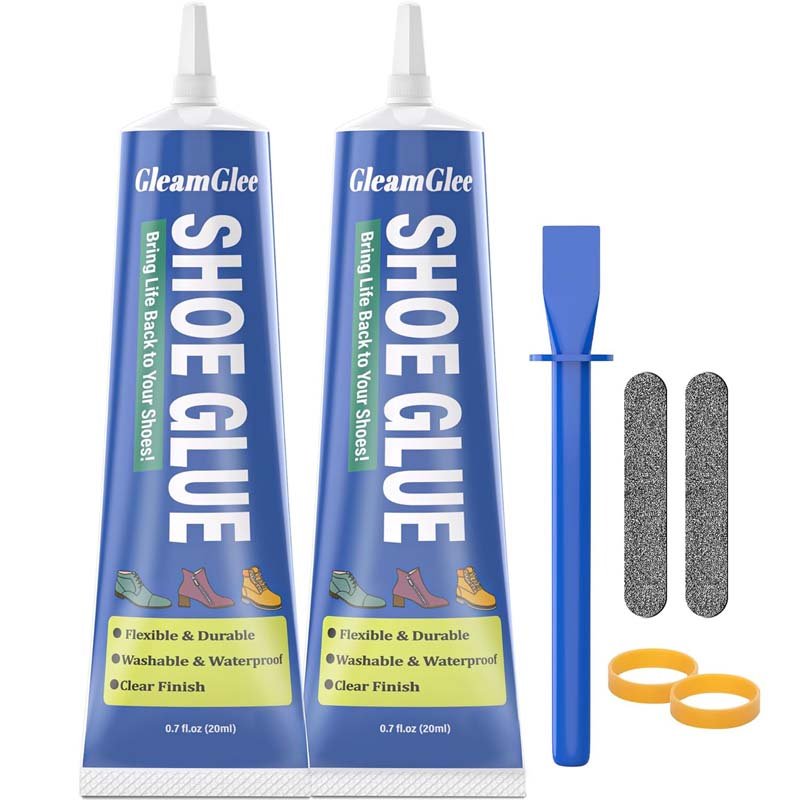
GleamGlee Shoe Glue is designed around this type of flexible repair. It cures clear and remains elastic rather than forming a stiff, chalky residue line, making it suitable for common repairs involving sneakers, canvas footwear, leather shoes, work boots, and mixed-material constructions where both appearance and movement matter over time.
Rain and Repeated Flexing
A ten-minute walk in light drizzle is very different from several hours on a muddy trail. Both are wet-weather situations, yet the repaired joint experiences different levels of moisture, abrasion, impact, and flexing. A city sneaker may encounter road splash and pavement, while a hiking boot can be repeatedly exposed to wet grass, mud, stones, and deeper puddles during the same outing.
The location of the repair also changes the stress pattern. Toe edges tend to experience high bending and abrasion, heel areas absorb repeated impact, and sidewalls may scrape against curbs, rocks, or trail surfaces. A repair that is acceptable on a lightly loaded decorative section may not be suitable for the forefoot of a shoe that bends thousands of times during daily use.
For practical rainy-weather repairs, four stresses should be considered together:
- Moisture from rain, splash, puddles, wet grass, or damp ground.
- Flexing from walking, running, climbing, and repeated forefoot movement.
- Abrasion from pavement, grit, mud, rocks, steps, and curbs.
- Impact from heel strike, jumps, fast walking, and uneven terrain.
A repair that handles these combined conditions is more useful than one selected simply because the adhesive package claims very high strength. The real test is whether the bond continues moving with the shoe after days or weeks of ordinary wet-weather wear.
Water Resistance Is Not Wet-Surface Bonding
One of the most common misunderstandings in shoe repair is assuming that a waterproof adhesive can automatically be applied directly to a soaking wet shoe. These are separate characteristics. Many adhesives become resistant to water only after curing and still require a clean, dry bonding surface to develop dependable initial adhesion.
Water trapped between the adhesive and shoe material can reduce direct surface contact, especially on fabric, foam, porous leather, or padded constructions. A shoe may feel dry on the outside while moisture remains deeper inside the seam, lining, or midsole. Applying adhesive too early can seal that moisture into the repair and make the final result less predictable.
Unless the exact adhesive instructions clearly allow damp-surface application, drying the footwear completely is the safer approach. For a planned repair at home, waiting several hours or overnight generally produces a more dependable bond than trying to save time by gluing immediately after walking through rain.

Which Shoe Glue Works Best for Wet-Weather Repairs?
The best adhesive for wet-weather footwear is usually a flexible shoe-repair glue that matches the materials being joined and remains moisture-resistant after curing. Rubber soles, leather uppers, canvas sneakers, vinyl footwear, foams, and coated synthetics behave differently, so the adhesive should be selected according to both substrate compatibility and the type of repair rather than speed alone.
Choose by Material
Modern footwear is rarely made from one material. A typical sneaker may combine a rubber outsole, EVA or polyurethane foam, mesh textile, synthetic leather, molded plastic reinforcement, and fabric lining. Hiking boots can combine leather, textile panels, rubber rands, cushioning foam, and harder outsole compounds. This mixed construction is one reason a glue that works well on one shoe may perform differently on another.
The first question should therefore be which two surfaces are actually being bonded. Rubber-to-canvas repair, rubber-to-leather repair, foam-to-rubber bonding, and vinyl-to-rubber sealing may each place different demands on the adhesive. Broad compatibility is especially useful for household repairs because one family can own many different types of footwear.
GleamGlee Shoe Glue is intended for common materials including leather, rubber, vinyl, and canvas, which makes it useful for everyday repairs such as a rubber outsole lifting from a canvas sneaker or a leather shoe separating along the sole edge. For unfamiliar coated plastics or valuable designer footwear, testing a small hidden area first is still sensible.
| Material | Common Shoe Location | Main Adhesive Need |
|---|---|---|
| Rubber | Outsole, toe cap, rain boot | Flexible bond and moisture resistance |
| Leather | Upper, welt, dress shoe | Strong adhesion with a neat finish |
| Canvas | Sneaker upper | Flexibility without excessive stiffening |
| Vinyl | Fashion footwear, boots | Compatibility with smooth synthetic surfaces |
| Foam | Midsole, insole | Flexibility and controlled application |
| Textile | Lining, upper panels | Bonding without excessive soak-through |
Material identification does not need to become complicated, but it should happen before glue is applied. A few minutes spent checking the shoe construction can prevent discoloration, softening, poor adhesion, or a visible repair that is harder to correct later.
Flexible Glue vs. Instant Glue
Instant adhesives are attractive because they feel convenient. A fast initial grab can be useful for tiny rigid household repairs, but shoe soles require a different balance of properties. A large separating sole may need adhesive distributed across a wider irregular area, and the user often needs enough working time to align the outsole accurately before the joint becomes fixed.
Flexible shoe adhesives are generally better suited to locations that bend repeatedly. They can tolerate small movements between the outsole and upper without immediately cracking or creating a rigid stress line. This is especially important for running shoes, children’s footwear, hiking boots, work shoes, and sneakers that flex strongly through the forefoot.
A practical order of priorities is more useful than choosing by cure speed alone:
- Compatibility with both bonding surfaces.
- Flexibility after the adhesive has cured.
- Resistance to rain and routine moisture exposure.
- Ability to cover or fill the actual damaged area.
- Enough working time for correct alignment.
- A clean finish where appearance matters.
Instant glue may still have a role in small low-flex decorative jobs, but speed should rarely be the main criterion for a rainy-weather sole repair. The better question is whether the cured bond can keep moving with the shoe after repeated walking.
Match Glue to the Damage
The damaged area often tells you more than the shoe category. A peeling outsole needs broad, flexible adhesion across a relatively large surface. A small crack in a rubber boot needs both bonding and sealing. A worn toe cap needs resistance to flexing and abrasion, while a loose insole is exposed more to body heat and perspiration than direct rain.
Localized separations between sound materials are usually good candidates for adhesive repair. When the surrounding foam crumbles, the outsole is deeply split, or a structural component is broken, stronger glue does not necessarily solve the real problem. In those situations, the adhesive may bond successfully to a layer that is itself already deteriorating.
For a sensible repair, ask whether the glue is reconnecting two sound surfaces or being asked to replace missing structure. This distinction helps avoid repeated failure and makes it easier to judge whether a shoe should be repaired at home, taken to a professional, or replaced.
Clear Finish and Precision
Appearance is a practical concern, especially on white sneakers, dress shoes, designer footwear, or visible sole edges. A strong repair can still look unfinished if excess adhesive spreads across the upper or leaves a cloudy residue around the bond line. Clear-curing adhesives are useful for these situations because small amounts of squeeze-out are less noticeable than opaque residue.
Precision application is equally important. Narrow toe gaps, heel edges, and sole seams do not require glue spread over a large section of the shoe. A fine metal nozzle allows adhesive to be placed deeper inside a separation while reducing contact with surrounding leather, canvas, or synthetic material.
The GleamGlee repair kit includes two 20 ml tubes, a metal precision nozzle, an applicator, two sandpaper sheets, and two rubber bands. These accessories are practical rather than decorative because they support surface preparation, controlled dispensing, and steady holding pressure, which are three of the stages most likely to influence the quality of a home shoe repair.
How Should Shoes Be Prepared Before Gluing?
Shoes should normally be clean, structurally sound, and fully dry before adhesive is applied. Mud, dust, loose old adhesive, oil, and unstable material should be removed from both bonding surfaces. Smooth rubber or glossy surfaces may benefit from light sanding when the product instructions permit it, because strong adhesion depends on direct contact with sound shoe material rather than contamination.
Dry the Shoe Completely
Rain-soaked footwear can stay damp much longer than it appears. The outside of a rubber sole may feel dry within minutes, while canvas, foam, leather, stitching, or internal padding can retain water for hours. Applying adhesive while these areas remain damp can reduce the predictability of the bond and may trap moisture inside the joint.
After a wet walk, remove detachable insoles where appropriate and allow air to circulate through the shoe. Open the damaged section only enough to help cleaning and drying; pulling a sole farther apart than necessary can increase the repair area and damage material that was still firmly attached.
Natural ventilation is generally safer than aggressive heating. Very hot dryers, radiators, heat guns, or similar methods can distort synthetic materials, affect foams, dry leather unevenly, or disturb original factory bonding. A stable room-temperature environment may take longer, but it gives both the shoe and adhesive a more controlled starting point.
For home repair, the most reliable sequence remains simple: clean first, dry fully, prepare the bonding area, and only then begin applying adhesive.
Remove Dirt and Old Glue
Fresh adhesive bonds best to the actual shoe surface rather than a layer of mud, grit, rubber dust, or loose factory glue. Even an excellent new adhesive can fail when the material underneath it separates first. This is why cleaning and removing unstable residue often matter more than increasing the amount of glue.
Begin by brushing away dry dirt and grit. Loose ridges of old adhesive can be removed carefully when they are clearly detached, but there is no benefit in aggressively scraping material that remains firmly bonded if doing so risks cutting into foam, rubber, leather, or fabric.
The goal is a stable bonding surface rather than a perfectly polished one. Where a compatible cleaner is used, allow all remaining moisture or solvent to evaporate before gluing. Heavy conditioners, oils, or waxes should generally not be applied to the bonding zone immediately before repair because they may interfere with adhesion.
Five or ten minutes of careful cleaning can prevent an entire second repair later, making surface preparation one of the highest-value steps in rainy-weather shoe maintenance.
Sand Smooth Surfaces
Light abrasion can help when a bonding surface is extremely smooth, glossy, or covered with a weak surface layer. The intention is not to reshape the sole or remove large amounts of material. A few controlled passes are often enough to dull the shine and create a cleaner, more receptive surface for the adhesive.
Sand only the hidden area that will actually be bonded. Rubber outsole edges and toe caps are common candidates, while finished leather, suede, nubuck, and visible coated materials require much greater caution. These materials can be permanently marked, so abrasion should be limited to concealed bonding areas when it is suitable at all.
After sanding, remove every trace of loose dust before applying glue. Adhesive spread over sanding particles is still bonding to contamination instead of the substrate itself. The two sandpaper sheets included in the GleamGlee repair kit are intended for this preparation stage, especially on smooth sole edges and similar repair locations.
Careful sanding may take less than a minute, but it can significantly improve the consistency of contact between the adhesive and the shoe material.
Check the Damage Before Gluing
A visible opening at the sole edge may extend much farther inside than it appears. Before dispensing adhesive, inspect the shoe from several angles and gently lift only the loose portion to determine where sound bonding ends. This helps you understand the true size of the repair and avoids leaving a larger hidden cavity behind the sealed edge.
Look for cracks, missing chunks, crumbling foam, torn fabric, deformed heel sections, or broken structural components. Older polyurethane and foam midsoles deserve particular attention because some degrade internally and begin crumbling under light finger pressure. Adhesive may attach perfectly to the outer layer while the deteriorating foam underneath continues to break apart.
Localized separation between healthy materials is an excellent repair candidate. Widespread material failure is not. Making this distinction before starting prevents unrealistic expectations and helps the user decide whether adhesive repair, professional shoe repair, or replacement is the more sensible option.

How Do You Apply Shoe Glue for a Watertight Bond?
For a reliable rain-resistant repair, apply enough adhesive to cover the real bonding area evenly without creating an oversized thick mass. Work the glue into separated sole edges, align the parts carefully, and maintain steady pressure while the adhesive sets. Small gaps should be sealed continuously because one open pathway can allow moisture and grit to work behind an otherwise strong repair.
Apply an Even Layer
A common beginner mistake is treating a separating sole like a tiny rigid object and applying only a few isolated drops. This can leave large dry spaces between the glue points. Those unbonded areas may flex independently, collect moisture, and create pathways where the separation grows deeper during repeated walking.
The better approach is controlled coverage across the actual bonding zone. Tight-fitting surfaces generally need less material than irregular gaps, while deeper cracks may require a formulation suitable for filling. Too much adhesive can be just as problematic as too little because a thick mass may squeeze onto the upper, prevent proper seating, or require a longer curing period.
A precision nozzle helps guide adhesive into narrow openings without forcing the sole farther apart. Once the damaged area has been covered appropriately, bring the surfaces together smoothly and check the alignment before applying holding pressure.
A repair does not need to look heavily coated to be strong. Clean, continuous contact inside the joint is far more important than a visible ridge of glue around the outside.
Align and Hold the Sole
Correct alignment is especially important for outsole repairs because even a strong adhesive cannot compensate for a sole that has shifted out of position. Before the glue develops significant tack, check the toe, heel, and both side edges to make sure the outsole sits naturally against the upper and midsole.
Apply even pressure across the repaired section rather than squeezing one small point excessively. Different holding methods can work depending on shoe geometry. Rubber bands are useful for sneakers and casual footwear, tape can stabilize a small lifting toe edge, and soft clamps may help on accessible flatter sections.
Too much pressure should also be avoided because it can force most of the adhesive out of the bond line or deform soft foam. The two rubber bands supplied with the GleamGlee kit are useful because they distribute pressure around common shoe shapes without requiring workshop tools.
Once the shoe is secured, leave it in a stable position. Repeatedly opening the edge to “check progress” interrupts curing and can undo the careful alignment achieved at the start.
Seal Small Gaps
After the main joint is aligned, inspect the exposed edge for small irregular openings. These areas are particularly important in rainy weather because even a narrow gap can allow water, sand, and road grit to move behind the repaired section.
Toe edges are common problem areas because they combine high flexing with frequent contact against steps, curbs, pavement, or trail surfaces. A small unsealed corner can become the starting point for a new peel after several wet walks.
Rubber rain boots may require a slightly different repair approach when sealing cracks. The adhesive needs to bridge the opening while remaining flexible enough to move with the boot material. Large splits, hardened rubber, or widespread surface cracking may indicate material deterioration that simple glue cannot correct for long.
Visible repairs should be kept neat. Clear adhesive helps reduce visual impact, but a large glossy bead can still look obvious on white sneakers, leather shoes, or fashion footwear. Precision and restraint generally create a cleaner and more durable result.
Avoid Common Application Errors
Many disappointing repairs are caused by application mistakes rather than weak adhesive. One of the most common is sealing only the outermost few millimeters of a much larger sole separation. The edge looks repaired for a short time, but movement continues behind it until the opening returns.
Another frequent mistake is applying fresh glue directly over dirt, loose old adhesive, or damp material. In this case, the new adhesive may cure perfectly while the contaminated layer underneath remains the actual weak point.
Common errors include:
- Applying adhesive before rain-soaked material has dried fully.
- Using too much glue in a tight-fitting joint.
- Bonding only the visible edge of a deeper separation.
- Failing to align the outsole before applying pressure.
- Moving or flexing the shoe during early curing.
- Wearing the shoe before the stated cure period is complete.
- Assuming one sealed section makes the whole shoe waterproof.
A successful repair often looks surprisingly simple. The surfaces meet cleanly, excess glue stays minimal, alignment remains natural, and the shoe is left undisturbed until the adhesive has developed enough strength for normal movement.
How Long Should Shoe Glue Cure Before Rain?
Shoe glue should normally be exposed to rain only after reaching the cure time specified for that exact formulation. Initial tack, surface dryness, handling strength, and full cure are different stages. Depending on chemistry, repair thickness, temperature, and humidity, footwear adhesives may require roughly overnight to several days before they reach the strength and water resistance expected during real outdoor use.
Dry Time vs. Cure Time
Users often describe adhesive as “dry” when it no longer feels wet or sticky. That observation can be misleading because the visible surface may become firm while the material deeper inside the repair is still developing strength. A sole may therefore feel stable enough to handle before it is ready for bending, long walks, or rain.
Published cure guidance varies considerably across footwear adhesives. Some dedicated formulations specify an overnight cure of around 8–12 hours for normal applications, while others commonly recommend about 24 hours and may need 48–72 hours to reach maximum strength under certain conditions.
| Repair Situation | Practical Planning Window | Main Consideration |
|---|---|---|
| Thin localized repair | Overnight or product minimum | Follow exact product guidance |
| Standard sole separation | Around 24 hours is common for many products | Avoid early walking and rain |
| Thick gap filling | Often longer than a thin bond | Deeper adhesive cures more slowly |
| Cool environment | May extend curing | Temperature affects many adhesive systems |
| Heavy outdoor footwear | Use full cure rather than minimum handling time | Greater stress after returning to service |
| Repeated wet exposure | Allow complete cure before use | Water resistance develops after curing |
These figures are useful planning references rather than universal instructions. The cure time printed for the adhesive in hand should always take priority because formulations can behave very differently even when they are sold for similar shoe-repair tasks.
Thickness Changes Curing
A thin film between two prepared surfaces behaves differently from a thick mass filling a deep cavity. The outside of a heavy application may appear dry while the center remains soft, which is one reason oversized glue beads can create uncertainty about when a repair is actually ready for use.
This is particularly relevant around worn heels, deep sole gaps, and damaged toe sections where users may be tempted to fill the entire opening at once. When the adhesive instructions permit layered application, several controlled layers can sometimes cure more predictably than one large mass.
The shoe itself can also restrict airflow. Adhesive placed deep between a rubber outsole and dense foam may experience different conditions from a thin bead exposed along an outer seam. For thicker repairs, working toward the longer end of the manufacturer’s recommended curing period is generally a safer approach.
Waiting is inconvenient, but premature walking can disturb alignment and create small internal openings that later become entry points for rain and grit.
Temperature and Humidity
Environmental conditions influence the curing of many adhesive systems, although the effect is not identical for every chemistry. A moderate indoor environment tends to provide more predictable results than a cold garage, damp porch, or unheated shed, especially during rainy seasons.
Low temperatures can slow some curing reactions and make adhesive thicker during application. Humidity may accelerate certain moisture-curing systems while affecting others differently. This variation is why broad online claims such as “shoe glue always dries in six hours” should not be treated as universal rules.
Avoid trying to force curing with excessive heat unless the product and shoe materials clearly allow it. Very hot air can distort synthetic uppers, soften foams, dry leather unevenly, or weaken original factory bonds. A stable room-temperature location is usually safer for household repair.
When conditions are cool or the bond line is thick, allowing extra time within the stated curing guidance is often more sensible than testing the shoe at the earliest possible moment.
Plan Around Rain
One of the easiest ways to improve a rainy-season repair is to plan backward from the next time the shoes will be needed. If a pair of boots must be worn for work the following morning, beginning the repair late at night may leave too little time for the adhesive to cure properly.
A practical schedule should include time for the wet shoe to dry, surface cleaning, sanding if appropriate, adhesive application, alignment, holding pressure, and the entire curing period. If a product calls for 24 hours, repairing at 9 p.m. and wearing the shoe at 7 a.m. gives only ten hours, no matter how firm the outside appears.
Having a second pair available is especially useful for work footwear, school shoes, hiking boots, and commuting shoes during a rainy week. This simple habit removes the pressure to rush the repair and gives the adhesive enough time to develop the properties it was designed to provide.
How Do You Make Shoe Glue Repairs Last in Rain?
Long-lasting rainy-weather repairs depend on more than the first application. Allow the glue to cure fully, inspect the joint before wet use, remove mud and grit after rainy walks, and address new lifting early. A repair is most successful when the surrounding shoe material remains structurally sound, because adhesive cannot permanently restore foam, rubber, or structural parts that are already deteriorating.
Inspect Before Wet Use
A newly repaired shoe should be checked after curing and before it is taken on a long rainy walk. Start with a visual inspection rather than immediately soaking the shoe. Look closely along the repaired edge and confirm that the surfaces remain aligned and that no obvious corner or cavity has reopened.
Next, flex the shoe gently through a normal walking range. Do not fold the forefoot sharply or pull directly against the repaired joint. A properly cured flexible bond should move with the shoe without visibly lifting at the edge.
| Inspection Point | Acceptable Sign | Warning Sign |
|---|---|---|
| Sole edge | Continuous closed contact | New visible opening |
| Gentle flex | Bond follows shoe movement | Edge begins lifting |
| Adhesive surface | Firm and fully cured | Soft or tacky area |
| Alignment | Sole sits naturally | Sole shifted or twisted |
| Midsole | Material remains solid | Foam crumbles under light pressure |
| Surrounding seams | No obvious opening | Another crack or leaking seam nearby |
When practical, wear the shoe briefly in dry conditions first. A short normal walk can reveal alignment or movement problems before rain adds moisture and grit to the repair.
Clean After Rain
Rain is only part of the durability challenge. Mud, road dust, sand, and small pieces of grit often collect along sole edges during wet weather. Once trapped around a small opening, these particles can act like abrasives each time the shoe bends.
After a wet outing, remove loose mud and allow footwear to dry naturally. Inspect repaired toe sections, heel edges, and sidewalls during cleaning. A new separation measuring only a few millimeters is much easier to address than a sole that has peeled halfway around the shoe after several more days of use.
Avoid aggressively pulling at a repaired edge simply because it looks slightly irregular. If the bond remains stable, unnecessary testing can create a problem that did not previously exist.
For hiking or work footwear used frequently in rain, rotating between two pairs can also help by giving each shoe enough time to dry completely between uses. This benefits the entire shoe construction, not just the repaired joint.
Understand Repeat Failures
When the same repair fails more than once, simply adding another layer of adhesive is rarely the best first response. The failure surface can provide useful clues about what actually happened.
If the cured adhesive separates cleanly from one material, surface preparation or material compatibility may be the issue. If old factory glue remains attached to the new adhesive but releases from the shoe, unstable residue may not have been removed. If pieces of foam remain stuck to the cured glue, the shoe material itself may be breaking down internally.
The repair location can also explain repeat problems. Toe separations experience high bending and abrasion, heel separations deal with impact, and sidewall areas can experience twisting. Understanding the stress pattern makes it easier to decide whether the area needs better preparation, more complete bonding coverage, a more flexible adhesive, or professional repair.
From a practical repair standpoint, the goal is to identify the failure mode before applying more glue. This approach saves material and usually produces a more durable second repair.
Know When to Replace the Shoe
Shoe glue can extend the useful life of footwear, but it should not be used to keep every damaged shoe in service indefinitely. This is particularly important for safety footwear, heavily worn sports shoes, deteriorated midsoles, and shoes with structural heel or outsole damage.
Localized problems are usually the best candidates for DIY repair. Examples include a peeling outsole edge, small toe separation, loose heel edge, minor rubber crack, detached insole, or small seam opening where the surrounding material is still strong.
Professional assessment or replacement becomes more sensible when the shoe shows widespread foam breakdown, major outsole cracking, deformation that changes walking stability, damaged safety components, or repeated separation after careful repair. Adhesive can reconnect sound surfaces, but it cannot permanently replace structure that no longer exists.
A sensible repair mindset is therefore not about using the strongest possible glue on every damaged shoe. It is about recognizing when a flexible waterproof adhesive can genuinely extend useful service life and when the footwear has moved beyond the limits of a reliable home repair.

Conclusion
Reliable rainy-weather shoe repair comes down to a straightforward sequence: choose a flexible adhesive compatible with the materials, clean and dry the bonding area thoroughly, lightly prepare smooth surfaces when appropriate, apply enough glue to create continuous contact, hold the parts in correct alignment, and allow the repair to reach its full cure before exposing it to rain. Each of these steps supports the next, which is why skipping preparation or rushing curing can undermine an otherwise good adhesive.
For everyday sneakers, hiking footwear, work boots, school shoes, leather footwear, canvas shoes, and rubber soles, a careful repair can extend the useful life of a pair that is otherwise still in good condition. The most dependable results come from treating waterproofing as a combination of adhesion, sealing, flexibility, curing, and maintenance rather than relying on one strength claim printed on a tube.
Products such as GleamGlee Shoe Glue are designed around these practical repair needs, combining a clear, flexible, water-resistant bond with a fine metal nozzle and accessories for surface preparation and holding pressure. Whether the user is repairing one favorite pair at home or evaluating shoe-care products for a retail or private-label range, the same standard matters: the adhesive should perform not only on a clean workbench, but also after the repaired shoe returns to real walking, flexing, wet streets, and unpredictable rainy weather.

FAQ
Is Shoe Glue Waterproof After It Dries?
Many dedicated shoe-repair adhesives are designed to resist water once they have cured completely, but surface dryness alone does not confirm that full waterproof performance has developed. The exact waiting period depends on adhesive chemistry, layer thickness, temperature, and humidity. Users should follow the stated cure time for the specific product and remember that waterproof adhesive does not automatically make every seam, upper panel, or untreated section of the shoe waterproof.
How Long Should Shoe Glue Dry Before Getting Wet?
Some shoe adhesives can reach useful cure levels overnight, while others commonly require around 24 hours or as long as 48–72 hours to develop maximum strength. Thick gap-filling repairs often need more time than thin bond lines. The safest approach is to follow the manufacturer’s full cure guidance rather than testing the shoe as soon as the outside of the adhesive feels dry.
Can I Apply Waterproof Shoe Glue to Wet Shoes?
Unless the product specifically states that it can bond to damp or wet surfaces, it is generally better to let the shoe dry completely first. Moisture trapped between the adhesive and the shoe can reduce direct contact and make the repair less predictable. Canvas, leather, foam, stitching, and padded sections can retain water even after the outer surface appears dry, so rain-soaked footwear may need several hours or overnight drying before repair.
What Is the Best Glue for a Rubber Shoe Sole?
A flexible shoe-repair adhesive that is compatible with rubber and the material above the sole is usually more suitable than a brittle general-purpose glue. The adhesive should maintain flexibility, resist routine moisture exposure, and cover the full damaged area. For mixed-material footwear, such as rubber bonded to leather or canvas, checking compatibility with both surfaces is more important than selecting glue based only on a fast drying time.
Can Shoe Glue Repair Hiking Boots for Rainy Conditions?
Small outsole separations, lifting rubber edges, toe-cap openings, and similar localized damage on hiking boots can often be repaired successfully when the surrounding material remains strong. The repair should be thoroughly cleaned, dried, bonded with a flexible moisture-resistant adhesive, held in alignment, and fully cured before the boots return to wet trails. Widespread sole deterioration, crumbling foam, or structural damage may require professional repair or replacement.
Why Does a Shoe Sole Peel Again After Gluing?
Repeat failure is commonly linked to incomplete cleaning, trapped moisture, loose old adhesive, insufficient coverage, premature use, poor material compatibility, or deterioration inside the shoe itself. If foam or rubber is already crumbling, new glue may bond strongly while the underlying material continues to fail. Inspecting the failed joint before applying more adhesive helps identify whether the problem is preparation, stress, material breakdown, or the adhesive choice itself.
How Can I Make a Shoe Glue Repair Last Longer in Rain?
Allow the adhesive to cure fully, keep the repaired edge clean, remove mud and grit after wet use, let the shoe dry naturally, and inspect small separations before they spread. Avoid repeatedly pulling at the repaired area to test it. A flexible waterproof bond will normally last longer when the repaired surfaces are structurally sound, correctly prepared, completely bonded, and given enough curing time before returning to regular rainy-weather use.
Share:
Table of Contents
Here, creating your adhesives glue & removal cleaner collection is no longer a barrier—it’s a collaborative journey where GleamGlee helps brands and businesses transform their vision into durable, certified, and market-ready solutions.
Partner with GleamGlee
Join hundreds of global partners who trust GleamGlee for adhesives and cleaners that combine innovation, compliance, and speed. Our vertically integrated system—from R&D to warehouse—guarantees consistent performance and reliable delivery.
Whether you’re sourcing FBA-ready stock or developing your own formula, our team provides unmatched technical support and responsive service.