Skip to content

Fabric Glue for Small Home Textile Repairs: A Refined Guide
Your trusted adhesives glue & cleaner manufacturer

Small textile problems have a habit of staying unfixed far longer than they should. A curtain may drag across the floor for months, a decorative cushion may develop a short seam opening, or a table runner may slowly fray at one corner while the rest of the item remains perfectly usable. Sewing can solve many of these problems, but setting up a sewing machine or taking a household textile to a repair shop can feel excessive for a minor job. Fabric glue offers a practical middle ground. A well-formulated textile adhesive can create a flexible bond between compatible fabric surfaces without leaving a row of stitches, making it useful for selected repairs, alterations, trims, patches, and household craft projects. The important word is “selected.” Good adhesive repair is less about applying the strongest glue available and more about understanding the fabric, the size of the bonding area, the direction of stress, the expected care cycle, and the amount of movement the repaired section experiences in everyday use.
Fabric glue can repair many small household textile problems, including loose curtain hems, light cushion-cover seams, table-linen edges, decorative trims, patches, appliqués, and minor tears. Reliable results depend on using a textile-specific adhesive, testing the actual fabric, applying a thin controlled layer, aligning the materials accurately, and allowing the bond to reach its full specified cure before washing, ironing, hanging, stretching, or heavily flexing the repaired item.
Think of two repairs that appear almost identical from across a room. One is a four-foot curtain hem that has come loose along the bottom edge. The other is a one-inch opening in the seat seam of a heavily used sofa cushion. The curtain repair offers a broad overlap and relatively little separating force, while the cushion seam may be stretched every time someone sits down. Both involve fabric, but only one naturally gives an adhesive an easy job. Learning to recognize that difference is what turns fabric glue from an occasional craft supply into a genuinely useful home textile repair tool.
What Can Fabric Glue Repair at Home?
Fabric glue is most useful for small, flexible repairs where two compatible textile surfaces can overlap and the bonded area is not constantly pulled apart. Loose hems, decorative cushion-cover seams, table-linen edges, lightweight patches, appliqués, ribbons, and trims are typical examples. Load-bearing straps, heavily tensioned upholstery seams, and structural textile joints usually need stitching, reinforcement, or professional repair instead.
Which Small Repairs Work Best?
The best adhesive repairs usually share three qualities: enough surface area for the glue to spread between the materials, limited continuous tension, and an arrangement that keeps the joint mostly flat during use. This is why a long curtain hem can actually be a more predictable glue repair than a very short tear in a tightly stretched upholstery seam. The curtain offers inches or even feet of overlapping contact area, while the upholstery damage may concentrate force at a narrow point every time the fabric is compressed.
Curtain hems, table-runner edges, pillowcase seams, decorative cushion covers, fabric patches, lace, ribbons, felt appliqués, and lightweight decorative borders generally fit this pattern. When the damaged area has frayed fibers, adding a compatible backing patch behind the tear can increase the available bonding area and distribute stress across sound fabric instead of relying on weakened fibers directly along the damaged line. This simple change often matters more than choosing an adhesive marketed with the largest strength number.
A useful way to evaluate a repair is to position the fabric exactly where you want it before applying any adhesive. If the layers naturally remain close together and only need help staying in place, the job is favorable for fabric glue. If the parts immediately spring apart, stretch away from each other, or carry noticeable weight, the repair is asking much more from the adhesive. In that situation, increasing overlap, adding backing material, combining glue with stitching, or choosing another method usually produces a more reliable result.
| Home Textile Repair | Typical Stress | Fabric Glue Fit | Practical Approach |
|---|---|---|---|
| Curtain hem | Low | High | Bond inside a folded hem |
| Table-runner edge | Low | High | Use a thin layer inside the fold |
| Ribbon or lace trim | Low | High | Bond continuously along the trim |
| Pillowcase seam | Low–moderate | High | Work from the reverse side |
| Decorative cushion tear | Moderate | Moderate–high | Add a backing patch |
| Sofa cushion seam | Moderate–high | Conditional | Consider glue plus stitching |
| Upholstery seat seam | High | Low | Structural sewing is generally preferable |
| Fabric handle or strap | High | Low | Use mechanical reinforcement |
When Is Sewing Still Better?
Fabric glue and sewing do not solve textile problems in exactly the same way. Thread creates a mechanical connection through the fabric structure, while adhesive creates a bonded interface across the surfaces touching each other. A properly designed glued joint can be strong and flexible, but narrow seams that repeatedly open under tension can place a peeling force on the adhesive that is very different from the broad, distributed stress seen in a folded hem or patch.
Areas that support weight deserve particular caution. Tote handles, storage-basket straps, furniture upholstery near seat edges, heavily stuffed cushion closures, hanging loops, backpack straps, pet beds exposed to scratching, and fabric attached around moving furniture mechanisms can experience repeated loading from several directions. An adhesive may still be useful for positioning, stabilizing frayed fabric, or holding a backing patch, but stitching or another mechanical reinforcement often provides a more appropriate primary repair.
There is also no rule saying a repair must be either glued or sewn. Hybrid methods are common because each technique can solve a different part of the problem. A fabric patch can be bonded across a damaged area to stabilize loose fibers and then stitched around selected edges where extra mechanical security is useful. Likewise, an appliqué can be positioned cleanly with textile adhesive before decorative stitching is added. Choosing the method according to the actual stress usually produces a better result than treating fabric glue and sewing as competing solutions.
How Do You Judge Repair Stress?
Three types of movement are especially useful to understand: shear, peel, and stretch. Shear occurs when bonded layers try to slide across each other. A broad curtain hem usually presents this type of load across a relatively large area. Peel begins at an exposed edge and progressively lifts one layer from another, which can be much harder on an adhesive. Stretch asks the glue film to move with the textile and return repeatedly without cracking, stiffening, or separating.
You can perform a simple stress check without specialized tools. Put the damaged fabric back into its normal shape, then move it the way it moves during everyday use. Fold the curtain, compress the cushion, pull lightly at the seam, or hold the table runner by its edge. Watch where tension begins and whether one edge immediately tries to lift. If a repair line opens before adhesive is applied, the bond will face that same separating force after curing.
Backing patches are particularly useful because they change the geometry of a repair. Instead of asking adhesive to join two narrow torn edges, the patch gives the glue a broad area of intact material around the damage. There is no universal patch dimension suitable for every textile, because weave, fabric weight, tear shape, and expected movement differ substantially. The more reliable principle is to extend the patch beyond damaged fibers and onto sound material so the adhesive has a stable surface to work with.

Which Home Textiles Work with Fabric Glue?
Fabric glue commonly works well on porous textiles such as cotton, linen, denim, canvas, felt, and many compatible blends, but fiber content alone does not determine performance. Fabric weight, weave, coatings, dyes, surface treatments, and absorbency all influence adhesion and appearance. Thin, coated, waterproof, synthetic, or delicate fabrics should always be tested before a visible household repair is completed.
Are Cotton and Linen Suitable?
Cotton and linen are widely used in curtains, pillowcases, table runners, decorative covers, canvas storage products, and other household textiles, and their porous woven structures can make them relatively straightforward surfaces for many textile adhesives. Liquid glue can make close contact with the fibers rather than sitting entirely on top of a smooth nonporous finish. That does not mean every cotton or linen article will respond in exactly the same way.
A dense cotton canvas, for example, behaves very differently from a translucent cotton voile. The canvas can hide a modest adhesive film relatively well and may need enough glue to wet its heavier fibers. A thin curtain fabric can show darkening if excessive adhesive penetrates through the weave. Linen can also vary considerably, from loosely woven decorative cloth to dense upholstery-weight material, so the visible effect of a repair depends as much on construction as on the fiber name printed on the care label.
Before committing to a cotton or linen repair, look at the fabric in bright natural light and examine the weave. A highly open structure increases the risk of adhesive passing through. Pale colors can reveal saturation more easily than darker textiles. Stain-resistant finishes may affect wetting, while repeated use of fabric softener can leave residues that change the way the surface interacts with liquid adhesive. Treat cotton and linen as generally favorable categories, but still test the actual article.
What About Delicate Fabrics?
Delicate textiles present a different problem because a repair can be structurally successful yet visually disappointing. Fine curtains, lace, sheer decorative fabrics, satin-like materials, loosely woven cloth, and light-colored textiles may reveal adhesive through changes in transparency, texture, stiffness, or surface reflection. A glue film that disappears inside a folded canvas hem may be very obvious when sunlight passes through an ivory sheer curtain.
The safest test reproduces the real joint. If you intend to make a folded hem, create a small folded sample rather than dropping glue onto a flat piece of fabric. If you plan to attach lace or ribbon, bond a short piece of the same trim onto a hidden area or spare fabric. Allow the test to cure completely before judging it, because many textile adhesives look noticeably different when wet compared with their final clear state.
Evaluate the cured sample from both sides and under more than one light source. Check for darkening, glossy areas, stiffness, rippling, bleed-through, and a visible edge around the adhesive film. For curtains, hold the test against daylight. For cushions and table linens, bend or drape the fabric rather than examining it only while flat. If the repair becomes more noticeable than a few small stitches would be, adhesive may not be the most attractive option.
Do Synthetic Fabrics Need Testing?
Synthetic textile is a very broad category. Polyester curtains, nylon fabric, microfiber upholstery, fleece, laminated cloth, polyester-cotton blends, coated outdoor cushions, and blackout curtain backings can all contain synthetic fibers while presenting completely different bonding surfaces. An adhesive that performs well on one synthetic blend should not automatically be assumed to work on another material simply because both contain polyester.
Surface treatments are particularly important. Outdoor cushions may have water-resistant coatings, dining-chair fabrics may be treated for stain resistance, and blackout curtains can have laminated layers designed to block light and reduce moisture penetration. Treatments that prevent liquids from wetting a surface easily can also interfere with the way some liquid adhesives spread and contact the fibers. In these cases, more glue is not necessarily the solution and can simply create a larger visible residue.
Testing should continue beyond the first few minutes after application. Allow the adhesive to complete its stated cure, then flex the sample repeatedly and inspect the edges. If the textile is intended to be washed and both the adhesive and fabric allow laundering, evaluate the repair through the permitted care cycle before using the same technique on a valuable article. An apparently strong initial bond can behave differently after repeated bending or exposure to water.
Does Fabric Finish Matter?
Fabric finish is one of the most overlooked variables in household adhesive repair. The care label may identify the material as cotton, linen, or polyester, but the adhesive actually contacts whatever sits on the outer surface of those fibers. That can include wrinkle-resistant treatments, starch, softeners, stain repellents, waterproof finishes, dyes, cleaning residues, or manufacturing lubricants that are not obvious when the textile is viewed normally.
Prewashing is useful for washable textiles when the original care label permits it, particularly if the material is new and may contain finishing residues. Avoid adding fabric softener before bonding because softeners are designed to modify fiber feel and moisture interaction. For curtains, upholstery covers, or large decorative fabrics that cannot easily be washed, remove dust and lint carefully and follow the original textile manufacturer’s cleaning instructions before considering an adhesive repair.
Older home textiles can present the opposite problem. Years of washing, household cleaning sprays, skin oils, cooking residue, or silicone-containing treatments may alter the surface even though the fibers themselves remain intact. When a fabric glue that normally bonds well seems unusually easy to peel away from a particular item, the cause may be surface contamination or finish compatibility rather than insufficient adhesive strength.
| Fabric Condition | Main Concern | What to Check After Cure | Practical Approach |
|---|---|---|---|
| Medium cotton | Excess absorption | Stiffness and darkening | Thin, even application |
| Linen | Uneven penetration | Texture and visible glue lines | Test a hidden folded sample |
| Canvas | Thick joint | Flexibility | Suitable for many patches and hems |
| Sheer textile | Bleed-through | Front visibility in daylight | Use very controlled application |
| Loose weave | Glue migration | Adhesive passing through openings | Reduce quantity or change method |
| Coated fabric | Poor wetting | Edge lifting | Confirm compatibility first |
| Stretch fabric | Repeated extension | Flexibility after movement | Use a flexible textile adhesive |
| Synthetic blend | Formulation-dependent | Adhesion after full cure | Always test the actual material |
How Do You Prepare Fabric for Repair?
Good preparation means cleaning and fully drying the bonding area, removing loose fibers, restoring the textile to its natural alignment, protecting adjacent layers, and testing the adhesive before repairing a visible section. Careful preparation reduces weak bonding, misalignment, bleed-through, hard spots, and glue marks. For small home repairs, surface preparation often influences the result as much as the adhesive itself.
Should Fabric Be Clean and Dry?
Household textiles collect very different contaminants depending on where they are used. Kitchen curtains may hold airborne cooking oils, decorative cushions can accumulate dust and skin oils, table linens may carry detergent or starch residue, and sofa covers can contain traces of cleaning products. If adhesive bonds mainly to those contaminants rather than to the fabric itself, even a technically strong glue may produce an inconsistent repair.
When the textile is washable, clean it according to its care label and let it dry completely before bonding. Avoid introducing fabric softener immediately before a repair because it can leave a conditioning layer on the fibers. For items that cannot be washed easily, remove surface dust, lint, and loose debris carefully. Do not automatically use household solvents or aggressive cleaners because they can discolor fabric or leave their own residues behind.
Flattening the work area is equally useful. A wrinkled curtain hem or twisted cushion seam is harder to align accurately and can trap the bond in the wrong position. If the care label allows ironing, lightly smooth the material before applying glue and let it return to room temperature. The objective is to create a clean, dry, stable repair zone where both textile surfaces can make even contact.
Should You Test the Glue First?
A compatibility test is not wasted time, particularly on curtains, expensive cushion covers, delicate fabrics, vintage textiles, or any material whose composition is uncertain. The test provides information that a product label cannot completely predict because it reproduces the actual combination of fabric, dye, finish, age, previous washing, room conditions, and application technique present in your project.
Whenever possible, use an offcut of the same textile. If no spare material exists, choose an inconspicuous hem allowance, inner seam, reverse corner, or hidden section. Reproduce the repair method rather than applying an isolated drop. A folded hem should be tested as a folded hem, and a patch should be tested with the same patch material and approximately the same adhesive quantity intended for the final project.
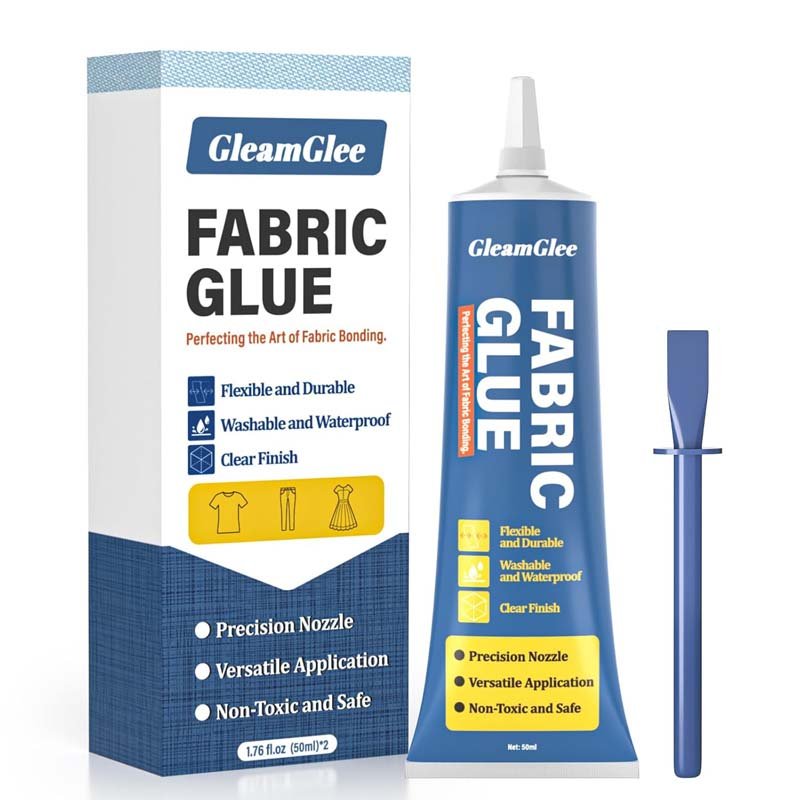
GleamGlee Fabric Glue, for example, is designed with an initial setting period of approximately 6–10 minutes and a full cure of about 24 hours. The early set helps the fabric remain in position, but it is not the correct point for final evaluation. Judge transparency, flexibility, edge adhesion, and appearance only after the test has completed its full cure, then gently move the sample the way the finished textile will move in everyday use.
How Do You Prevent Glue Marks?
Glue marks usually come from excess adhesive, uncontrolled spreading, excessive pressure, or placing the wet glue too close to an exposed edge. Because fabric absorbs liquids differently from wood, metal, or plastic, adding a thick bead does not automatically improve the joint. Excess glue can travel into the weave, squeeze beyond the repair line, darken light-colored textiles, or produce an unnecessarily rigid area after curing.
Protect the surface beneath the repair before opening the adhesive. For pillowcases, cushion covers, or other double-layer articles, insert a suitable non-stick barrier inside so glue cannot pass through the front layer and bond it accidentally to the fabric behind it. When hemming curtains, work on a protected flat surface rather than trying to apply adhesive while the panel remains hanging vertically.
A precision nozzle makes small jobs easier because it places adhesive where the joint actually needs it. GleamGlee’s fine-point nozzle, for example, is suited to narrow hems, trims, patch edges, and local seam repairs where a wide uncontrolled bead would be difficult to manage. If glue squeezes heavily from most of the joint after ordinary pressing, treat that as a sign to reduce the amount on the next section rather than simply wiping away the excess repeatedly.
How Much Pressure Is Enough?
Pressure helps the wet adhesive make close contact with both textile surfaces, but more pressure is not always better. Crushing a delicate fabric or squeezing a folded hem as hard as possible can push adhesive through the weave or force it beyond the intended repair area. The goal is even contact across the bonding zone without changing the natural shape or texture of the textile.
Flat repairs can often be secured with clips, light weights, or another method appropriate for the fabric while the adhesive reaches its initial set. Curved or stuffed articles should generally be unloaded first. Remove a cushion insert before bonding a seam so the foam or filling is not pushing against the repair while it cures. Long curtain hems should be supported flat instead of hanging under their own weight during early curing.
Once the surfaces are aligned correctly, avoid repeatedly lifting the edge to check whether the glue has started working. Pulling a forming bond apart and pressing it back together can introduce gaps and disturb the adhesive film. A careful repair typically benefits from less handling: align once, apply controlled pressure, secure the joint, and allow the product to follow its specified setting and curing process without unnecessary movement.

How Do You Make Common Textile Repairs?
Most small home textile repairs use the same basic sequence: clean the fabric, test compatibility, align the damaged area, create sufficient overlap, apply a thin controlled adhesive layer, press the materials together, stabilize the position, and allow full curing. The details change by project because curtain hems require accurate measurement, cushion covers experience more movement, and table linens or decorative trims demand particularly clean visible edges.
How Do You Fix a Curtain Hem?
Curtain hemming is one of the most practical no-sew uses for fabric glue because a folded hem creates a broad hidden contact area along the full width of the panel. Begin with the curtain hanging in its normal position and establish the desired finished length before cutting anything. Measure at both sides and near the center because floors, rods, and curtain panels are not always perfectly level.
After marking the length, remove the curtain and place it flat on a clean surface. Form the hem and check the finished measurement again. A double fold can conceal the raw textile edge and create a cleaner appearance, although very heavy curtain fabric may become bulky when doubled. Before applying adhesive across the complete width, test the planned fold in a hidden section to make sure the glue does not show through.
Apply a thin, continuous layer inside the fold rather than coating the exposed face of the curtain. Press progressively from one side toward the other and watch for wrinkles or stretched fabric. GleamGlee Fabric Glue provides approximately 6–10 minutes before its stated initial set and requires about 24 hours for full cure, giving useful positioning time for longer hems. Keep the curtain supported during curing instead of rehanging it as soon as the fold feels stable.
How Do You Repair Cushion Covers?
Cushion covers require more judgment because their normal use involves compression, bending, and occasional pulling. A small opening in the seam of a decorative removable cover can be a good fabric-glue project, while a heavily tensioned seat cushion seam may need structural stitching. Begin by removing the insert and deciding whether the damage is simply an opened seam or whether the surrounding fabric has weakened or torn.
If the original seam allowance remains intact, turn the cover inside out when possible and restore the fabric to its original overlap. This keeps adhesive away from the visible face and recreates a wider bonding area. If the cloth around the tear is frayed, add a compatible backing patch that extends onto sound fabric so the repair does not depend entirely on weakened fibers along the torn edge.
After bonding, keep the cover flat and unloaded through the full cure period. Reinstalling a thick cushion insert too early can push directly against the new joint and change its alignment before the adhesive has developed its intended properties. A flexible cured bond is important because the finished cover must still bend and compress naturally; the repaired area should not behave like a rigid plastic plate sewn into otherwise soft fabric.
How Do You Fix Table Linens?
Table runners, tablecloths, placemats, and decorative napkins generally experience less structural stress than upholstered furniture, making loose hems and frayed edges suitable adhesive repairs when the material is compatible. Their main challenge is appearance. The repair often remains fully visible on a dining table, so even a strong bond can feel unsuccessful if the edge becomes stiff, uneven, glossy, or visibly darker.
For a loose hem, work from the reverse side and recreate the original fold before applying glue. Use a thin adhesive film inside the folded area and progress in manageable sections so the edge remains straight. Corners can contain several layers of fabric, making them easy places to over-apply adhesive. Fold the corner dry first and confirm how the textile naturally sits before adding glue.
A small tear in the center of a decorative runner often benefits from a backing patch rather than trying to place adhesive directly between two narrow torn edges. Choose a patch that is compatible in fiber, weight, and color whenever possible, particularly for loosely woven textiles where the support material may be partly visible. Allow washable table linens to reach full cure before returning them to their normal cleaning cycle.
How Do You Attach Fabric Trim?
Fabric adhesive is especially useful for lightweight ribbon, lace, felt shapes, appliqués, decorative edging, and similar embellishments because it can hold a long strip continuously rather than fixing it only at widely spaced stitching points. The cleaner the positioning, the more professional the finished result, so arrange the entire decoration on the textile before introducing wet adhesive.
For ribbon or lace, mark discreet positioning points and check that the trim is neither stretched nor twisted. Apply a controlled line behind the material, keeping the glue away from exposed edges where squeeze-out would be visible. A precision nozzle is valuable on narrow trim because it reduces the need to spread a large puddle manually. Work progressively rather than coating several feet of trim at once and then trying to position everything before the adhesive begins setting.
Weight remains important. Lightweight woven trim and fabric appliqués generally place little mechanical stress on a bond, while dense beaded decorations, heavy metal embellishments, or large three-dimensional ornaments can act like small weights pulling from the fabric surface. These heavier elements may require stitching or combined reinforcement even when fabric glue is used to stabilize their position before sewing.
Is Fabric Glue Durable and Washable?
Fabric glue can provide durable and washable textile repairs when the formulation is designed for flexible laundering, the material is compatible, the joint is prepared correctly, and the adhesive reaches full cure before normal use. Washability, ironing tolerance, drying time, and care conditions are product-specific. The original textile care label still matters, so the most restrictive care requirement should guide the finished repaired item.
How Long Does Fabric Glue Take to Cure?
Set time, dry time, and full cure are different stages, although they are frequently confused in casual DIY instructions. Initial set describes the stage when the bonded materials begin holding their position. Dryness usually refers to visible or surface wetness disappearing. Full cure occurs later, when the adhesive has developed the properties specified for its normal use, including the intended flexibility and resistance to handling.
For GleamGlee Fabric Glue, the stated initial setting period is approximately 6–10 minutes, while full curing takes about 24 hours. A hem that appears secure after ten minutes should therefore not automatically be rehung, washed, ironed, or repeatedly flexed. The early hold is useful for positioning, but the adhesive still needs time to complete the curing process before the repair is exposed to its regular service conditions.
Cure times also vary between fabric-glue formulations, so numbers from one product should never be copied onto another bottle or project. Application thickness, textile absorbency, room temperature, humidity, and the amount of airflow around the joint can influence practical drying behavior. A thin adhesive film between porous cotton layers may behave differently from a thicker application between dense fabric surfaces, which is another reason controlled application is preferable.
| Repair Stage | GleamGlee Fabric Glue | Practical Action |
|---|---|---|
| Application | Immediate | Apply a thin, even film |
| Positioning | First few minutes | Align and smooth the textile |
| Initial set | About 6–10 minutes | Keep the joint stable |
| Full cure | About 24 hours | Avoid washing and heavy stress |
| Normal care | After full cure | Follow both glue and textile instructions |
Can Repaired Textiles Be Washed?
A repaired textile can be washable when the adhesive is specifically formulated to withstand laundering after full curing. This feature is particularly useful for cushion covers, pillowcases, table linens, washable curtains, decorative fabric storage products, and garments that cannot realistically remain out of the laundry indefinitely. However, the phrase “fabric glue” alone does not guarantee wash resistance, so product-specific instructions remain important.
GleamGlee Fabric Glue is designed as a washable textile adhesive after curing, allowing repaired fabric to return to normal household use when the original material also permits washing. This does not override the care requirements of the textile itself. A dry-clean-only curtain remains dry-clean only, and a cushion cover labeled for gentle washing should not suddenly be exposed to an aggressive hot cycle merely because the adhesive can tolerate laundering.
After the first permitted wash, inspect the edges of the repair before subjecting the item to heavy use. Edge lifting usually reveals application or compatibility issues earlier than the center of a broad bonded area. If a patch, hem, or trim remains flat and flexible after the care cycle, the repair is behaving as intended. Repeatedly laundering an item more harshly than either the textile or adhesive specification allows will shorten the useful life of almost any repair method.
Can You Iron the Repaired Fabric?
Ironing depends on two separate limits: the heat tolerance of the cured adhesive and the heat tolerance of the textile. A fabric glue may be designed for ironing after cure while the curtain, synthetic blend, printed tablecloth, delicate trim, or coated upholstery fabric requires a low temperature. The lower permitted temperature should always determine how the repaired article is treated.
GleamGlee Fabric Glue is designed to remain suitable for ironing after complete curing. That does not mean an iron should be used to accelerate the curing process unless a specific adhesive formulation explicitly requires heat activation. Ordinary liquid fabric glue and thermo-activated adhesive are different product types, and applying unnecessary heat while a conventional bond is still wet can disturb alignment or encourage excessive adhesive migration through the textile.
When both the textile and the adhesive permit ironing, use the temperature specified by the fabric care label and avoid leaving the iron stationary on the repaired area. A pressing cloth can provide an additional protective layer where appropriate. For many curtain hems or decorative repairs, ironing is not required for bond strength at all; once the fold is aligned correctly, normal curing should establish the adhesive joint without repeated heat treatment.
How Do Repairs Stay Flexible?
Flexibility is one of the most useful differences between a textile-specific adhesive and a general hard-setting household glue. Curtains fold and sway, tablecloths are folded for storage, pillowcases twist in laundering, and cushion covers bend whenever the insert is compressed. A repair that is technically bonded but feels like a rigid card underneath the fabric can be uncomfortable, visually obvious, and more likely to concentrate stress along its edges.
A flexible formulation helps the adhesive film move with the fibers instead of becoming brittle as the article bends. GleamGlee Fabric Glue is designed to remain soft and flexible after drying, which is particularly useful for household textiles that need to retain their normal drape and hand feel. The amount applied still matters, because a thick deposit of even a flexible adhesive can create a firmer area than a thin, continuous film.
After full curing, gently move the repair the way it will move in normal service. Fold a curtain hem, bend a table runner, flex a decorative cushion cover, or lightly compress a patched area. Look for edge lifting and feel for unusual stiffness. A good textile repair should do more than stay attached; it should allow the repaired article to continue behaving like fabric rather than turning one small section into a rigid patch.
Which Fabric Glue Should You Choose?
Choose fabric glue according to the textile and repair rather than selecting only by the strongest-sounding claim. Useful characteristics for small household repairs include confirmed fabric compatibility, a flexible cured bond, clear appearance, manageable positioning time, controlled dispensing, wash resistance when required, and suitable ironing compatibility. For curtains and soft furnishings, maintaining normal drape and appearance is often as important as initial bond strength.
Which Features Matter Most?
Material compatibility should be the first specification considered because no adhesive performs identically across every cotton, linen, synthetic blend, coated textile, and stretch fabric. The second factor is cured flexibility. A curtain hem or pillowcase must continue bending after repair, so an excessively hard bond can create a problem even if it feels strong when first tested on a flat workbench.
Clear drying is valuable when the bonding area sits close to a visible edge, while washability matters for removable covers, table linens, and washable curtains. Working time deserves equal consideration. Long hems and decorative trims may require several minutes of positioning before the user is satisfied with alignment. An adhesive that grabs instantly can be convenient for a tiny appliqué but frustrating when several feet of fabric need to remain straight.
Application control is another feature that is easy to underestimate. Fine repairs do not need a large uncontrolled bead of adhesive, which is why a precision nozzle can improve both appearance and glue usage. GleamGlee Fabric Glue combines a fine-point applicator with a stated 6–10 minute initial set, approximately 24-hour full cure, transparent flexible finish, and washable, ironing-compatible performance after curing. It is available in a 50 g single-tube configuration and a two-tube 50 g option for users managing multiple projects.
| Selection Factor | Why It Matters | What to Look For |
|---|---|---|
| Material compatibility | Fabrics and coatings behave differently | Clear textile compatibility guidance |
| Flexible cure | Preserves drape and movement | Soft, flexible bond |
| Clear finish | Keeps visible repairs discreet | Transparent cured film |
| Working time | Helps with long hems and trim | Enough positioning time |
| Full-cure guidance | Prevents premature loading | Clearly stated cure period |
| Washability | Important for household textiles | Post-cure washing instructions |
| Ironing compatibility | Useful for linens and hems | Supported heat-care guidance |
| Nozzle control | Reduces mess and bleed-through | Fine or precision applicator |
Is Clear-Drying Glue Better?
Clear-drying fabric glue is generally preferable for visible household repairs because it reduces the risk of a colored bonding line showing around hems, patches, or trims. However, transparent adhesive should never be interpreted as automatically invisible. A heavy application can still alter the texture, stiffness, reflection, or apparent shade of the fabric even when the cured adhesive itself has no noticeable color.
This distinction is particularly important on light-colored curtains, sheer fabrics, pale cushion covers, lace, satin-like textiles, and decorative table linens. Sunlight passing through a curtain can reveal an area of excess adhesive that looked perfectly clear when the material was lying flat under indoor lighting. The application technique therefore matters just as much as the cured color of the formulation.
GleamGlee Fabric Glue is designed to cure transparent without a yellow-looking finish, which helps keep typical fabric repairs visually discreet. The best results still come from combining a clear formulation with controlled quantity, hidden placement, correct pressure, and compatible material. Test the cured repair under realistic lighting and from the viewing angle in which the textile will normally be seen rather than judging it only at close range on a worktable.
Is Slow-Setting Glue Useful?
The fastest adhesive is not automatically the easiest adhesive for textile work. Large fabric surfaces often need time for adjustment. When hemming a wide curtain, attaching a long ribbon border, positioning a backing patch, or aligning a patterned textile, a short working window allows the user to smooth wrinkles, correct the fold, and confirm placement before the bond reaches its initial set.
GleamGlee Fabric Glue has a stated initial setting period of approximately 6–10 minutes, which provides useful positioning time without requiring the project to remain completely loose for an extended period. Full curing takes about 24 hours. That timing profile can be helpful for repairs where visual alignment matters more than instant grab, particularly on long hems and decorative applications.
Other projects may call for a different profile. A tiny lightweight appliqué can sometimes benefit from faster initial hold, while a long curtain fold rewards more adjustment time. The practical question is therefore not simply “Which glue dries fastest?” but “How much positioning time does this repair require before the fabric must begin holding itself in place?” Matching working time to project size reduces hurried application and the need to reposition partially bonded material.
How Much Glue Should You Apply?
There is no responsible universal instruction such as using a fixed millimeter-thick layer for every textile. Canvas, felt, linen, sheer curtains, woven cotton, and synthetic blends absorb and display adhesive differently. The most useful rule is to create a thin, continuous adhesive film across the intended contact area without saturating the fabric or causing glue to squeeze heavily beyond the repair.
Watch the material during application. If large dry gaps remain between the surfaces, coverage may be insufficient. If adhesive immediately appears on the visible face, passes through an open weave, or pours from the edge with light pressure, the application is too heavy or the formulation may not be appropriate for that textile. A cured area that feels unnecessarily hard can also indicate excessive glue rather than insufficient product flexibility.
Precision dispensing is particularly helpful because it encourages gradual application. Place adhesive only where the surfaces will overlap, press the section, and observe how the fabric responds before continuing across the entire project. The goal is not to make the amount of glue visually reassuring. The goal is to leave a continuous, reliable bond hidden inside the textile while preserving the softness, appearance, and drape that made the item worth repairing.

Conclusion
Small home textile repairs are a good reminder that usefulness often depends more on choosing the right method than on choosing the most powerful product. A loose curtain hem, lifted table-runner edge, decorative cushion seam, or detached trim can often be restored without a sewing machine when the fabric is compatible, the repair offers enough bonding area, and the joint is not carrying heavy structural loads. Looking at movement and stress before applying adhesive helps prevent unsuccessful repairs later.
Preparation makes an equally large difference. Clean, dry fabric, a hidden compatibility test, careful alignment, a thin adhesive film, and enough time for complete curing are simple steps, but together they determine whether a repair remains flexible and unobtrusive or becomes stiff, messy, and unreliable. Washability and ironing resistance should always be treated as product-specific properties, while the original textile care label continues to govern how the finished article should be cleaned and maintained.
For everyday repair projects, GleamGlee Fabric Glue offers a practical combination of a clear flexible finish, approximately 6–10 minutes of initial setting time, a 24-hour full cure, controlled precision application, and compatibility with washing and ironing after curing according to its product guidance. These characteristics are useful for curtains, cushion covers, table linens, patches, trims, and other flexible projects where neat appearance matters alongside adhesion. The broader lesson is simple: match the glue to the textile, match the repair to the expected stress, and give the bond enough time to develop before putting the item back into service.

Frequently Asked Questions
Can fabric glue replace sewing for home textile repairs?
Fabric glue can replace sewing for many low-stress household repairs, including curtain hems, lightweight trims, decorative patches, table-linen edges, and some removable cushion-cover seams. It should not automatically replace stitching on load-bearing or heavily stretched areas such as furniture seat seams, fabric handles, straps, and highly tensioned closures. The deciding factors are the available bonding area, expected movement, textile compatibility, and whether the repaired joint experiences continuous peeling or stretching.
What fabrics are easiest to repair with fabric glue?
Medium-weight porous textiles such as many cotton, linen, canvas, denim, and felt materials are generally straightforward candidates for compatible fabric adhesives because the glue can make effective contact with their fiber structure. However, construction and surface treatment still matter. Sheer textiles, coated fabrics, waterproof materials, synthetic blends, stretch fabrics, and heavily treated upholstery should be tested because adhesive absorption, bleed-through, edge adhesion, and cured flexibility can vary considerably.
How long should fabric glue dry before using the repaired item?
Always follow the stated cure time for the specific adhesive rather than relying on how dry the surface feels. GleamGlee Fabric Glue has an initial setting period of approximately 6–10 minutes and a full cure of about 24 hours. The repaired textile should remain stable during this period and should not be washed, ironed, heavily stretched, or placed under normal load until the full specified cure has been completed.
Can fabric glue be used to hem curtains without sewing?
Yes, fabric glue can be a practical no-sew option for compatible curtain fabrics because a folded hem creates a broad hidden bonding surface with relatively low structural stress. Measure the curtain while it is hanging, mark the finished length at several points, remove it, create the fold on a flat protected surface, and apply a thin continuous layer inside the hem. Keep the curtain supported until the adhesive reaches full cure before rehanging it.
Will fabric glue show through curtains or light-colored fabric?
It can if too much adhesive is applied or if the textile is very thin, loosely woven, translucent, or highly absorbent. Even clear-drying glue may change the way light passes through a fabric if the application is excessive. Test a hidden folded sample first, allow it to cure fully, and examine it against daylight. A thin controlled layer placed inside the repair usually gives a cleaner result than a thick bead close to a visible edge.
Is fabric glue washable after it dries?
Some textile adhesives are specifically formulated for washing after full cure, while others are intended mainly for craft applications and may not tolerate laundering. GleamGlee Fabric Glue is designed to remain washable after complete curing, but the textile’s original care instructions still apply. A dry-clean-only curtain remains dry-clean only, and a delicate cushion cover should continue following its normal care method even when the cured adhesive itself can withstand washing.
How can I keep a fabric-glue repair soft and flexible?
Use a fabric-specific adhesive designed to remain flexible after curing, and avoid applying more product than the joint needs. A thick deposit can create a stiff area even when the formulation itself is flexible. Spread a thin, continuous film across the bonding surface, apply even pressure, and allow complete curing before bending the repair. When finished correctly, the repaired section should continue folding, draping, and moving naturally with the surrounding textile.
Share:
Table of Contents
Here, creating your adhesives glue & removal cleaner collection is no longer a barrier—it’s a collaborative journey where GleamGlee helps brands and businesses transform their vision into durable, certified, and market-ready solutions.
Partner with GleamGlee
Join hundreds of global partners who trust GleamGlee for adhesives and cleaners that combine innovation, compliance, and speed. Our vertically integrated system—from R&D to warehouse—guarantees consistent performance and reliable delivery.
Whether you’re sourcing FBA-ready stock or developing your own formula, our team provides unmatched technical support and responsive service.