 Skip to content
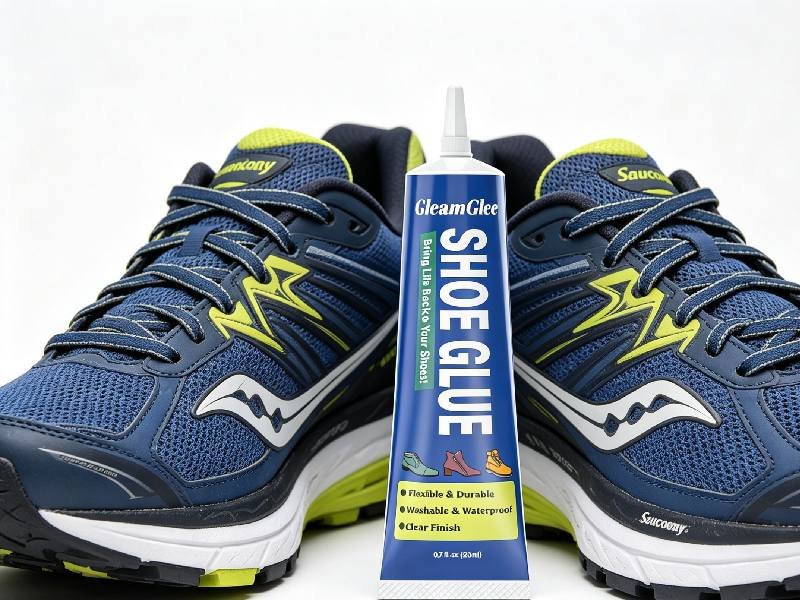
Worn out shoes are not always finished. Many pairs are thrown away because of one repairable problem: the sole starts peeling, the heel lifts, the toe cap opens, or the insole curls up. The upper may still fit well. The tread may still have grip. The shoe may still feel comfortable. But once a small edge separates, every step pulls on that same weak spot and makes the damage spread faster.
To fix worn out shoes using shoe adhesive, clean and dry the damaged area, lightly sand both bonding surfaces, apply a thin layer of flexible waterproof shoe adhesive, press the parts together firmly, hold them with rubber bands or clamps, and let the repair cure for at least 24 hours before wearing. A good repair depends on surface preparation, pressure, and full curing time.
This is why shoe adhesive is different from ordinary household glue. Shoes bend thousands of times during normal walking. They meet rain, sweat, dust, road oil, heat, and repeated impact. A repair that looks fine after 10 minutes can fail after one walk if the adhesive dries too hard, the surface was dirty, or the shoe was worn before curing. The good news is simple: when the shoe material is still solid, a careful glue repair can often extend the life of sneakers, boots, dress shoes, sandals, work shoes, and children’s shoes without replacing the whole pair.
What Are Worn Out Shoes?
Worn out shoes are footwear that show visible signs of damage or degradation due to repeated use, stress, and environmental exposure. The wear can affect the sole, heel, insole, upper, or stitching, impacting both comfort and performance. Worn out shoes often occur even when the shoes are still functional in other areas, making targeted repairs a cost-effective alternative to replacement. Understanding the type and extent of wear is crucial in choosing the correct repair method and adhesive type. A well-executed repair can restore both durability and appearance, extending the life of your shoes significantly.
The main signs of worn out shoes include peeling soles, loose heels, worn toe edges, cracking midsoles, curling insoles, and lifted rubber edges. The cause of these issues is usually repetitive pressure, friction, moisture, dirt, or exposure to extreme temperatures. Evaluating the damage in detail before starting repairs ensures a more reliable outcome. Many shoes fail first at high-stress points, such as the toe bend, heel, or sidewall, while the rest of the shoe remains intact.
Worn out shoes differ by material and shoe type. Sneakers may show worn rubber edges, midsole cracks, or detached insoles. Boots may have peeling Vibram soles, worn heel guards, or split seams. Dress shoes often experience lifting soles, cracked welts, or heel detachment. Children’s shoes frequently peel at the toe or insole due to running, dragging toes, and frequent bending. Recording and assessing these conditions allows you to create a step-by-step repair plan that addresses the exact weak points, improving repair longevity.
Peeling Soles
Peeling soles are among the most common forms of wear in shoes. A sole can begin to lift at the toe, sidewall, or heel, often starting with a small gap that increases over time. A peeled sole reduces the stability of the shoe, exposes internal layers to moisture and debris, and can worsen if ignored. In most cases, the sole material itself remains intact, allowing a flexible adhesive to restore a firm bond.
Key factors that cause peeling soles:
- Constant bending at the toe or ball of the foot during walking or running
- Heavy use on rough surfaces causing repeated friction
- Moisture exposure, including rain, sweat, or floor cleaning agents
- Dirt, mud, or oil weakening the adhesive bond from the factory
- Repeated compression of the midsole material
| Area of Peeling | Common Cause | Repair Possibility | Notes |
|---|---|---|---|
| Toe edge | Repeated bending | High | Use flexible glue and clamp properly |
| Heel edge | Impact stress | High | Secure alignment before curing |
| Side sole | Friction from steps | Medium | Apply controlled adhesive and press |
| Midsole cracks | Heavy use, compression | Medium | May need layer-by-layer repair |
| Worn outsole | Abrasion | Limited | Replacement may be better |
Peeling can happen in different materials, including rubber, foam, leather, vinyl, and synthetic blends. The approach to repair depends on the material type. Rubber and synthetic soles generally require light sanding and flexible waterproof adhesive. Leather soles may need surface cleaning and precise glue placement to avoid visible residue. For canvas or fabric edges, adhesive should be applied carefully under the lifted edge to prevent fraying or staining.
Loose Heels
A loose heel is a frequent problem in high heels, dress shoes, boots, and some sandals. It occurs when the heel attachment weakens due to repeated pressure or moisture, making the shoe unstable. Even small heel movements can affect balance and comfort and can lead to faster deterioration of other shoe parts if not addressed.
Factors causing loose heels:
- Body weight repeatedly pressing on the heel during walking or climbing
- Moisture exposure that softens adhesives or materials
- Manufacturing tolerances allowing slight heel movement that worsens over time
- Impact on uneven surfaces, stairs, or sports activities
Repairing a loose heel involves:
- Cleaning the contact area and removing old adhesive
- Applying flexible waterproof shoe glue to the heel base and heel block
- Aligning the heel correctly before pressing
- Holding the heel firmly in place using clamps, rubber bands, or weight during curing
| Heel Type | Damage Sign | Repair Success | Recommended Glue |
|---|---|---|---|
| Dress shoe heel | Slight wobble | High | Flexible clear adhesive |
| Boot heel | Lifted edge | Medium | Waterproof flexible adhesive |
| Sandal strap heel | Pulling or loose | High | Thin layer under strap |
| High heel spike | Slight detachment | Medium | Use precision nozzle to control flow |
Proper pressure during curing is essential to ensure the adhesive bonds the heel completely to the shoe base. Even after gluing, avoid using the shoe for 24–48 hours to allow full bond strength. Check alignment periodically during curing to prevent uneven attachment, which can cause discomfort or further damage.
Worn Toe Edges
Toe edge wear is common in sneakers, children’s shoes, and running shoes, as the front of the shoe bends with every step. This area often begins to separate first, particularly at the sole-to-upper connection, exposing the material underneath. Small lifted edges, if unaddressed, can worsen with friction, catching on surfaces like stairs, carpeting, or pavement.
Common causes of worn toe edges:
- Repetitive bending at the forefoot during walking, running, or climbing
- Dragging toes or scuffing against surfaces
- Weak adhesive bonds from previous wear
- Exposure to moisture and dirt that reduces adhesion
Repair strategies for toe edges:
- Lightly sand both surfaces to improve glue grip
- Clean thoroughly to remove dust, oil, and debris
- Apply thin, even layers of flexible adhesive under the lifted area
- Press the edge down and secure it with rubber bands or tape
- Allow the glue to cure fully before wearing
| Shoe Type | Toe Edge Issue | Repair Feasibility | Glue Type |
|---|---|---|---|
| Sneakers | Slight peel | High | Flexible clear glue |
| Canvas shoes | Lifted toe cap | High | Thin layer of waterproof adhesive |
| Leather shoes | Scuffed edge | Medium | Precision application needed |
| Children’s shoes | Peeling toe | High | Quick-setting flexible adhesive |
| Running shoes | Edge separation | Medium | Apply extra pressure for bending area |
By carefully inspecting worn toe edges and addressing peeling early, it is possible to restore function and extend the shoe’s lifespan. Proper surface preparation, glue selection, and curing ensure the repair can withstand repeated bending and walking stresses.
Midsole and Insole Wear
The midsole and insole of shoes also experience wear over time, often invisible until discomfort or partial separation occurs. Cracks, compressions, and curling of foam or cushioning layers can compromise comfort and reduce the effectiveness of the sole. While adhesive cannot restore worn cushioning, it can secure curled insoles, cracked midsole edges, and other separation issues.
Indicators of midsole and insole wear:
- Compressed foam causing uneven support
- Separated or curled insole edges
- Cracked midsole edges visible through outsole
- Shifting or slipping footbeds
Repair methods include:
- Applying flexible adhesive under lifted insole edges
- Holding the insole flat with weight during curing
- Re-securing midsole edges with clamps or rubber bands
- Avoid gluing directly to foam that may crumble; focus on attachment surfaces
| Shoe Area | Damage Type | Repair Action | Notes |
|---|---|---|---|
| Insole | Curling edge | Glue underneath, clamp | Allows footbed to lay flat |
| Midsole | Crack along edge | Thin adhesive line | Supports edge without stiffening shoe |
| Foam layer | Compression | Not repairable | Replace if cushioning lost |
| Sockliner | Slipping | Glue along perimeter | Ensure comfort after cure |
Properly addressing midsole and insole wear can improve the overall durability of repaired shoes, reduce discomfort, and prevent secondary damage to other shoe parts, such as heels, toe edges, and outsoles.
Which Shoe Adhesive Helps?
Choosing the right shoe adhesive is critical for successful repair of worn out shoes. Not all glues are created equal—differences in flexibility, curing time, waterproof properties, and compatibility with various shoe materials determine how long a repair lasts. Flexible adhesives allow shoes to bend during walking without cracking, while waterproof adhesives ensure that outdoor and sports shoes withstand rain, mud, and sweat. Clear-drying adhesives help maintain the appearance of visible areas, making repairs less noticeable. Assessing the type of shoe, the material involved, and the stress the repaired area will endure is essential before selecting the adhesive.
A good shoe adhesive should bond leather, rubber, vinyl, canvas, foam, and synthetic materials. It should remain flexible, resist water, and dry without leaving residue. Adhesives that are too rigid, quick-drying, or only suitable for household applications often fail under shoe flex, high impact, or exposure to moisture. For most everyday shoe repairs, a kit that includes a precision applicator, sandpaper for surface preparation, and rubber bands or clamps to hold the repair is highly recommended.
For professional-quality repairs at home, select an adhesive that is designed for shoes. These adhesives form strong, long-lasting bonds and allow precise application even in tight or complex areas. They also minimize the risk of damaging delicate materials like suede, nubuck, or high-end leather. By matching the adhesive properties to the type of repair and shoe material, repairs become durable, flexible, and discreet, significantly extending the life of worn out footwear.
Flexible Adhesive for Shoe Repairs
Flexible shoe adhesive is essential because footwear flexes constantly during walking, running, or climbing. A stiff adhesive may hold initially but will crack under repeated motion, causing the repair to fail. Flexible adhesives move with the shoe, maintaining a secure bond between the sole, heel, insole, or upper.
Key points about flexible adhesives:
- Maintain elasticity after drying to prevent cracking
- Ideal for bending areas such as the toe, midsole, and heel
- Suitable for multiple materials, including rubber, leather, vinyl, and canvas
- Work well in shoes with mixed materials or layered construction
Flexible adhesives also allow minor adjustments during the curing process. If the shoe is pressed into place immediately after applying adhesive, small misalignments can be corrected without compromising the bond. This property makes flexible adhesives particularly effective for sports shoes, children’s footwear, and boots that experience heavy movement.
| Shoe Area | Why Flexibility Matters | Application Tip |
|---|---|---|
| Toe cap | High bending stress | Apply thin adhesive under lifted edge |
| Midsole | Repeated compression | Even layer on contact surfaces |
| Heel | Impact and weight | Clamp firmly for full cure |
| Sidewall | Lateral twisting | Light sanding for adhesion |
Flexible adhesive is also critical when the shoe faces repeated temperature changes or moisture exposure, as it prevents the bond from becoming brittle and breaking over time.
Waterproof Shoe Adhesive
Waterproof shoe adhesive is vital for any shoe exposed to moisture. Rain, puddles, snow, sweat, and wet terrain can weaken standard adhesives, leading to early failure. Waterproof adhesives maintain strong adhesion even when shoes encounter water during outdoor activities or daily use.
Benefits of waterproof adhesives include:
- Maintain bond integrity under wet conditions
- Reduce the risk of sole separation during hiking or running
- Extend the longevity of outdoor, work, or sports footwear
- Compatible with most materials like rubber, leather, vinyl, and canvas
Application guidelines for waterproof adhesive:
- Ensure the repair area is dry before application
- Remove dust, dirt, or old adhesive remnants
- Apply a thin, even layer to both surfaces
- Press surfaces together firmly and secure with rubber bands or clamps
- Allow full curing time (typically 24–48 hours) before exposing the shoe to moisture
| Shoe Type | Water Exposure | Recommended Action |
|---|---|---|
| Rain boots | High | Apply full layer along crack, clamp 24–48h |
| Hiking boots | Medium to high | Sand and clean surface first |
| Running shoes | Medium | Limit water exposure until cured |
| Work boots | High | Apply flexible, waterproof adhesive evenly |
Waterproof adhesives are especially useful in worn out soles, lifted heels, cracked midsoles, and peeling edges, providing a durable repair even under repeated moisture and stress.
Clear Shoe Adhesive
Clear adhesives are ideal for visible repairs, maintaining a neat appearance after the bond dries. Many worn out shoes have repairs in areas that are immediately noticeable, such as white sneaker midsoles, high-contrast dress shoes, sandals, and decorative trim.
Advantages of clear adhesives:
- Dry fully transparent without residue
- Preserve original shoe aesthetics
- Suitable for leather, rubber, vinyl, canvas, and mixed materials
- Help create professional-looking repairs on high-end shoes
Tips for using clear adhesive:
- Apply thinly to avoid shiny ridges or raised edges
- Use the precision nozzle for narrow or hard-to-reach areas
- Press surfaces evenly to ensure the bond is flat and invisible
- Wipe any excess immediately before drying
| Shoe Area | Why Clear Matters | Best Practice |
|---|---|---|
| Sneaker midsoles | Visible surface | Thin layer, wipe excess |
| Leather dress shoes | Maintain polished look | Apply under lifted edge only |
| High heels | Cosmetic visibility | Clamp carefully, check alignment |
| Sandals | Strap and edge repair | Use small dots, avoid spread |
| Children’s shoes | Fun and neat appearance | Apply carefully on rubber edges |
Clear adhesive allows both casual users and shoe enthusiasts to repair shoes effectively without compromising appearance. Combining flexibility, waterproof properties, and transparency gives the best overall performance for worn out shoes.
How to Fix Worn Out Shoes?
Fixing worn out shoes successfully depends more on preparation and technique than on the amount of adhesive used. Many shoe repairs fail because dirt remains inside the gap, the surfaces are too smooth, the shoe is worn before the adhesive fully cures, or the damaged parts are not held together firmly during drying. A proper repair should restore contact between the original shoe components while maintaining flexibility during walking.
Most worn out shoe repairs involve the same basic process: cleaning, surface preparation, adhesive application, pressure, and curing. Whether repairing a peeling sneaker sole, a loose boot heel, a detached insole, or a worn sandal strap, these steps help maximize bond strength and extend the life of the footwear. Skipping any one of these stages can significantly reduce repair durability.
The good news is that many common shoe problems can be repaired at home with simple tools and a high-quality shoe adhesive. A pair of shoes that may cost $80–$250 to replace can often be repaired in less than an hour of hands-on work, followed by curing time. The key is to treat the repair like a structural restoration rather than simply sticking two surfaces together.
Step 1: Clean Shoes
Before any adhesive touches the shoe, the repair area must be cleaned thoroughly. Dirt, dust, oil, mud, road salt, shoe polish, and old adhesive residue create a barrier between the glue and the actual shoe material. Even the strongest shoe adhesive cannot bond properly if contaminants remain trapped inside the damaged area.
Many sole separations occur gradually. As the sole starts lifting, dirt and moisture work their way deeper into the gap. In heavily used work boots, hiking boots, and running shoes, it is common to find compacted dirt several millimeters deep inside the separation area. If this material is not removed, the repair may fail within days or weeks.
A proper cleaning process includes:
● Brushing away loose dirt and dust.
● Removing old flaking adhesive.
● Wiping surfaces with a clean cloth.
● Allowing wet shoes to dry completely.
● Cleaning deep sole gaps before sanding.
● Checking hidden areas for trapped moisture.
| Shoe Type | Common Contaminants | Cleaning Priority |
|---|---|---|
| Running Shoes | Sweat, dust, road dirt | High |
| Hiking Boots | Mud, sand, moisture | Very High |
| Work Boots | Oil, grease, debris | Very High |
| School Shoes | Dust, playground dirt | Medium |
| Dress Shoes | Polish, dirt | Medium |
| Sandals | Skin oils, dust | Medium |
Moisture is often overlooked. Shoes that appear dry on the outside may still contain moisture inside the sole separation. For larger repairs, allowing the shoe to air dry for 12–24 hours before gluing often improves bonding performance significantly.
Step 2: Sand Shoes
Sanding is one of the most important but frequently skipped repair steps. Shoe materials such as rubber, leather coatings, vinyl, TPU, and synthetic midsoles often have smooth surfaces that limit adhesive grip. Light abrasion creates microscopic texture, increasing surface area and helping the adhesive lock into the material.
The goal is not to remove large amounts of material. Instead, sanding should create a slightly rough, clean surface without damaging the shoe structure. Fine or medium-grit sandpaper is usually sufficient for most repairs.
Areas that benefit most from sanding include:
● Rubber outsoles.
● Leather sole edges.
● Vinyl sidewalls.
● Plastic heel components.
● TPU running shoe sections.
● Smooth synthetic uppers.
Sanding guidelines:
| Material | Recommended Sanding | Risk of Over-Sanding |
|---|---|---|
| Rubber | Light-Medium | Low |
| Leather | Light | Medium |
| Vinyl | Light | Medium |
| Foam Midsole | Very Light | High |
| Plastic Heel | Medium | Low |
| Canvas | Minimal | High |
| Suede Edge | Very Light | High |
After sanding, remove all sanding dust. A dusty surface can reduce bond strength by creating a weak layer between the adhesive and the shoe material.
A comparison from repair testing commonly shows that lightly sanded surfaces can achieve significantly stronger bonds than unsanded surfaces, particularly on rubber and synthetic shoe materials. The difference becomes even more noticeable in outdoor footwear exposed to moisture and repeated flexing.
Step 3: Glue Shoes
Applying adhesive correctly is often the difference between a repair that lasts weeks and one that lasts months or even years. Many people use excessive amounts of glue, believing a thicker layer creates a stronger bond. In reality, shoe adhesives usually perform best when applied in a thin, controlled layer.
The adhesive should cover the entire contact surface without creating thick ridges or pools. Excess glue often squeezes out, creates visible residue, extends cure time, and can make the repaired area less flexible.
Common repair areas include:
● Sole separation.
● Heel detachment.
● Insole lifting.
● Toe cap peeling.
● Sandal strap separation.
● Midsole edge damage.
Glue application guide:
| Repair Type | Adhesive Amount | Difficulty |
|---|---|---|
| Toe Edge | Thin Line | Easy |
| Side Sole Gap | Thin Layer | Easy-Medium |
| Loose Heel | Even Coat | Medium |
| Insole Repair | Small Amount | Easy |
| Sandal Strap | Controlled Layer | Medium |
| Hiking Boot Sole | Medium Layer | Medium-High |
GleamGlee Shoe Glue uses a precision metal nozzle, allowing adhesive placement deep inside narrow gaps. This reduces waste and helps prevent glue from spreading across visible shoe surfaces.
Important application tips:
● Cover the full contact area.
● Avoid thick adhesive buildup.
● Keep glue away from suede nap and fabric surfaces.
● Align parts immediately after application.
● Remove excess glue before curing begins.
Proper alignment is critical. Once pressure is applied, repositioning becomes more difficult. Check sole edges, heel position, and upper alignment carefully before securing the repair.
Step 4: Press Shoes
Pressure allows the adhesive to create intimate contact between both surfaces while curing. Without sufficient pressure, microscopic gaps remain inside the repair area, reducing bond strength. Many failed shoe repairs can be traced back to inadequate clamping rather than weak adhesive.
Different repairs require different pressure methods:
| Repair Area | Pressure Method | Recommended Time |
|---|---|---|
| Toe Sole | Rubber Bands | 24 Hours |
| Side Sole | Multiple Bands | 24-48 Hours |
| Heel Repair | Clamp or Weight | 24-48 Hours |
| Insole Repair | Internal Weight | 12-24 Hours |
| Sandal Strap | Small Clamp | 24 Hours |
| Boot Sole | Heavy Banding | 24-48 Hours |
For larger sole separations, pressure should be distributed evenly across the entire repair area. Using several rubber bands usually works better than one tight band because it prevents gaps from forming at the edges.
Common pressure mistakes include:
● Uneven clamping.
● Insufficient pressure.
● Excessive pressure that distorts the shoe shape.
● Removing clamps too early.
● Walking in the shoes before curing finishes.
A properly pressed repair should show minimal movement when lightly tested after curing.
Step 5: Let Shoes Cure
Curing is often the most important stage of the entire repair. Many repairs fail not because of poor adhesive quality, but because the shoes are worn before the bond has fully developed. Adhesives continue building strength long after they feel dry to the touch.
The surface may appear dry after several hours, but the deeper adhesive layer may still be curing. During this period, bending, twisting, or weight-bearing can weaken the repair.
General curing recommendations:
| Repair Type | Minimum Cure | Better Cure Time |
|---|---|---|
| Small Edge Repair | 12 Hours | 24 Hours |
| Sole Separation | 24 Hours | 48 Hours |
| Heel Repair | 24 Hours | 48 Hours |
| Hiking Boot Repair | 24 Hours | 48-72 Hours |
| Work Boot Repair | 24 Hours | 48 Hours |
| Sandal Strap Repair | 12 Hours | 24 Hours |
Environmental conditions affect curing:
● High humidity slows curing.
● Cold temperatures increase cure time.
● Thick glue layers cure slower.
● Poor airflow may delay full strength development.
The first few wears after repair should be moderate. Avoid intense running, hiking, sports, or heavy work until the bond has experienced several normal walking cycles. A gradual return to full use often results in longer-lasting repairs.
When all five steps—cleaning, sanding, gluing, pressing, and curing—are performed correctly, many worn out shoes can continue providing months of additional service life. Sneakers, work boots, hiking boots, sandals, school shoes, and dress shoes frequently benefit from repairs that cost only a fraction of replacing the entire pair.

Do Worn Out Shoes Last?
Worn out shoes can last after repair when the main shoe material is still strong, the damage is limited, and the adhesive is allowed to cure fully. A peeling sole, loose edge, lifted insole, or small heel gap can often be repaired well. A completely worn outsole, collapsed cushioning, broken heel structure, or crumbling midsole is harder to save with adhesive alone.
The repair life depends on four things: the damage type, the shoe material, the pressure used during curing, and how the shoes are worn afterward. A casual sneaker with a small peeling toe edge may last for months after a clean repair. A work boot used daily on concrete, oil, mud, and rain may need more frequent checking because the repaired area faces much heavier stress.
A realistic repair goal is to extend shoe life, not make badly worn shoes new again. Shoe adhesive works best when it reconnects solid materials that have separated. If the material itself is gone, cracked through, or breaking apart, glue has less to hold. Repair early, cure long enough, and avoid pushing repaired shoes into heavy use too quickly.
Shoe Cure Time
Cure time is one of the biggest reasons shoe repairs either last or fail early. Many repaired shoes feel dry after a few hours, but the bond inside the sole gap, heel base, or insole edge may still be soft. Wearing the shoes too soon puts body weight, bending, twisting, and ground impact onto an adhesive layer that has not reached full strength. The repair may open again even if the glue looked dry on the outside.
Most shoe repairs need at least 24 hours before normal wear. Larger sole repairs, hiking boots, work boots, rain boots, and heel repairs often need 48 hours for a safer result. Thick glue layers take longer to cure than thin layers. Cold rooms, damp air, and poor airflow can also slow curing. A dry indoor room with stable temperature is usually better than a garage, bathroom, balcony, or laundry room.
Curing should be treated as part of the repair, not as waiting time after the repair. During this period, the shoe should stay pressed, aligned, and still. Removing rubber bands or clamps early can let the sole lift slightly before the bond is strong.
● Let small edge repairs cure at least 12-24 hours.
● Let sole and heel repairs cure at least 24 hours.
● Use 48 hours for heavy shoes, outdoor shoes, or thick repairs.
● Keep the repair away from water during curing.
● Avoid direct heat from hair dryers, heaters, or strong sun.
● Do not bend the repaired area to “test” it before full cure.
| Repair Type | Light Handling | Safer Wear Time | Better for Heavy Use |
|---|---|---|---|
| Small trim edge | 6-12 hours | 24 hours | 24 hours |
| Insole corner | 12 hours | 24 hours | 24 hours |
| Toe sole peel | 24 hours | 24-48 hours | 48 hours |
| Side sole gap | 24 hours | 48 hours | 48 hours |
| Loose heel | 24 hours | 48 hours | 48 hours |
| Work boot sole | 24-48 hours | 48 hours | 48-72 hours |
| Hiking boot outsole | 24-48 hours | 48 hours | 48-72 hours |
| Rain boot crack | 24 hours | 48 hours | 48 hours before wet use |
After curing, start with normal walking instead of intense use. A repaired running shoe should not go straight into a long run. A repaired hiking boot should not go straight onto a wet trail. A repaired work boot should be checked after the first shift. The first few wears help confirm whether the bond is holding under real movement.
Shoe Wear Areas
Worn out shoes last longer after repair when the damaged area does not carry extreme stress. Not every part of a shoe works the same way. A lifted side trim may last a long time after gluing because it does not carry full body weight. A toe sole repair faces bending with every step. A heel repair faces repeated impact. A basketball shoe or running shoe repair faces sharp twisting and forceful flexing.
High-stress areas need better preparation, stronger pressure, and longer curing. Toe bends, heel bases, outsole edges, and midsole sidewalls should be cleaned, sanded, glued thinly, and held firmly. Low-stress areas, such as decorative trim or a small insole corner, usually need less pressure and may last longer with a simple repair.
Repair life also depends on how the shoe is used. The same adhesive repair can perform very differently on casual walking shoes and sports shoes. A repaired sneaker used for light errands may last for months. The same repair used for basketball, trail running, skateboarding, or construction work may face much faster wear.
● Toe areas fail faster because they bend repeatedly.
● Heel areas fail from impact and body weight.
● Sidewalls fail from twisting and rubbing.
● Insoles fail from sweat, friction, and foot pressure.
● Boot soles fail faster in mud, oil, gravel, and water.
● Children’s shoes fail faster because of dragging, running, and scraping.
| Shoe Area | Stress Level | Common Failure | Repair Outlook |
|---|---|---|---|
| Decorative trim | Low | Edge lifting | Usually good |
| Insole corner | Low to medium | Curling or slipping | Good if flat pressed |
| Side sole edge | Medium | Peeling from friction | Good with clean prep |
| Toe bend | High | Peeling and cracking | Good if flexible adhesive is used |
| Heel base | High | Lifting or wobbling | Good if aligned and clamped |
| Midsole sidewall | High | Cracks or separation | Medium, depends on foam condition |
| Work boot outsole | Very high | Sole lifting under heavy use | Medium to good with longer cure |
| Sports shoe outsole | Very high | Flex and twist separation | Medium, repair may need checks |
The most practical rule is to repair early. A 1-inch lifted sole edge is much easier to save than a 6-inch separation filled with dirt and moisture. A small heel gap is safer to fix than a heel that has started wobbling badly. Early repair gives the adhesive more solid material to bond and reduces stress on nearby shoe parts.
Shoe Material Match
Worn out shoes last longer after repair when the adhesive matches the materials being bonded. Shoes are rarely made from one material. A sneaker may combine rubber, EVA foam, mesh, TPU, leather overlays, and fabric lining. A boot may combine leather, rubber, foam, stitching, and waterproof coatings. Each material affects how well adhesive grips.
Rubber and leather usually bond well when cleaned and lightly sanded. Smooth vinyl, plastic, and TPU often need more surface roughening because they can be slick. Foam midsoles need gentle handling because over-sanding can tear or crumble the surface. Canvas and fabric edges can absorb glue, so a thin layer is important to avoid stiff spots. Suede and nubuck require extra care because visible glue on the nap can leave permanent marks.
GleamGlee Shoe Glue is designed for common shoe materials such as leather, rubber, vinyl, canvas, and more. A clear, flexible, waterproof adhesive is helpful for mixed-material shoes because the repair area often includes both a hard sole and a softer upper.
● Use light sanding on rubber and synthetic soles.
● Clean leather polish or wax before applying adhesive.
● Avoid flooding fabric and canvas with glue.
● Keep adhesive away from visible suede or nubuck surfaces.
● Use thin glue on foam to avoid hard lumps.
● Press mixed materials firmly so both sides stay in contact.
● Let coated or waterproof shoes dry fully before gluing.
| Material | Common Shoe Damage | Repair Chance | Best Repair Note |
|---|---|---|---|
| Rubber | Outsole peeling, toe cap lifting | High | Sand lightly and clamp well |
| Leather | Sole edge lifting, heel gap | High | Remove polish from bonding area |
| Canvas | Sidewall separation | Medium to high | Use thin glue to avoid stiffness |
| Vinyl | Strap or upper separation | Medium | Roughen smooth surface lightly |
| EVA foam | Midsole edge lifting | Medium | Sand very gently |
| TPU/plastic | Heel shell, sole plate edge | Medium | Needs surface roughening |
| Suede/nubuck | Sole edge lifting | Medium | Protect visible nap |
| Mesh | Upper separation near sole | Medium | May need patch support |
| Crumbling foam | Midsole breakdown | Low | Adhesive has little solid material to hold |
| Worn-through outsole | Hole in sole | Low | Replacement or patch may be needed |
If the damaged material is still solid, adhesive has a better chance of lasting. If the material breaks apart when touched, the repair will be weak because the glue bonds to a failing surface. In that case, the shoe may need a patch, replacement sole, or professional repair instead of adhesive alone.
Shoe Use After Repair
How the shoes are used after repair affects how long they last. A well-glued sole can still fail early if the shoe is worn in rain before curing, used for intense sports immediately, or bent sharply at the repaired area. The first few wears should be moderate so the repair can settle under normal movement.
Repaired shoes should be checked after the first use. Look for small lifted edges, soft spots, or glue lines opening near the repair. If a tiny edge lifts, fix it early before dirt enters the gap. Once dirt, moisture, and grit get inside, the second repair becomes harder.
Care habits after repair:
● Avoid water for the first 24-48 hours.
● Start with light walking before sports or heavy work.
● Do not fold the toe area sharply by hand.
● Clean mud and grit from the repaired edge after outdoor use.
● Keep repaired shoes away from long heat exposure.
● Store shoes dry and ventilated.
● Recheck high-stress repairs after the first few wears.
| Shoe Use | Stress Level After Repair | Practical Advice |
|---|---|---|
| Casual walking | Low to medium | Usually safe after full cure |
| Office wear | Low | Good for dress shoe repairs |
| School use | Medium to high | Check toe and sole edges often |
| Running | High | Use only if cushioning is still good |
| Basketball | Very high | Repairs face strong twisting |
| Hiking | High | Wait longer before wet trails |
| Work sites | Very high | Inspect repair after heavy shifts |
| Rain use | High | Cure fully before water exposure |
A repaired shoe should not be expected to perform like a brand-new pair in every situation. If the shoe has worn cushioning, thin tread, or deep structural damage, comfort and traction may still be reduced. But when the problem is mainly separation, peeling, or lifting, shoe adhesive can provide a useful second life and delay replacement.
What Shoe Adhesive Tips Help?
The best shoe adhesive tips are simple but easy to overlook: use less glue, press the repair tightly, keep the shoes dry, and allow enough cure time before wearing. A shoe repair usually fails because the surface was dirty, the adhesive layer was too thick, the parts were not held together firmly, or the shoes were used before the bond was ready.
Shoe adhesive works best when it bonds two clean, solid surfaces. It should not be used as a thick filler for missing rubber, crumbling foam, or badly worn tread. When the damaged shoe part is still intact but separated, a thin, flexible adhesive layer can restore contact and help the shoe handle bending, walking, and light outdoor use again.
A careful repair should feel flat, firm, and natural after curing. The repaired edge should not bulge. The sole should not gap when bent gently. The insole should not feel lumpy under the foot. Small details such as sanding, clamping, wiping fresh excess glue, and waiting 24–48 hours often make a bigger difference than adding more adhesive.
Use Less Shoe Glue
Using too much shoe glue is one of the most common repair mistakes. A thick layer may look stronger when wet, but shoes need close surface contact. If the adhesive layer is too thick, the sole or heel may float slightly instead of sitting tight against the shoe. After curing, that thick layer can become a raised ridge that catches dirt, feels stiff, or starts peeling from the edge.
A thin layer usually works better because it lets both surfaces meet closely. The adhesive should cover the bonding area, not flood it. For a small toe peel, a narrow line is enough. For a side sole gap, a thin even coat works better than a blob. For an insole edge, small dots or a very thin line help avoid lumps under the foot.
Good glue control habits:
● Apply glue inside the gap, not across the outside of the shoe.
● Use a thin layer on the contact surface.
● Add slightly more only if the surface is rough or absorbent.
● Wipe fresh squeeze-out before it dries.
● Keep glue away from suede, nubuck, mesh, and fabric surfaces.
● Do not use adhesive to replace missing outsole material.
| Repair Area | Better Glue Amount | What Too Much Glue Causes |
|---|---|---|
| Toe edge | Thin line | Shiny visible ridge |
| Side sole gap | Thin even coat | Sole may not close flat |
| Heel base | Even layer | Heel may slide while clamping |
| Insole curl | Small dots or thin line | Footbed feels lumpy |
| Sandal strap | Thin contact layer | Glue marks on strap |
| Rubber crack | Controlled seal | Thick patch may peel |
| Sneaker sidewall | Thin line under edge | Messy outside glue line |
A precision nozzle helps control the amount. GleamGlee Shoe Glue uses a metal needle nozzle, which is useful for narrow sole gaps, toe caps, heel seams, insole corners, and visible sneaker sidewalls. It helps place the glue where the shoe actually needs it instead of spreading it across the upper.
Clamp Shoes Tight
Pressure is just as important as adhesive. Shoe glue needs firm contact while curing. If the sole, heel, strap, or insole lifts even slightly during drying, the repair may look closed from the outside but remain weak inside. Small air gaps reduce the bond and make the edge easier to reopen during walking.
Different shoe areas need different holding methods. Rubber bands work well for sneakers and flexible soles because they wrap around the shoe shape. Clamps work better for heel blocks, sandal straps, and thicker sole areas. Tape can help with small edge repairs, but it should be strong enough to hold the part flat without pulling the upper out of shape.
Useful pressing methods:
● Use rubber bands around the toe for peeling front soles.
● Use several bands for long side sole repairs.
● Use padded clamps for heel repairs.
● Place weight inside the shoe for curling insoles.
● Use tape for small lifted edges.
● Add cardboard padding under clamps to avoid dents.
| Repair Type | Holding Method | Pressing Tip |
|---|---|---|
| Toe sole peel | Rubber band or strong tape | Keep toe shape natural |
| Side sole gap | Several rubber bands | Check full edge contact |
| Loose heel | Clamp or steady weight | Keep heel straight |
| Insole curl | Weight inside shoe | Keep footbed smooth |
| Sandal strap | Clip or padded clamp | Protect visible strap |
| Work boot sole | Multiple strong bands | Add pressure in sections |
| High heel | Careful clamp | Check heel angle before curing |
Do not use extreme pressure that distorts the shoe. The goal is firm contact, not crushing. A clamp placed directly on leather, suede, foam, or mesh can leave dents, so padding is important. After clamping, check alignment once, wipe fresh glue squeeze-out, and leave the shoe still.
Keep Shoes Dry
Shoes should be dry before repair, during curing, and during the first stage after repair. Moisture weakens surface contact and slows curing. Even waterproof shoe adhesive needs a dry bonding surface to form a strong hold. If water is trapped inside a sole gap, the adhesive may bond poorly or cure unevenly.
Do not repair shoes immediately after rain, washing, hiking, running, or sports use. Thick sneakers, padded work boots, and hiking boots can hold moisture inside seams and sole layers even when the outside feels dry. Drying the shoes first may take longer, but it greatly improves the repair.
Better drying habits before repair:
● Remove loose insoles if possible.
● Brush away mud before it dries into the gap.
● Air dry shoes in a ventilated room.
● Stuff shoes lightly with dry paper to absorb moisture.
● Avoid hair dryers, heaters, and direct strong sun.
● Check the sole gap for hidden dampness before gluing.
| Shoe Condition | Repair Timing |
|---|---|
| Slightly dusty | Clean and repair after wiping |
| Damp from rain | Dry fully before repair |
| Wet inside sole gap | Wait longer before gluing |
| Sweaty sports shoes | Air dry before repair |
| Muddy boots | Clean, dry, then sand |
| Washed sneakers | Let dry completely first |
| Rain boots | Dry inside and outside first |
After the repair, keep the shoe away from water until the adhesive has cured. For outdoor shoes, rain boots, hiking boots, and work boots, waiting 48 hours before wet use is safer than wearing them the next day. A waterproof bond performs best after it has fully set.
Wait Before Wearing
Waiting long enough before wearing repaired shoes is one of the easiest ways to improve repair life. A glued edge may feel dry after a few hours, but the bond may not be strong enough for walking. Every step adds bending, twisting, compression, and impact. Wearing shoes too early can reopen the repair before the adhesive reaches full strength.
Most small repairs need at least 24 hours before normal use. Heavy repairs, thick soles, outdoor shoes, work boots, hiking boots, and heel repairs often perform better with 48 hours of curing. Cold rooms, thick glue layers, poor airflow, and damp conditions can increase drying time.
Use this cure guide:
| Repair Type | Minimum Wait | Better Wait |
|---|---|---|
| Small trim edge | 6–12 hours | 24 hours |
| Insole corner | 12 hours | 24 hours |
| Toe sole peel | 24 hours | 24–48 hours |
| Side sole gap | 24 hours | 48 hours |
| Loose heel | 24 hours | 48 hours |
| Work boot sole | 24–48 hours | 48–72 hours |
| Hiking boot repair | 24–48 hours | 48–72 hours |
| Rain boot crack | 24 hours | 48 hours before water exposure |
The first wear after repair should be light. Walk indoors or on smooth ground before using the shoes for running, hiking, sports, or long work shifts. Check the repaired edge after the first use. If a tiny part lifts, fix it early before dirt and moisture enter the gap.
Good post-repair habits:
● Start with light walking.
● Avoid rain during the first wear.
● Do not bend the repaired area sharply by hand.
● Check toe and heel edges after the first use.
● Clean mud from repaired areas after outdoor wear.
● Store repaired shoes in a dry, ventilated place.

Is GleamGlee Shoe Adhesive Good?
GleamGlee Shoe Adhesive is a strong choice for worn out shoe repair because it is made for common footwear problems such as peeling soles, loose heels, lifted toe caps, curling insoles, cracked midsole edges, and separating rubber or leather parts. It is designed to bond leather, rubber, vinyl, canvas, and other shoe materials while staying flexible after curing.
A good shoe adhesive should not only stick two surfaces together. Shoes bend, twist, compress, scrape, and meet water during daily wear. GleamGlee Shoe Adhesive forms a waterproof and elastic bond, helping repaired areas resist cracking or hardening after use. It also dries crystal clear, so visible repairs on sneakers, dress shoes, sandals, heels, and boots look cleaner.
The kit is also practical for home shoe repair. It includes two 20 ml tubes of glue, an applicator, two sandpaper sheets, and two rubber bands. That means the repair process is not limited to glue only. It also supports surface preparation and pressure, two steps that often decide whether a repair lasts.
Strong Shoe Hold
GleamGlee Shoe Adhesive is designed for the areas that usually fail first on worn out shoes: the sole edge, toe cap, heel base, insole, and sidewall. These areas do not just need a hard bond. They need a hold that can survive bending, walking, standing, and repeated floor contact. A stiff glue may crack quickly, especially near the toe where the shoe bends thousands of times during normal use.
The adhesive is suitable for many everyday repairs:
● Reattaching peeling sneaker soles.
● Fixing loose heels on dress shoes or boots.
● Securing curling insoles and footbeds.
● Repairing worn toe caps on school shoes.
● Bonding rubber outsole edges on work shoes.
● Patching lifted sidewalls on canvas shoes.
● Restoring sandal straps and flip-flop parts.
● Repairing light damage on hiking boots and rain boots.
| Repair Area | Why Strong Hold Matters | GleamGlee Use |
|---|---|---|
| Toe edge | Repeated bending | Flexible bond helps reduce cracking |
| Heel base | Body weight and impact | Strong hold with proper clamping |
| Side sole | Friction and twisting | Thin glue layer keeps edge attached |
| Insole | Foot pressure and sweat | Controlled amount avoids lumps |
| Boot outsole | Outdoor stress | Waterproof bond supports rough use |
| Sandal strap | Pulling force | Precise glue placement helps alignment |
For the best result, the damaged shoe material should still be solid. If rubber has crumbled, foam has collapsed, or the outsole is completely worn through, adhesive has less surface to hold. When the issue is separation rather than missing material, GleamGlee Shoe Adhesive can provide a practical and durable repair.
Clear Shoe Repair
Visible glue marks are one of the biggest frustrations in shoe repair. A sole may hold well, but if the adhesive dries white, yellow, cloudy, or raised, the shoe can look poorly repaired. This is especially noticeable on white sneakers, designer sneakers, dress shoes, sandals, high heels, and shoes with light-colored midsoles.
GleamGlee Shoe Adhesive dries crystal clear, helping repairs look cleaner after curing. The clear finish is useful for both small edge repairs and larger visible gaps, as long as the glue is applied in a thin layer and fresh excess is wiped away before drying.
Clear repair is helpful for:
● White sneaker midsoles.
● Leather dress shoe edges.
● High heel sole lines.
● Sandal straps and side edges.
● Children’s school shoes.
● Designer sneaker toe caps.
● Ballet flats and light-colored soles.
● Suede or nubuck shoes where only the sole edge is repaired.
| Shoe Type | Visible Repair Risk | Why Clear Glue Helps |
|---|---|---|
| White sneakers | White residue is obvious | Clear finish blends better |
| Dress shoes | Edge must look neat | Less visible glue line |
| High heels | Heel and sole areas show easily | Cleaner finish when clamped |
| Sandals | Straps are exposed | Clear glue reduces marks |
| Kids’ shoes | Bright colors show stains | Clear repair looks tidier |
| Designer shoes | Appearance matters more | Less obvious edge repair |
A clear adhesive still needs careful use. If too much glue is applied, it can dry as a shiny raised line. The cleanest repair comes from controlled application, firm pressing, and quick cleanup. The goal is to place the adhesive inside the damaged gap, not across the outside of the shoe.
Shoe Repair Kit
GleamGlee Shoe Adhesive comes as a complete repair kit, which makes it easier to handle the full repair process at home. Many shoe repairs fail because one step is missing. The surface is not sanded. The repair is not held tightly. The glue is applied without enough control. A kit with glue, sandpaper, applicator, and rubber bands helps solve these common problems.
The kit includes:
● Two 20 ml tubes of shoe glue.
● One applicator for spreading or guiding adhesive.
● Two sandpaper sheets for roughening smooth surfaces.
● Two rubber bands for holding the shoe during curing.
● A metal needle nozzle for precise glue placement.
| Kit Item | What It Helps With | Why It Matters |
|---|---|---|
| 20 ml glue tubes | Multiple shoe repairs | Enough for several pairs |
| Metal nozzle | Narrow sole gaps and edges | Reduces mess and waste |
| Applicator | Wider contact areas | Helps spread glue evenly |
| Sandpaper | Surface preparation | Improves grip on smooth materials |
| Rubber bands | Pressure during curing | Keeps soles and edges closed |
| Clear formula | Visible repairs | Helps avoid white residue |
| Waterproof bond | Outdoor use | Supports rain, mud, and daily wear |
The two 20 ml tubes can repair multiple pairs depending on damage size. Small edge repairs use very little glue, while larger sole repairs need more. For many households, one kit can cover sneakers, boots, sandals, slippers, children’s shoes, and occasional outdoor footwear repairs.
Shoe Material Fit
Shoe repair is difficult because most shoes are made from mixed materials. A single sneaker may include rubber outsole, foam midsole, mesh upper, synthetic overlays, and fabric lining. A boot may include leather, rubber, stitching, waterproof coating, and heel guards. A useful shoe adhesive needs to work across several of these materials.
GleamGlee Shoe Adhesive is suitable for leather, rubber, vinyl, canvas, and more. It can be used on everyday shoes, sports shoes, work shoes, boots, sandals, slippers, and children’s shoes. The flexible waterproof bond is especially helpful where a hard glue would crack under movement.
Material use guide:
| Material | Common Repair | Application Tip |
|---|---|---|
| Rubber | Peeling sole, toe cap | Sand lightly before gluing |
| Leather | Sole edge, heel area | Remove polish or dust first |
| Canvas | Sidewall separation | Use thin glue to avoid stiffness |
| Vinyl | Strap or upper separation | Roughen smooth surface lightly |
| Foam | Midsole edge lifting | Sand gently and avoid over-gluing |
| Suede/nubuck | Sole edge repair | Keep glue away from visible nap |
| Plastic parts | Heel shell or shoe detail | Lightly roughen for better grip |
The best results come when the shoe part is detached but still intact. If the outsole is missing, the foam is crumbling, or the material breaks apart when touched, glue alone may not restore the shoe properly. But when the problem is peeling, lifting, or separation, GleamGlee Shoe Adhesive gives a clean and practical repair option for extending shoe life.
Conclusion
Worn out shoes are often more repairable than they look. A peeling sole, loose heel, curling insole, or lifted toe edge does not always mean the whole pair is finished. When the shoe material is still solid, a flexible waterproof shoe adhesive can help restore the bond and extend the life of sneakers, boots, dress shoes, sandals, work shoes, and children’s shoes.
The strongest repairs come from careful preparation, not from using a large amount of glue. Clean the surface, dry the shoe fully, sand smooth bonding areas, apply a thin layer of adhesive, press the repair firmly, and allow enough curing time before wearing. For most sole and heel repairs, 24 hours is the minimum, while thicker boots or high-stress repairs often benefit from 48 hours.
GleamGlee Shoe Glue is designed for everyday shoe repair needs with a flexible waterproof bond, crystal-clear finish, precision metal nozzle, and complete repair kit. For branded product orders, wholesale supply, Amazon-ready products, or private-label shoe adhesive projects, GleamGlee can support formula development, packaging design, multilingual labeling, samples, bulk production, and global logistics. Businesses looking to launch or expand a shoe repair product line can contact GleamGlee for samples, quotations, and custom manufacturing solutions.


