 Skip to content
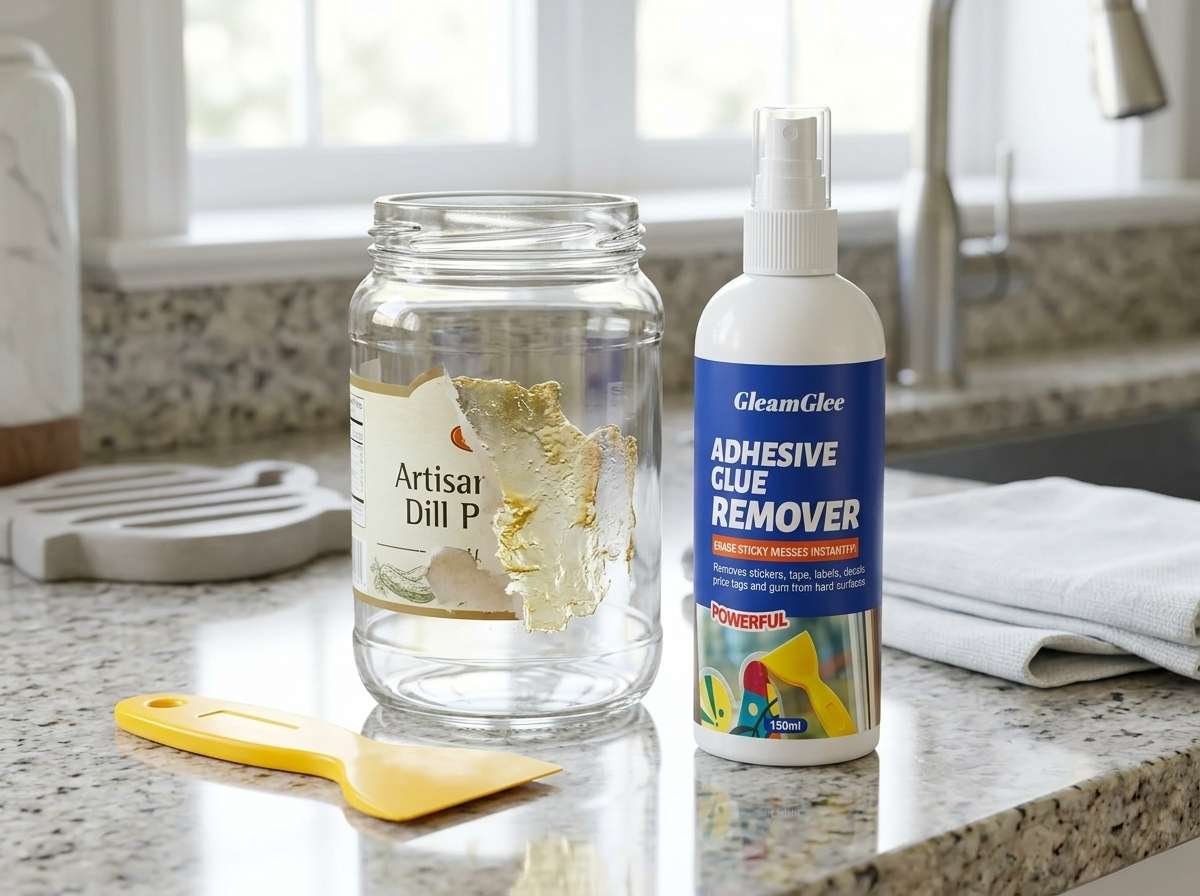
Sticker glue is one of those small household problems that becomes annoying very quickly. A new glass jar looks useful, but the label leaves a cloudy patch. A plastic storage box looks neat until old name stickers turn into gray sticky marks. A car window may still show decal residue after the sticker is gone. A desk, whiteboard, laptop stand, kitchen container, mirror, or gift box can all carry the same problem: the sticker peels away, but the glue stays behind.
The safest way to remove sticker glue is to soften the adhesive first, then lift it gently, then clean the remaining film. Warm soapy water works well on many glass and metal labels. Heat helps soften vinyl stickers and decals. Oil can loosen gummy residue on hard non-porous surfaces. Baking soda paste adds light scrubbing power. For thick, old, or stubborn glue, a dedicated adhesive remover can save time and reduce scraping.
The biggest mistake is starting with force. Heavy scraping may remove the glue, but it can also scratch glass, cloud plastic, dull painted surfaces, stain wood, or damage car finishes. Sticker glue removal is not about using the harshest method. It is about matching the method to the surface. Once the glue is softened correctly, most residue comes off with far less pressure, less mess, and a cleaner finish.
What Is Sticker Glue?
Sticker glue is the sticky adhesive layer left on a surface after a label, price tag, barcode sticker, tape, decal, protective film, or removable hook is peeled away. It is not just “dirt.” It is a pressure-sensitive adhesive that can stay soft, turn gummy, dry into a hard film, or collect dust and oil over time. That is why wiping with plain water often only spreads the mess instead of removing it.
For most household jobs, sticker glue should be treated by surface type and residue condition. Fresh label glue on glass may come off with warm soapy water in 10–20 minutes. Old tape residue on plastic may need careful testing and a residue remover. Sun-baked decal glue on car glass or bumpers often needs heat, softening time, and a plastic scraper. The safest rule is simple: soften first, scrape gently, then wash the final film away.
Why Sticker Glue Sticks
Sticker glue sticks because it is designed to hold with pressure, not because it dries like ordinary liquid glue. When a label is pressed onto glass, plastic, metal, wood, packaging, or painted surfaces, the adhesive flows into tiny surface lines that the eye cannot easily see. Even smooth glass or polished plastic has small texture points where glue can grip.
This is why sticker glue often stays behind after the top sticker layer is removed. The paper or vinyl face may peel off, but the adhesive layer remains attached to the surface. Once exposed, that glue layer quickly collects dust, lint, cooking grease, fingerprints, and dirt. A clear sticky patch can turn gray, yellow, or brown in only a few days, especially on kitchen items, office desks, storage boxes, and car surfaces.
Common reasons sticker glue stays behind:
- The sticker has been pressed down for a long time.
- The label was exposed to heat, sunlight, or moisture.
- The sticker was peeled too quickly or at a sharp angle.
- The surface has texture, pores, paint, grain, or coating lines.
- The adhesive is thicker, such as tape, decal glue, or hook adhesive.
- Dust and oil have mixed with the glue after the sticker was removed.
A useful way to understand sticker glue is to look at the type of label:
| Sticker Source | What Usually Stays Behind | Common Cleaning Problem |
|---|---|---|
| Price tag | Thin sticky film | Smears when rubbed dry |
| Glass jar label | Paper fibers plus glue | Needs soaking or softening |
| Packing tape | Long glue lines | Collects dust quickly |
| Vinyl decal | Clear rubbery residue | Often needs heat |
| Car sticker | Sun-baked adhesive | Needs careful surface testing |
| Removable hook | Thick foam glue | Must be removed in layers |
| Protective film | Wide cloudy glue patch | Can dull plastic if rubbed hard |
For customers, the real frustration is not only that the surface looks dirty. The sticky mark keeps coming back. If the adhesive layer is not removed fully, new dust sticks to it again. That is why a proper removal process should not stop at “less visible.” The surface should feel smooth and dry after cleaning.
Why Sticker Glue Turns Hard
Sticker glue turns hard because adhesive changes after exposure to air, heat, sunlight, dust, and time. A fresh barcode sticker on a plastic box may peel off easily today, but after six months in a warm room, the same sticker may leave a dry, flat, stubborn patch. The glue loses some of its soft peel-away behavior and bonds more tightly to the surface.
Heat is one of the biggest reasons sticker glue becomes difficult. Car decals, window stickers, appliance labels, storage bins near sunlight, and outdoor labels often go through many heating and cooling cycles. During the day, the glue softens and spreads slightly. At night, it cools and hardens again. After repeating this process many times, the residue can become darker, flatter, and harder to remove.
Kitchen sticker glue has another common problem. It often mixes with cooking oil, steam, sugar, dish soap residue, and dust. This creates a sticky-greasy film that does not respond well to water alone. Office tape residue has a different issue: it collects paper dust, eraser crumbs, marker powder, and hand oils, making the glue look like a dirty gray line.
Different residue conditions need different handling:
| Glue Condition | How It Feels | Better Cleaning Method | Difficulty |
|---|---|---|---|
| Fresh label glue | Soft and tacky | Warm soapy water | Low |
| Gummy residue | Sticky and stretchy | Oil or adhesive remover | Medium |
| Dry sticker film | Rough or cloudy | Paste or remover | Medium |
| Sun-baked decal glue | Flat and hard | Heat plus remover | High |
| Thick hook adhesive | Foam-like or rubbery | Scraper plus remover | High |
| Tape residue with dust | Dark and sticky | Remover, then soap wipe | Medium to high |
For hard residue, patience matters more than force. Let the softening method work before scraping. Warm water may need 10–20 minutes on jar labels. Oil may need 5–15 minutes on gummy glue. A dedicated adhesive remover may work faster on many hard-surface sticky marks; for example, GleamGlee adhesive remover is designed for a simple spray, wait about 15 seconds, then wipe or scrape process on suitable surfaces.
Key signs that sticker glue has aged:
- It feels dry instead of sticky.
- It looks yellow, gray, or cloudy.
- It smears when wiped but does not come off.
- It breaks into crumbs when rubbed.
- It forms a flat outline after a decal is peeled.
- It needs repeated passes instead of one wipe.
Old sticker glue should be removed in layers. First remove loose paper, vinyl, or foam. Then soften the adhesive. Then lift it with a plastic scraper or cloth. Finally, wash the surface so no oily or sticky film remains.
Where Sticker Glue Appears
Sticker glue appears in almost every part of a home, office, car, workshop, and retail environment. It is not limited to product stickers. Many sticky marks come from tape, decals, hook pads, film liners, barcode labels, shipping labels, craft glue dots, and double-sided mounting strips. The surface may look easy to clean, but the wrong method can leave scratches, stains, or dull spots.
In daily home use, the most common sticker glue problems are found on glass jars, food containers, kitchen counters, plastic storage bins, mirrors, windows, appliance panels, desks, and gift packaging. In cars, residue often appears on windows, bumpers, body panels, interior trim, and protective film areas. In offices and schools, tape marks show up on file folders, whiteboards, rulers, trays, desks, and plastic supplies.
Common sticker glue scenarios:
- Glass jars: label glue remains after soaking or peeling.
- Plastic containers: barcode stickers leave cloudy sticky marks.
- Windows and mirrors: decals and tape leave thin residue.
- Whiteboards: tape marks make the surface look dirty.
- Desks and tables: price tags and craft stickers leave gummy patches.
- Car glass: inspection stickers or decals leave hard adhesive.
- Bumpers: bumper stickers leave sun-baked glue.
- Acrylic sheets: protective film leaves hazy adhesive patches.
- Wall hooks: foam pads leave thick residue after removal.
- Gift boxes: price labels tear the surface if removed too quickly.
Surface type changes the cleaning method:
| Surface | Common Sticker Glue Issue | Safer First Step |
|---|---|---|
| Glass | Label haze, tape marks | Warm water or adhesive remover |
| Plastic | Cloudy residue, label glue | Mild soap and test first |
| Wood | Price tag glue, tape marks | Gentle heat, minimal moisture |
| Car glass | Decal residue | Heat and plastic scraper |
| Car paint | Sticker outline, glue film | Tested remover, microfiber cloth |
| Acrylic | Protective film glue | Soft cloth, low pressure |
| Painted wall | Hook pad residue | Slow peeling, light cleaning |
| Metal | Label glue, tape marks | Remover or warm soapy wipe |
For customers, the most important question is not only “How do I remove it?” but “How do I remove it without ruining the item?” A glass jar can be soaked. A wooden table cannot. A plastic storage box may handle soap but not rough scrubbing. A car window can usually take more cleaning than car paint. Matching the method to the surface saves time and prevents avoidable damage.
A simple home cleaning kit for sticker glue can include:
- Microfiber cloths
- Plastic scraper
- Mild dish soap
- Warm water
- Cotton pads
- Baking soda
- Hair dryer
- Surface-safe adhesive remover
- Clean dry towel for final wiping
This kit covers most everyday sticker glue jobs without reaching for knives, steel wool, harsh bathroom cleaners, or random solvents. For thicker residue, old labels, tape marks, decals, waxy glue, gum residue, or hook adhesive, GleamGlee adhesive remover gives customers a faster and more controlled option for many hard surfaces. Its spray format helps cover the sticky area evenly, while the included scraper helps lift softened residue with less effort.
Which DIY Sticker Glue Method Works?
The best DIY sticker glue method depends on three things: the surface, the age of the glue, and how thick the residue is. Warm soapy water works well for fresh paper labels on glass, ceramic, and metal. Heat works better when a sticker or decal is still partly attached. Oil can soften gummy residue on hard non-porous surfaces. Baking soda paste helps when softened glue still needs light friction.
A good removal method should make the glue easier to lift without forcing the surface to suffer. If a method needs heavy scraping, it is usually the wrong method or the glue has not been softened long enough. Most sticker glue problems improve when the cleaning process follows a simple order: soften the adhesive, lift the residue, then wash away the final film.
For stubborn glue, DIY methods may need more time or repeated passes. A glass jar label may need 10–20 minutes in warm water. A gummy price tag mark may need 5–15 minutes with oil. A vinyl decal may need steady heat before peeling. If the residue is old, thick, or mixed with dust, grease, wax, or tape adhesive, a dedicated adhesive remover can save time and reduce rubbing.
Sticker Glue with Warm Water
Warm water is the safest first method for many sticker glue jobs, especially when the sticker is made of paper and sits on a washable hard surface. It works by softening the paper layer and loosening the water-sensitive parts of the adhesive. This is why it is commonly used for glass jars, ceramic bottles, metal tins, food containers, candle jars, and some durable plastic items. It is not a fast method, but it is gentle, cheap, and easy to control. If the item can be soaked without damage, warm water should usually be tried before stronger cleaners or scraping tools.
A practical warm-water process is simple: fill a bowl or sink with warm water, add a few drops of dish soap, and soak the item for 10–20 minutes. After soaking, lift the sticker from one corner and peel slowly. If paper fibers remain, rub them with a soft cloth or the soft side of a sponge. If the glue still feels slippery or sticky, wash once more with dish soap before drying.
Warm water works best when:
- The sticker is paper-based, not waterproof vinyl.
- The surface is glass, ceramic, stainless steel, or durable hard plastic.
- The glue is fresh or only lightly aged.
- The item can be soaked safely.
- The surface does not have paper labels, seams, raw wood, or electronics.
It is less useful when sticker glue has turned hard, rubbery, or sun-baked. It may also fail on laminated labels, shipping tape, double-sided tape, vinyl decals, car stickers, and old barcode stickers. In those cases, water may remove the top paper but leave the glue behind.
| Item | Warm Water Result | Better Follow-Up |
|---|---|---|
| Glass food jar | Usually very good | Baking soda paste or remover for leftover glue |
| Candle jar | Good after wax is removed | Dish soap wash |
| Metal tin | Good | Dry quickly to avoid rust |
| Plastic container | Sometimes good | Test heat and water tolerance |
| Wine bottle | Good but slow | Scrub paper fibers gently |
| Appliance label | Not ideal | Use cloth method, avoid soaking |
Do not soak wooden items, cardboard packaging, electronics, painted craft pieces, or anything with open edges that can absorb water. Warm water can swell wood, lift paper layers, loosen printed graphics, or leave moisture trapped in seams. For large surfaces such as windows, desks, and car panels, soaking is not practical, so apply warm soapy water with a cloth instead.
Sticker Glue with Heat
Heat works well when the sticker, decal, tape, or film is still partly attached. Instead of trying to scrape a cold sticker away, gentle warmth softens the adhesive and helps the top layer peel off in larger pieces. This method is especially useful for vinyl decals, car window stickers, protective films, shipping labels, and old labels that tear when pulled. A hair dryer is usually better than a heat gun because it gives softer heat and lowers the risk of warping plastic, damaging paint, or overheating the surface.
The right technique matters. Warm one corner for 20–40 seconds, then lift the edge with a fingernail, plastic card, or plastic scraper. Pull the sticker slowly at a low angle, almost parallel to the surface. If the sticker starts tearing, stop and warm the next section before pulling again. Pulling too fast or straight upward usually leaves more glue behind.
Heat works best when:
- The sticker has a plastic, vinyl, or laminated top layer.
- The surface can handle mild warmth.
- The goal is to remove the sticker sheet before cleaning residue.
- The adhesive feels stretchy or resistant.
- The sticker is on glass, metal, car glass, or durable hard plastic.
Use heat carefully on plastic, painted wood, acrylic, car paint, coated glass, appliance panels, and interior trim. Thin plastic can bend or warp. Acrylic may cloud if heated and rubbed. Car paint should only be warmed gently, preferably in shade on a cool panel. If the surface becomes hot to the touch, stop and let it cool.
| Surface | Heat Use | Main Risk |
|---|---|---|
| Car glass | Very useful | Be careful with tint film |
| Plain glass | Useful | Avoid thermal shock |
| Hard plastic | Useful with low heat | Warping or dulling |
| Acrylic | Risky | Clouding or bending |
| Painted wood | Cautious use | Finish softening |
| Car paint | Gentle only | Clear coat stress |
| Wall paint | Gentle only | Paint lifting |
Heat does not always remove the final glue film. It often removes the sticker face and leaves a thin adhesive layer. That is normal. After peeling, the surface may still need warm soap, oil, baking soda paste, or adhesive remover. The benefit of heat is that it reduces the amount of glue left behind and makes the next cleaning step easier.
Sticker Glue with Oil
Oil is useful for gummy sticker glue that feels soft, sticky, or rubbery. It works better on non-porous hard surfaces than on absorbent materials. Cooking oil, olive oil, baby oil, mineral oil, or coconut oil can loosen certain adhesive residues by softening the sticky layer. The method is popular because the materials are easy to find at home, but it should be used carefully. Oil can solve the glue problem on glass and metal, yet create a stain problem on wood, paper, matte paint, fabric, or porous stone.
Apply a small amount of oil to the sticky area with a cotton pad or cloth. Keep it local; do not flood the surface. Let it sit for 5–15 minutes, then rub gently. If the residue begins to roll into small beads or smear less, the oil is working. After the glue is removed, wash the area with dish soap. Without this final wash, the surface may feel greasy and attract dust again.
Oil works best for:
- Glass jar label glue
- Metal tin residue
- Glossy ceramic surfaces
- Hard plastic containers after testing
- Small gummy price tag marks
- Sticker glue that feels soft rather than dry
Avoid oil on:
- Raw wood
- Unsealed stone
- Cardboard or paper packaging
- Fabric
- Matte painted walls
- Soft-touch plastic coatings
- Rubber-like surfaces
- Items where an oily smell or film is a problem
Oil is not ideal for sun-baked decal residue or thick hook adhesive. It may soften the top layer, but it can also spread the glue wider if too much is used. Use less oil than expected, wait patiently, then wipe in controlled strokes.
| Residue Feel | Oil Result | Better Choice if Oil Fails |
|---|---|---|
| Soft and sticky | Usually good | Dish soap finish |
| Gummy and stretchy | Good with dwell time | Adhesive remover |
| Dry and crusty | Weak | Heat or remover |
| Paper-glue mix | Medium | Warm water first |
| Thick tape glue | Limited | Scraper plus remover |
| Sun-baked decal glue | Weak | Heat plus remover |
Oil is a good household method when the surface is forgiving. It is not the cleanest method for fast jobs because it almost always needs a second wash. If the cleaned area must be dry, smooth, and ready for a new label, make sure all oil is removed before relabeling.
Sticker Glue with Baking Soda
Baking soda helps when sticker glue has already been softened but still clings to the surface. It gives mild friction, which can lift adhesive without jumping straight to rough pads or metal scraping. It does not dissolve glue by itself. Its value is in helping loosened residue break away from the surface. Mixed with water, it becomes a simple paste. Mixed with a small amount of oil, it becomes more effective on gummy jar-label residue.
A good paste should be thick enough to stay on the glue but not so dry that it scratches. Spread it over the residue, let it sit for 5–15 minutes, then rub gently with a soft cloth. On glass jars and durable ceramic, a little more pressure is usually acceptable. On plastic, acrylic, polished metal, coated appliances, and glossy finishes, use very light pressure and test first. Even a mild powder can leave fine marks if rubbed too hard.
Baking soda paste is useful when:
- Warm water removed the paper but left sticky glue.
- Oil softened the residue but did not fully lift it.
- A jar or bottle still has cloudy label marks.
- The surface is hard, washable, and not easily scratched.
- Light friction is needed, but harsh scrubbing is too risky.
Suggested paste choices:
| Glue Problem | Paste Mix | Wait Time | Best Surface |
|---|---|---|---|
| Light sticky film | Baking soda + water | 5–10 minutes | Glass, ceramic |
| Gummy jar glue | Baking soda + oil | 10–15 minutes | Glass jars, metal tins |
| Paper label remains | Baking soda + water | 10 minutes | Bottles, jars |
| Plastic residue | Baking soda + water | Test first | Durable hard plastic |
| Thick tape residue | Paste may be weak | Use after softening | Smooth hard surfaces |
Do not use baking soda paste aggressively on acrylic sheets, glossy plastic, car paint, lacquered wood, mirror coatings, soft appliance panels, or polished decorative surfaces. The surface may lose shine before the glue is fully gone. If a test spot turns cloudy, stop immediately and switch to a softer cloth method or a tested adhesive remover.
Baking soda is best for slow household cleanup, especially jars, bottles, and durable kitchen items. For old tape marks, decals, hook adhesive, waxy residue, gum marks, or glue mixed with grease, it may not be strong enough alone. In those cases, use baking soda only as a light finishing method after the residue has been softened properly.
How to Clean Sticker Glue by Surface?
Sticker glue should be cleaned by surface, not by one fixed method. Glass can usually handle soaking, wiping, and gentle scraping. Plastic needs testing because some plastics turn cloudy or scratch easily. Wood needs low moisture because water and oil can stain the finish. Car surfaces need the most care because glass, paint, trim, and interior plastic all react differently.
A safe cleaning method starts with one question: what surface is under the glue? A glass jar can sit in warm water for 20 minutes. A wooden table cannot. A car window may handle heat and a scraper, but car paint should only be cleaned with a tested remover and microfiber cloth. The same sticker glue can be easy on one surface and risky on another.
For most surfaces, the best process is: loosen the sticker glue, lift it gently, then remove the final film. Do not begin with hard scraping. If the glue does not move, it needs more softening, not more force. A plastic scraper, microfiber cloth, warm water, mild soap, hair dryer, and a surface-safe adhesive remover can handle most daily sticker glue problems when used correctly.
Sticker Glue on Glass
Glass is usually the easiest surface for sticker glue removal because it is hard, smooth, and non-porous. The adhesive normally sits on top of the glass instead of soaking in. That makes glass jars, bottles, mirrors, windows, candle holders, glass tabletops, and car windows easier to clean than wood or soft plastic. Still, glass is not always risk-free. Mirrors, tinted glass, coated windows, frosted glass, and decorative glass need gentler handling because the coating may be more delicate than the glass itself.
For small glass items, warm water is often the best first step. Soak jars, bottles, or candle containers in warm soapy water for 10–20 minutes, then peel the label slowly. If the paper breaks apart, rub with a cloth instead of scratching with a blade. For larger glass surfaces, spray the sticky area with warm soapy water or adhesive remover, let it soften, then lift the residue with a plastic scraper.
Useful glass cleaning details:
- Use warm water for paper labels on jars and bottles.
- Use heat for vinyl decals or window stickers before peeling.
- Use a plastic scraper for softened glue, especially on coated or tinted glass.
- Use dish soap after oil or remover to clear the final film.
- Avoid metal blades on mirror edges, tinted windows, frosted glass, and coated glass.
| Glass Surface | Best First Method | Wait Time | Main Risk |
|---|---|---|---|
| Food jar | Warm soapy soak | 10–20 minutes | Paper fibers spreading |
| Candle jar | Warm soak after wax removal | 10–20 minutes | Wax mixing with glue |
| Window | Spray remover or warm cloth | 15 seconds–5 minutes | Streaks or coating damage |
| Mirror | Mild cleaner and cloth | 1–3 minutes | Edge backing damage |
| Car glass | Heat plus remover | 1–5 minutes | Tint film scratches |
| Glass table | Remover and microfiber cloth | 15 seconds–3 minutes | Scraper marks if dry |
For stubborn glass residue, GleamGlee adhesive remover can make the process faster. Spray the glue, wait about 15 seconds for many common sticky marks, then wipe or scrape. This works well for old price labels, tape marks, jar labels, window decals, and sticky film left by protective packaging. After cleaning, wash food-related glass items thoroughly before reuse.
Sticker Glue on Plastic
Plastic is harder to judge than glass because “plastic” can mean many different materials. A storage bin, food container, acrylic sheet, toy, appliance panel, laptop accessory, car trim piece, or cosmetic bottle may all react differently. Some plastics are tough. Some scratch from a fingernail. Some turn cloudy when rubbed with baking soda. Some soften or discolor when exposed to strong cleaners.
Before using any method on plastic, test a hidden area. The goal is to remove the glue without changing the surface. Start with mild soap and a soft cloth. If the glue is fresh, this may be enough. If the sticker is still attached, gentle heat from a hair dryer can help loosen it, but keep the heat moving and use a low setting. Thin plastic can warp quickly if overheated.
A safer plastic cleaning process:
- Test under the item, inside a corner, or near a hidden edge.
- Remove loose sticker pieces first.
- Wipe with warm soapy water using a soft cloth.
- If residue remains, use a small amount of adhesive remover on the glue only.
- Wipe lightly instead of scrubbing hard.
- Wash or dry the surface after cleaning.
| Plastic Surface | Safe Starting Point | Avoid |
|---|---|---|
| Storage bin | Mild soap, plastic scraper | Metal blade |
| Food container | Warm soap, full rinse | Strong solvent smell |
| Acrylic sheet | Soft cloth, tested cleaner | Baking soda rubbing |
| Appliance panel | Test-safe remover | Rough sponge |
| Car interior trim | Microfiber cloth | Harsh solvent |
| Toy surface | Mild soap first | Long soaking near seams |
| Soft-touch plastic | Very gentle test | Oil and strong cleaner |
Oil may help with gummy residue on hard plastic, but it can leave a greasy film. Baking soda paste may remove glue from durable plastic, but it can dull glossy or clear surfaces. Alcohol and strong solvents can damage some plastics, so they should not be used blindly. If the plastic starts looking cloudy, sticky, pale, or rough, stop immediately.
GleamGlee adhesive remover can be used on many hard plastic surfaces after testing. Spray lightly or apply it to a cloth, wait briefly, and wipe the glue with gentle pressure. The included scraper can help on durable plastic, but it should be kept low and flat. On clear acrylic or glossy plastic, cloth wiping is safer than scraping.
Sticker Glue on Wood
Wood needs careful cleaning because it can absorb water, oil, and dissolved glue. Even finished wood may have worn areas, small cracks, open grain, or thin coating. A method that works perfectly on glass can leave a dark mark on wood. Raw wood, painted wood, stained wood, varnished wood, laminate furniture, and wooden desks all need different levels of caution.
The first step is to check the finish. Raw wood should not be soaked. Painted wood can peel if the sticker is pulled too fast. Varnished wood can lose shine from strong rubbing. Laminate can swell at the edges if water gets into seams. For most wood surfaces, gentle heat is safer than liquid soaking. Warm the sticker with a hair dryer on a low setting, then peel slowly with a fingernail or plastic card.
For wood, use less liquid than you think you need. A damp cloth is safer than a wet cloth. If adhesive remover is needed, apply it to a cloth first instead of spraying directly onto the wood. Press the cloth onto the glue briefly, wipe gently, then dry the area right away.
Important wood cleaning points:
- Do not soak wood.
- Avoid oil on raw or lightly finished wood.
- Avoid baking soda paste on glossy wood finishes.
- Avoid metal scrapers.
- Dry the surface immediately after cleaning.
- Test under the table edge, behind a leg, or inside a drawer.
| Wood Type | Main Risk | Better Method |
|---|---|---|
| Raw wood | Dark oil or water stains | Dry peeling, minimal liquid |
| Painted wood | Paint lifting | Gentle heat, slow peel |
| Varnished wood | Dull rub marks | Mild cloth cleaning |
| Laminate wood | Edge swelling | Low moisture |
| Wooden desk | Scratches and shine loss | Plastic card, soft cloth |
| Cabinet surface | Finish damage | Test remover first |
Old price tags on wood can be difficult because the sticker may bond to the finish. Pulling too quickly can lift the finish along with the glue. Heat the sticker, peel slowly, and stop if the surface color comes up. For thick glue that remains, use a tested adhesive remover in tiny amounts. The cleaner should touch the glue, not flood the surrounding wood.
Sticker Glue on Cars
Car sticker glue needs a slower and more controlled method because a car has several surface types. Car glass, painted body panels, bumpers, chrome trim, rubber seals, dashboards, and interior plastic should not be treated the same way. A plastic scraper may be fine on exterior glass but risky on painted body panels. Heat may help remove decals, but too much heat can stress plastic trim or paint.
For car glass, start with gentle heat. Warm the sticker or decal with a hair dryer, lift one corner, and peel slowly at a low angle. If glue stays behind, use adhesive remover and a microfiber cloth. A plastic scraper can help on exterior glass, but avoid scraping tinted film. If the sticker is on the inside of a tinted window, use cloth wiping only unless the tint manufacturer allows scraping.
For car paint, work in the shade and make sure the surface is cool. Wash the area first so dust and grit do not scratch the paint while wiping. Use a tested adhesive remover, apply lightly, and wipe with microfiber. Do not use knives, metal blades, steel wool, rough pads, or harsh solvents on painted panels.
Car surface guide:
| Car Area | Best Method | Avoid |
|---|---|---|
| Exterior glass | Heat, remover, plastic scraper | Scraping tinted film |
| Painted body | Tested remover, microfiber | Metal blade |
| Bumper | Remover and soft cloth | Heavy pressure |
| Interior trim | Mild test, cloth wipe | Strong solvent |
| Dashboard | Light cleaner only | Oil soaking |
| Chrome trim | Soft cloth, tested remover | Abrasive pads |
| Rubber seal | Mild soap first | Solvent soaking |
Old bumper sticker glue is often sun-baked. It may not come off in one pass. Spray, wait, wipe, and repeat. Thick glue may lift in layers, which is normal. Do not keep rubbing the same spot with heavy pressure. If the cloth starts dragging, the adhesive needs more softening.
GleamGlee adhesive remover is useful for car windows, bumpers, hard trim, and suitable painted areas after testing. Its spray helps cover decal residue and tape marks evenly, while the scraper can help on hard smooth surfaces like glass. For paint, use microfiber and light pressure. After removing the glue, wash the area again and dry it so no cleaner remains on the finish.

How to Remove Tough Sticker Glue?
Tough sticker glue usually needs a layered cleaning method. Old labels, tape marks, decals, and hook adhesive often contain thicker glue, aged residue, dust, oil, or foam backing. A quick wipe is rarely enough. The safer method is to remove the loose top layer first, soften the adhesive underneath, lift it slowly, and then clean the final film.
Do not treat stubborn glue as a strength test. Hard rubbing often spreads the residue wider or damages the surface before the glue releases. If sticker glue smears, stretches, or turns cloudy while wiping, it usually means the adhesive has softened but has not fully separated from the surface. Pause, add a little more softening time, then lift again with a cloth or plastic scraper.
A good rule is: thick glue comes off in layers. First remove paper, vinyl, foam, or tape backing. Then work on the sticky base. Finally remove the haze or oily film left behind. This process may take 2–3 passes on old residue, but it usually gives a cleaner finish with fewer scratches, stains, or dull spots.
Old Sticker Glue
Old sticker glue is harder to remove because it has changed over time. A fresh label may peel away in one piece, but a label that has been on a jar, plastic box, appliance, window, or car surface for months can leave a dry yellow film or a sticky gray patch. Heat, sunlight, air, dust, and hand oil all make old glue more stubborn. In kitchens, old label glue often mixes with grease. In garages, it may mix with dust. On car windows, sunlight can bake the adhesive until it feels flat and hard.
Start by removing anything loose. If paper fibers remain, wipe them away with warm soapy water if the surface can handle moisture. If the residue is dry and hard, warm it gently with a hair dryer for 20–40 seconds. Then apply a softening method. For glass and metal, warm water, adhesive remover, or a baking soda paste can work. For plastic, painted surfaces, and car finishes, test first and use light pressure.
A practical old-glue process:
- Remove loose paper, vinyl, or label fragments first.
- Warm the residue gently if the surface allows heat.
- Apply adhesive remover, oil, or warm soap depending on the surface.
- Let the glue soften before wiping.
- Use a plastic scraper at a low angle, not a knife.
- Repeat in thin layers instead of forcing one heavy scrape.
- Wash or wipe the final film after the glue is gone.
| Old Glue Condition | How It Looks | Better Method | Watch Out For |
|---|---|---|---|
| Yellow label film | Flat, dry patch | Remover or paste | Dull plastic |
| Gray sticky mark | Dust stuck in glue | Remover, then soap wipe | Smearing |
| Paper-glue mix | Rough and wet-looking | Warm water first | Surface swelling |
| Sun-baked glue | Hard, thin layer | Heat plus remover | Paint damage |
| Greasy residue | Slick and sticky | Degreasing soap, remover | Oily film |
For many hard surfaces, GleamGlee adhesive remover can shorten the work because it is designed to soften stubborn label glue, tape residue, waxy marks, gum residue, and sticky buildup. Spray the residue, wait about 15 seconds for many common marks, then wipe or scrape. If the glue is very old, repeat once rather than rubbing harder.
Tape Sticker Glue
Tape sticker glue can be more annoying than a normal price tag because tape leaves long, narrow adhesive lines. Packing tape, masking tape, duct tape, double-sided tape, and mounting tape all behave differently. Thin tape residue may smear like oil. Duct tape can leave thick rubbery glue. Double-sided tape may leave a raised adhesive strip that needs to be lifted in pieces.
The first step is to judge the thickness. If the tape residue is only a thin film, a cloth and adhesive remover may be enough. If it is thick, remove the bulk first with a plastic scraper or by rolling it with your finger. Do not spread cleaner over a thick foam or rubber layer before lifting the top material; the cleaner may not reach the adhesive underneath. Once the top layer is gone, treat the sticky base.
Tape residue often appears on desks, windows, whiteboards, plastic boxes, appliances, file folders, moving boxes, car glass, and bumpers. Whiteboards need extra care because rough scrubbing can damage the writing surface and make marker stains harder to erase later. Plastic boxes also need testing because aggressive rubbing may leave shiny or cloudy patches.
Tape glue removal guide:
| Tape Type | Residue Feel | Better Cleaning Move | Risk |
|---|---|---|---|
| Clear packing tape | Smooth sticky line | Remover and cloth | Smearing |
| Masking tape | Dry paper-glue mix | Warm water if safe | Paper spreading |
| Duct tape | Thick rubbery glue | Scraper plus remover | Surface scratches |
| Double-sided tape | Raised sticky strip | Lift in layers | Glue stretching |
| Mounting tape | Foam plus adhesive | Remove foam first | Paint lifting |
| Craft tape | Light residue | Mild soap or oil | Surface dulling |
For long tape marks, wipe in one direction instead of rubbing in wide circles. Circular rubbing can spread softened glue outside the original line. If the cloth becomes sticky, fold to a clean side. A dirty cloth will drag glue back across the surface.
On hard suitable surfaces, GleamGlee adhesive remover works well for tape marks because the spray can cover the long glue line evenly. Spray along the residue, wait briefly, then wipe with a microfiber cloth. For thicker tape glue, use the included scraper after the adhesive has softened. Finish with a mild soap wipe if the surface is washable.
Decal Sticker Glue
Decal sticker glue is often tougher because decals are made to last longer than ordinary labels. Vinyl decals, window graphics, car decals, inspection stickers, wall decals, brand labels, and protective films usually use stronger adhesive. When the decal is peeled away, a clear film, cloudy outline, or rubbery residue may remain. The older the decal, the more likely the glue has been affected by sunlight and heat.
Heat is usually the best first step when the decal is still attached. Warm one corner with a hair dryer, lift the edge, and pull slowly at a low angle. Do not pull straight up. A low angle helps the adhesive stay attached to the decal backing, so less glue remains. If the decal tears, stop and warm the next section before peeling again.
After the decal is removed, treat the remaining glue based on the surface. Glass can usually handle adhesive remover and a plastic scraper. Car paint needs a tested remover and microfiber cloth. Acrylic signs need very light pressure because they can cloud. Painted walls are risky because wall decals may pull paint, especially if the paint is matte, old, or poorly bonded.
Decal residue guide:
| Decal Location | Common Problem | Better Method | Avoid |
|---|---|---|---|
| Car window | Clear glue film | Heat, remover, scraper | Scraping tint |
| Car paint | Decal outline | Tested remover, cloth | Metal tools |
| Home window | Cloudy patch | Remover, plastic scraper | Dry scraping |
| Painted wall | Paint lifting | Gentle heat, slow peel | Soaking |
| Acrylic sheet | Protective film glue | Soft cloth, tested cleaner | Abrasive paste |
| Laptop shell | Sticker shadow | Test cleaner first | Strong solvent |
Sometimes, a “decal shadow” remains after the glue is gone. That mark may not be adhesive. It may be a color difference caused by sunlight, dust, or cleaning exposure around the decal. Removing glue can make the surface smooth again, but it may not always erase long-term fading or discoloration.
For stubborn decal glue, work in small sections. Spray or apply remover to one area, wipe, then move to the next area. On vertical glass or car surfaces, avoid over-spraying. Use enough product to wet the glue, not enough to run into seals, cracks, or trim.
Hook Sticker Glue
Hook sticker glue is one of the toughest sticky residues because many removable hooks use foam pads or thick mounting adhesive. When the hook is pulled off incorrectly, the foam may tear and leave a raised patch behind. This residue can be rubbery, stretchy, or strongly bonded to the wall, tile, glass, cabinet, or door. The biggest risk is not only leftover glue; it is pulling off paint, finish, or surface coating during removal.
If the hook has a pull tab, stretch the tab slowly along the surface rather than pulling outward. Pulling outward can tear paint or lift coating. If the tab breaks, warm the pad gently with a hair dryer. Then use dental floss, fishing line, or a plastic card to work behind the foam pad. The goal is to separate the pad from the surface without gouging it.
Once the thick foam is removed, treat the remaining adhesive. On glass, tile, metal, and other hard smooth surfaces, adhesive remover and a plastic scraper can work well. On painted walls and wood, use very little liquid and test first. Spray onto a cloth instead of directly onto the surface. Hold the cloth against the glue briefly, then wipe lightly.
Hook residue removal steps:
- Remove the hook body first.
- Stretch the pull tab slowly if it is still attached.
- If the tab breaks, warm the pad gently.
- Cut behind the foam with dental floss if needed.
- Remove the foam layer before treating the glue.
- Apply remover only to the remaining sticky patch.
- Wipe gently and dry the area.
| Surface Under Hook | Risk Level | Safer Method |
|---|---|---|
| Glass | Low | Remover and plastic scraper |
| Tile | Low to medium | Remover, cloth, scraper |
| Metal door | Medium | Test finish first |
| Painted wall | High | Heat, slow removal, little liquid |
| Wood cabinet | High | Test, avoid soaking |
| Plastic panel | Medium | Test cleaner first |
Do not attack hook adhesive with a knife. It can cut into wood, scratch tile glaze, gouge plastic, or leave shiny marks on painted walls. Thick hook glue should be removed in stages: foam first, adhesive second, final film last.
For suitable hard surfaces, GleamGlee adhesive remover can help soften the remaining hook glue after the foam pad is removed. The spray gives even coverage, and the scraper helps lift softened adhesive with less effort. On painted or delicate surfaces, use a cloth application and short contact time. The surface matters more than the glue, so test before treating a visible area.
Is Sticker Glue Removal Safe?
Sticker glue removal is safe when the cleaning method is matched to the surface. Most damage happens when people rush: scraping dry glue, using a metal blade on plastic, soaking wood, overheating thin surfaces, or applying strong cleaners without testing. The sticker residue may look like the main problem, but the surface underneath is usually what needs the most protection.
A safe removal process should feel controlled. The glue should soften before it is lifted. The tool should slide under the residue, not dig into the surface. The cleaner should stay on the sticky area, not flood seams, coatings, or porous materials. If the surface changes color, becomes cloudy, feels tacky, or loses shine, stop and switch to a gentler method.
The safest order is simple: test first, soften slowly, use light pressure, and clean the final film. This matters on plastic containers, acrylic sheets, wood furniture, car paint, appliance panels, mirrors, whiteboards, and painted walls. On glass jars or metal tins, the risk is lower. On valuable, coated, painted, or soft surfaces, patience prevents permanent marks.
Test Sticker Glue First
Testing is the easiest way to avoid damage, especially when the surface is plastic, painted, coated, wooden, acrylic, or part of a car. Many surfaces look stronger than they are. A glossy plastic storage box can turn cloudy after rough rubbing. A painted wall can lose color when a hook pad is removed. A wooden desk can darken after oil touches the finish. A car trim piece can discolor if the wrong cleaner sits too long. Testing tells you whether the surface can handle the method before the visible area is affected.
A good test only takes a few minutes. Choose a hidden spot such as the underside of a container, the back edge of a desk, the inside of a drawer, the lower corner of a car trim panel, or a small area behind the object. Apply the same cleaner or method you plan to use on the real sticker glue. Wait briefly, wipe dry, then inspect the surface under light from different angles.
Check for these warning signs during the test:
- Color becomes lighter, darker, or uneven.
- Glossy surface turns dull.
- Plastic looks cloudy or feels rough.
- Paint feels soft, sticky, or starts lifting.
- Wood absorbs liquid and forms a dark patch.
- Printed logos or surface coating rub off.
- Cleaner leaves a film that does not wash away.
| Surface | Test Area | Watch For | Safer Contact Time |
|---|---|---|---|
| Glass | Corner or edge | Coating or tint damage | 1–2 minutes |
| Hard plastic | Underside or back edge | Clouding, dulling | 2–5 minutes |
| Acrylic | Small hidden corner | Fine scratches, haze | 1–2 minutes |
| Finished wood | Under edge or drawer area | Stain, dull finish | 3–5 minutes |
| Car paint | Low hidden panel edge | Haze, color change | 1–3 minutes |
| Interior trim | Lower trim corner | Discoloration | 2–5 minutes |
| Painted wall | Behind furniture | Paint lifting | 3–5 minutes |
Testing is especially important when using oil, alcohol, baking soda paste, adhesive remover, or heat. Warm water may look harmless, but it can swell wood and damage paper labels. Oil can loosen glue, but it can also stain porous surfaces. Baking soda can lift residue, but it can dull glossy plastic. Heat can soften decals, but it can warp thin plastic or stress paint.
For GleamGlee adhesive remover, testing is still recommended, even though it is made for many hard surfaces such as glass, metal, plastic, wood, car surfaces, windows, tables, counters, tools, and other hard household areas. Spray a small amount on a hidden spot or apply it with a cloth, wait briefly, then wipe dry. If the surface looks unchanged, move to the visible residue area with light pressure.
Avoid Sticker Glue Scratches
Scratches usually happen before the glue is ready to move. Dry sticker glue can feel tough, so people often reach for knives, metal blades, rough sponges, steel wool, or hard brushes. These tools may remove residue, but they can also leave permanent lines on plastic, acrylic, appliance panels, car paint, mirrors, whiteboards, and coated glass. Once the surface is scratched, cleaning the glue no longer solves the full problem.
The safer rule is to soften first and scrape second. If the glue is still hard, sticky, rubbery, or dragging under the tool, it needs more softening time. A plastic scraper, old plastic card, microfiber cloth, or soft sponge is usually enough after the adhesive has loosened. The tool should move smoothly. If it skips, squeaks, or catches, pause and re-soften the glue.
Use the scraper at a low angle. A flat scraper edge slides under softened residue. A steep angle digs into the surface. Work slowly from the outside edge of the glue toward the center. Keep the scraper clean while working; sticky buildup on the scraper edge can drag grit across the surface and create fine scratches.
| Tool | Good Use | Risky Use |
|---|---|---|
| Microfiber cloth | Final wiping and soft rubbing | Heavy dry glue removal |
| Plastic scraper | Softened residue lifting | Pressing into soft coatings |
| Old plastic card | Small sticker edges | Hot or delicate surfaces |
| Soft sponge | Soap cleanup | Scrubbing glossy acrylic |
| Metal blade | Plain uncoated glass only | Plastic, paint, tint, mirror |
| Steel wool | Rarely needed | Most household surfaces |
| Knife | Not recommended | Wood, plastic, car surfaces |
A few practical habits reduce scratch risk immediately:
- Wipe away dust or grit before rubbing.
- Fold the cloth often so a clean section touches the surface.
- Use short strokes instead of wide aggressive circles.
- Keep pressure light on plastic, acrylic, and paint.
- Never use a blade on car paint, interior trim, or plastic panels.
- Do not use baking soda paste on clear acrylic or glossy plastic unless tested.
Scratches can be hard to see at first. A surface may look clean indoors but show marks under sunlight or side lighting. Car paint may show swirl marks later. Acrylic may look cloudy after drying. Whiteboards may start staining where the surface was scratched. That is why a slower method often gives a cleaner result than a fast scrape.
For tough glue on hard suitable surfaces, GleamGlee adhesive remover helps reduce heavy scraping. The spray softens sticky residue, while the scraper helps lift it after softening. The scraper should still be used gently, especially on plastic, car surfaces, painted finishes, and coated materials.
Prevent Sticker Glue Stains
Sticker glue stains often come from the cleaning method rather than the sticker itself. Oil can leave dark patches on wood. Too much water can swell raw wood or damage paper packaging. Alcohol can dull some coatings. Baking soda paste can leave pale rub marks on glossy plastic. Strong cleaners can discolor painted or soft-touch surfaces. Even a dirty cloth can smear old glue and grease into a wider stain.
Before choosing a method, think about whether the surface can absorb liquid. Glass, glazed ceramic, stainless steel, and many hard plastics are non-porous, so they are easier to clean. Raw wood, fabric, paper, cardboard, unsealed stone, matte paint, and some textured plastics can absorb oil, water, cleaner, or dissolved glue. Once absorbed, the stain may be harder to fix than the original sticky spot.
Use less product at first. Thick glue needs contact time, not flooding. Wet the residue enough to soften it, then let the method work. On vertical surfaces, spray onto a cloth and hold it against the glue instead of spraying so much that the cleaner runs into seams, cracks, edges, or trim.
| Cleaning Method | Stain Risk | Better Surface Choice |
|---|---|---|
| Warm water | Swelling, water marks | Glass, ceramic, metal |
| Oil | Dark stains, greasy film | Glass, metal, hard plastic |
| Baking soda paste | Dull or pale rub marks | Durable glass, ceramic |
| Alcohol | Finish dulling | Tested hard surfaces only |
| Strong solvent | Discoloration | Avoid unless surface-approved |
| Adhesive remover | Surface reaction if untested | Tested hard surfaces |
A clean finish depends on the last wipe. After the visible glue is gone, the surface may still have a thin film of oil, softened adhesive, or cleaner. If that film stays, the area may attract dust again or feel slippery. Wash washable surfaces with mild dish soap and water. On wood, painted surfaces, and car interiors, use a lightly damp cloth and dry immediately. On car paint and exterior trim, wipe the area clean and avoid leaving residue under direct sun.
For food-related items such as glass jars, plastic containers, metal tins, and kitchen tools, always wash thoroughly after using oil, paste, or adhesive remover. The goal is not only to remove the sticker glue, but also to leave the surface clean enough for normal use.
Stain prevention is about control: small amount, short contact, gentle wiping, and a final clean cloth. If the stain risk is high, start with a hidden-area test and use the mildest method that works.
Stop Sticker Glue Damage
Sticker glue damage usually happens when the surface is weaker than expected. The glue may be stuck firmly, but the coating, paint, plastic, or finish may be easier to damage than the adhesive. Pulling too fast can lift wall paint. Scraping too hard can mark plastic. Soaking too long can swell wood. Heating too much can warp thin material. Using a strong cleaner without testing can dull or discolor the finish.
The safest way to stop damage is to notice warning signs early. If the cloth picks up surface color, stop. If plastic turns cloudy, stop. If paint feels soft, stop. If wood darkens, stop. If the scraper leaves lines, stop. Continuing usually makes the damage worse, while pausing gives you a chance to change method.
A damage-control guide:
| Warning Sign | What It Means | What to Do |
|---|---|---|
| Surface color transfers to cloth | Paint or coating is lifting | Stop and use gentler method |
| Plastic turns cloudy | Surface is reacting or scratched | Stop rubbing |
| Wood darkens | Liquid or oil is absorbing | Dry immediately |
| Paint feels tacky | Cleaner is softening finish | Wipe off and stop |
| Glue smears wider | Residue is softened but not lifted | Add dwell time, reduce rubbing |
| Scraper leaves lines | Pressure or angle is wrong | Re-soften and use cloth |
| Surface loses shine | Abrasion or cleaner reaction | Stop and inspect |
Some marks are not glue damage. A decal or sticker that stayed in place for years may leave a shadow because the covered area aged differently from the exposed area. On cars, windows, plastic bins, and painted surfaces, the surrounding area may fade, collect dust, or oxidize while the covered area remains protected. Removing the glue can make the surface smooth, but it may not fully remove the color difference.
For delicate surfaces, use a slower plan:
- Work in small sections.
- Use short contact time.
- Apply cleaner with a cloth instead of direct spraying.
- Use microfiber instead of rough pads.
- Keep the surface cool and out of direct sun.
- Repeat light passes instead of one aggressive pass.
- Finish by drying and checking the area under good light.
GleamGlee adhesive remover is useful for many tough sticky residues because it is made for sticker glue, label glue, tape marks, silicone traces, wax residue, gum residue, grease, and other sticky messes. Its spray bottle gives even coverage, and the included scraper helps lift softened residue from suitable hard surfaces. Still, no remover should be used blindly on every surface. Testing, light pressure, and proper finishing are what make sticker glue removal safe.
Why GleamGlee for Sticker Glue?
GleamGlee adhesive remover is made for the sticky problems that normal wiping often cannot finish: sticker glue, label residue, tape marks, decal glue, hook adhesive, waxy residue, gum marks, light silicone traces, and glue mixed with dust or grease. It is useful for glass jars, windows, plastic storage boxes, desks, kitchen counters, tools, car glass, bumpers, hard trim, and many other hard household surfaces. The main value is control: spray the residue, wait briefly, then wipe or lift the softened glue with less scraping.
For daily cleaning, the product is designed to save time without making the process complicated. Many common sticky marks can be treated with a spray, about 15 seconds of waiting, and a cloth or scraper. The spray bottle helps cover the glue evenly, while the included scraper gives better control on thicker residue. For delicate surfaces such as painted wood, car paint, acrylic, coated plastic, or interior trim, a hidden-area test should still come first.
Fast Sticker Glue Removal
Fast sticker glue removal matters because most sticky residue jobs happen during normal life, not during a planned cleaning project. A jar needs to be reused. A price tag must come off a gift. A tape line is left on a desk. A decal has been peeled from a car window. A storage box needs a new label, but the old one leaves a gray patch. In these moments, warm water, oil, and baking soda can work, but they often take longer and may require repeated rubbing.
GleamGlee adhesive remover is designed to soften sticky residue quickly on suitable hard surfaces. For many common marks, the process is easy to remember: spray, wait about 15 seconds, then wipe or scrape. This short waiting time helps reduce the urge to scrape hard while the glue is still dry. Less dry scraping means less risk of surface scratches, especially on glass, plastic, desks, tools, and car glass.
Common fast-cleaning situations include:
- Removing price tag glue before gifting an item.
- Cleaning label residue from glass jars before reuse.
- Removing tape marks from desks, folders, and whiteboards.
- Cleaning decal glue from car windows.
- Removing barcode stickers from plastic containers.
- Lifting old sticky patches from tools or storage boxes.
| Method | Usual Waiting Time | Best Use | Extra Work Needed |
|---|---|---|---|
| Warm water | 10–20 minutes | Paper labels on jars | Drying and re-washing |
| Oil | 5–15 minutes | Gummy residue on glass or metal | Dish soap finish |
| Baking soda paste | 10–20 minutes | Jar residue and light film | Rinsing paste |
| Heat | 1–5 minutes per area | Sticker peeling and decals | Residue cleaning after |
| GleamGlee remover | About 15 seconds for many marks | Sticky residue on hard surfaces | Wipe or scrape finish |
Fast does not mean careless. Thick hook adhesive, old bumper sticker glue, or tape residue baked by heat may still need more than one pass. The better approach is to repeat light applications rather than scrape harder. Spray, wait, lift, wipe, and check the surface. If glue remains, repeat the process in a smaller area.
Clean Sticker Glue Finish
A clean finish is the part people care about most after the sticker is gone. The surface should not feel greasy, dusty, cloudy, or sticky. Many household methods remove some glue but leave another problem behind. Oil can leave a slippery film. Baking soda can leave powder in corners. Warm water may leave paper fibers. Hard rubbing can leave dull patches on plastic. Sticker glue that is only half removed can attract dust again within a few days.
GleamGlee adhesive remover is made to soften and break down sticky residue so it can be wiped away more cleanly. On suitable hard surfaces, it helps reduce repeated rubbing and makes the final wipe easier. This matters on visible surfaces such as windows, mirrors, car glass, desks, counters, storage bins, appliance surfaces, and tools. A surface that feels smooth after cleaning is less likely to collect dust or leave a sticky outline.
A better finish usually comes from three small habits:
- Remove loose sticker pieces before spraying.
- Wipe with a clean cloth after the glue softens.
- Wash or dry the surface after the residue is gone.
| Surface | Desired Finish | Common Problem | Better Final Step |
|---|---|---|---|
| Glass jar | Clear and reusable | Label haze | Wash with dish soap |
| Window | No streaks | Tape film | Dry microfiber wipe |
| Plastic bin | Smooth for relabeling | Old sticky rectangle | Mild soap wipe |
| Desk | Clean hand-touch area | Dust stuck in glue | Damp cloth, then dry |
| Car glass | Clear visibility | Decal residue | Microfiber finish |
| Countertop | No sticky feel | Glue mixed with grease | Soap wipe |
| Tool surface | Clean grip | Price tag glue | Dry cloth finish |
For food-related items, always wash after using any adhesive remover. For car surfaces, clean the treated area again so dissolved adhesive and cleaner do not sit on the finish. For office items or storage boxes, let the surface dry before applying a new label. If a new label is applied over cleaner film, it may wrinkle, slide, or peel early.
A clean finish is not only about appearance. It affects how the item works afterward. A jar can be reused neatly. A window looks clearer. A storage bin can accept a fresh label. A desk feels clean under the hand. That is the difference between “the sticker is gone” and “the surface is actually clean.”
Easy Sticker Glue Spray
The spray design makes sticker glue removal easier because it puts the product where the glue is. Pouring liquid onto a cloth can use too much product. Soaking an item may be impossible if the surface is large, vertical, wooden, painted, or attached to something else. A spray bottle helps cover the adhesive area evenly without flooding the whole surface. This is especially useful for tape lines, decal glue, hook residue, label patches, and sticky marks on windows, counters, desks, and car surfaces.
GleamGlee adhesive remover also comes with a scraper, which helps when the residue is thicker than a thin film. The spray softens the glue; the scraper lifts it. This combination is helpful for old labels, double-sided tape, hook adhesive, vinyl residue, and stubborn glue that does not wipe away immediately. The scraper should be used low and flat, not straight down into the surface.
Best spray-use habits:
- Spray only enough to wet the sticky area.
- On delicate surfaces, spray onto a cloth first.
- Let the product sit briefly before wiping.
- Use the scraper only after the glue has softened.
- Keep the scraper edge clean while working.
- Wipe the surface again after residue is removed.
| Residue Type | Spray Amount | Scraper Use | Notes |
|---|---|---|---|
| Thin label film | Light spray | Usually not needed | Cloth may be enough |
| Tape line | Even spray along the mark | Sometimes useful | Wipe in one direction |
| Decal glue | Light to medium spray | Useful on glass | Test on paint |
| Hook residue | Spray after foam removal | Helpful on hard surfaces | Avoid digging |
| Wax residue | Remove bulk first | Light scraping | Finish with cloth |
| Gum mark | Remove main gum first | Helpful after softening | Repeat if needed |
For vertical surfaces, control matters. Spray lightly and avoid runoff into seams, trim, mirror edges, wall cracks, or car panel gaps. If the glue is on wood, painted wall, car paint, or coated plastic, applying the remover to a cloth first gives more control than direct spraying.
The spray and scraper design is practical because sticker glue rarely appears in one perfect flat spot. It can be on a curved bottle, a window corner, a desk edge, a plastic bin, a car bumper, or a tool handle. A controlled spray and a small scraper make it easier to work on these real surfaces without using random sharp tools.
Daily Sticker Glue Use
Sticker glue removal is a repeat problem in homes, cars, offices, schools, workshops, kitchens, and craft rooms. It appears after shopping, shipping, decorating, organizing, moving, repairing, reselling, and cleaning. A product that only works for one type of label is not enough for daily use. GleamGlee adhesive remover is built for many common sticky messes, from light label film to thicker tape marks and hook residue on suitable hard surfaces.
In a household, it can be used after peeling labels from jars, bottles, containers, storage boxes, mirrors, windows, desks, counters, and appliances. In a car, it can help with sticker residue on glass, bumper areas, body surfaces after testing, and hard interior trim. In an office or school setting, it can clean file folders, whiteboards, plastic trays, rulers, desks, and tape marks left from signs or labels.
Daily-use examples:
| Area | Common Sticky Problem | How GleamGlee Helps |
|---|---|---|
| Kitchen | Jar labels, barcode stickers | Softens glue for easier wiping |
| Home storage | Old labels on bins | Prepares surface for new labels |
| Office | Tape marks, name tags | Cleans desks and folders |
| School | Sticker marks on supplies | Removes glue from hard plastic items |
| Car care | Decals, bumper sticker residue | Helps lift adhesive after peeling |
| Craft room | Glue dots, tape residue | Cleans work surfaces and tools |
| Packaging | Price labels, gift stickers | Removes sticky marks before reuse |
For daily use, safety still depends on good habits. Test first. Use light pressure. Keep cleaner away from surfaces that may absorb liquid. Do not use sharp blades on plastic, paint, wood, or car surfaces. Wash food-contact items after cleaning. These small steps make the product more reliable in real cleaning situations.
GleamGlee is also suitable for people who want one cleaner for several sticky jobs instead of keeping separate products for jars, tape, decals, gum, wax, and hook adhesive. It keeps the process simple: soften the residue, lift it carefully, and wipe the surface clean. That is what most people need when sticker glue turns a small task into an annoying mess.
Conclusion
Sticker glue removal is easier when the surface is treated with care. Warm water, heat, oil, and baking soda paste all have a place, but none of them should be used blindly. Glass can handle more moisture. Plastic needs testing. Wood needs low liquid and gentle pressure. Car surfaces need extra patience. The safest process is always the same: soften the glue, lift it carefully, clean the final film, and inspect the surface before applying more force.
For old labels, tape marks, decals, hook residue, waxy buildup, gum marks, and stubborn sticky messes, a dedicated adhesive remover can make the job faster and cleaner. GleamGlee adhesive remover is designed for daily household cleaning, car care, office cleanup, packaging residue, DIY work, and many hard-surface sticky problems. Its spray bottle helps cover the glue evenly, while the scraper helps lift softened residue with better control.
GleamGlee welcomes customers who want to order branded adhesive remover products, add sticky residue remover to an online store, build a private-label cleaning line, or customize packaging and formula for a specific market. With R&D support, multi-language label design, mature production, compliance-focused packaging, overseas warehouse resources, and flexible customization, GleamGlee can support both direct product orders and B2B adhesive remover inquiries for Amazon sellers, retailers, distributors, Shopify brands, and cleaning product companies.


