 Skip to content
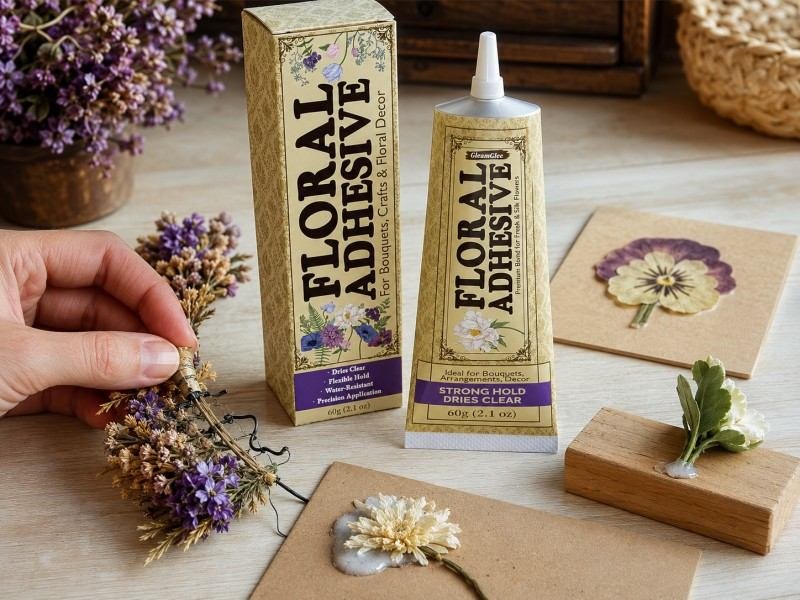
A flower can look perfectly positioned on a worktable and still loosen during refrigeration, transport, or normal wear. When that happens, the adhesive is often blamed first, but bond failure usually develops from several smaller problems working together. A damp stem, an oversized glue bead, a smooth plastic base, poor weight distribution, or insufficient drying time can turn a promising design into a last-minute repair.
Floral adhesive is most dependable when it is treated as part of a complete design process rather than a shortcut. Fresh flowers must remain hydrated, yet the exact bonding point needs to be clean and dry. The adhesive should match the flower and base material, while its quantity, tack stage, placement angle, and drying conditions must be controlled.
To apply floral adhesive correctly, prepare clean and dry bonding points, test delicate flowers, apply a thin layer to the flower, base, or both surfaces as instructed, wait for useful tack, position the flower without sliding, hold it gently, and allow the finished design to dry before refrigeration, packaging, transport, or wear.
The difference becomes obvious during real event work. Forty wrist corsages may leave the studio looking identical, but a few can fail later if condensation formed on flowers taken directly from refrigerated storage. Careful preparation prevents that problem before the adhesive container is even opened.
What Is Floral Adhesive and When Should You Use It?
Floral adhesive is a specialized bonding product used to attach fresh flowers, artificial flowers, foliage, ribbon, wrapped wire, and lightweight decorative elements. It is most useful when a design needs discreet attachment points without excessive wiring or taping. Corsages, boutonnieres, flower crowns, floral jewelry, wreath details, and small centerpiece accents are common applications.
How Floral Adhesive Works
Floral work brings together materials that behave very differently from one another. A fresh stem may contain moisture, sap, natural wax, or conditioning residue, while satin ribbon absorbs liquid and smooth plastic provides little surface grip. Successful bonding depends on the compatibility of the complete material pair, not simply the advertised strength of the adhesive.
Cold floral adhesive is commonly chosen for delicate floral work because it can be applied without the high temperature associated with a glue gun. That makes it practical around fresh petals, foliage, ribbon, tulle, decorative fabrics, and lightweight accessories. However, a room-temperature application does not guarantee compatibility with every flower variety. Pale petals, orchids, dyed flowers, preserved greenery, and unfamiliar materials should always be tested before production.
A suitable adhesive should create a controlled bond without adding unnecessary bulk, weight, stiffness, or visible residue. The finished joint should support the flower while remaining discreet from the front, side, and back. A thick transparent bead may still look obvious because it catches light, darkens fabric, or creates a raised glossy edge.
Where It Works Best
Floral adhesive performs particularly well when traditional wire-and-tape construction would make the finished design heavy, bulky, or visually distracting. Wearable flowers benefit from this approach because customers expect corsages, boutonnieres, crowns, and floral jewelry to remain attractive without feeling stiff or uncomfortable.
Typical uses include:
- Attaching small blooms to wristlets
- Securing compact boutonniere flowers
- Filling gaps in flower crowns
- Adding foliage to wrapped wire
- Fixing decorative ribbon details
- Positioning accents in bouquets
- Attaching artificial flowers to wreaths
- Finishing small centerpiece details
- Bonding lightweight floral jewelry
- Securing flowers to reinforced fabric bases
The best attachment point is usually firm, concealed, and close to the design’s center of support. A flower placed far from the base creates leverage, meaning a small amount of movement places much greater stress on the bond. Shorter, balanced positioning often improves reliability more effectively than adding more adhesive.
When Other Methods Are Better
Floral adhesive should not replace structural mechanics where weight, wind, gravity, repeated bending, or overhead safety are involved. Wire, floral tape, pins, clips, cable ties, clamps, foam systems, grids, frames, and other supports remain essential in professional floral construction.
Wire is useful when a weak stem needs reinforcement or a flower must hold a specific angle. Floral tape binds components and covers mechanics. Pins or magnets secure boutonnieres to clothing. Frames, clamps, and cable ties carry the load of arches, suspended installations, outdoor displays, and large decorative structures.
A practical decision begins with the consequence of failure. A loose filler flower on a table wreath may be inconvenient, but a heavy hanging component above guests creates a serious risk. Adhesive can stabilize or finish a well-supported installation, but it should never be expected to carry a load that requires mechanical engineering.
| Floral Application | Main Role of Adhesive | Additional Support Often Needed |
|---|---|---|
| Wrist corsage | Attach small flowers and foliage | Wristlet, ribbon, wrapped wire |
| Boutonniere | Secure compact floral components | Pin, magnet, or backing |
| Flower crown | Add blooms to a flexible base | Wrapped wire, tape, or headband |
| Centerpiece | Attach lightweight finishing details | Container, foam, grid, or wire |
| Artificial wreath | Bond flowers and ornaments | Picks or wire for heavier pieces |
| Large installation | Finish selected decorative areas | Frame, clamps, ties, or cable |
Fresh, Dried, and Artificial Materials
Fresh flowers require proper hydration, but the area receiving adhesive must be free from visible water, condensation, sap, and surface contamination. A flower can be well conditioned internally while still presenting a dry and suitable attachment point. Confusing hydration with a wet bond surface is one of the most common reasons for unreliable results.
Artificial flowers introduce a different set of challenges. Their construction may include polyester petals, molded plastic sockets, foam centers, coated wire, painted stems, and decorative finishes. A formula that bonds a fresh carnation stem may not grip a glossy plastic flower base with the same reliability.
Dried flowers can be brittle, so an extremely rigid joint may transfer movement into the stem and cause it to break beside the bond. Preserved flowers may carry oils, dyes, or softening treatments that affect adhesion. Testing the exact flower, base, adhesive, storage condition, and holding period remains more reliable than a broad claim that a product works on all floral materials.
Which Floral Adhesive, Flowers, and Tools Do You Need?
Choose floral adhesive by matching the formula to the flower type, bonding surface, working time, cured flexibility, finish, environmental exposure, and expected movement. Prepare the exact materials used in the project and assemble a clean tool kit with a precision applicator, sharp shears, tweezers, wire, floral tape, protective materials, labels, and a stable drying tray.
Choosing the Right Formula
Begin with the materials rather than the product name. Floral adhesives may be designed for fresh flowers, artificial flowers, ribbon, foam, decorative accessories, or general floral craft work. Products grouped under the same category can differ in viscosity, tack speed, flexibility, solvent system, application method, and surface compatibility.
A thin adhesive may spread easily across fabric but run into visible petals. A thicker formula may stay where placed but require more dispensing pressure and create heavier deposits. Fast initial tack can improve production speed during repetitive corsage assembly, while a longer working time may be more useful for detailed headpieces requiring careful alignment.
Important selection points include:
- Fresh, dried, preserved, or artificial flower compatibility
- Porous or nonporous bonding surfaces
- Thin, medium, or thick viscosity
- Initial tack and open working time
- Handling strength and full cure
- Clear or discreet finish
- Flexibility after curing
- Cooler and humidity exposure
- Nozzle precision and dispensing force
- Container sealing and storage stability
A strong formula is not commercially useful when customers cannot apply it cleanly. Precision, predictable flow, and manageable working time influence customer satisfaction as much as final bond strength.
Testing Flowers Before Production
Test the most sensitive, expensive, pale, dyed, preserved, or unfamiliar flowers first. White and cream petals reveal staining more easily than dark blooms. Soft greenery may curl or collapse, while waxy foliage can resist bonding. Succulents, latex-producing stems, and freshly cut botanical materials may release moisture or sap that interferes with the joint.
A useful test compares several controlled samples rather than relying on one successful bond. Prepare at least three repeats for each critical material pair and use the same flower variety, adhesive batch, base, preparation method, and storage conditions planned for the finished order.
Suggested test points include:
- A light application to identify the minimum useful amount
- A normal application based on the product instructions
- A heavier application to reveal staining or slow drying
- A room-temperature sample
- A sample exposed to intended cooler conditions
- A sample subjected to simulated transport movement
Inspect each piece after initial setting, after several hours, after cooling when relevant, and after normal handling. Record movement, residue, odor, discoloration, softening, brittleness, and material separation.
Essential Tools
A tidy workstation reduces contamination, waste, and rushed decisions. The core tools should be positioned before adhesive is opened so flowers can be placed while the formula remains within its useful working stage.
Useful tools include:
- Floral adhesive in its original labeled container
- Precision dispensing nozzle
- Sharp floral shears
- Floral knife
- Fine tweezers
- Disposable plastic palette
- Protective work mat
- Paper towels
- Floral wire
- Floral tape
- Nitrile gloves when required
- Timer
- Sample labels
- Rigid drying tray
- Small waste container
Sharp shears produce cleaner cuts and reduce crushed plant tissue. Tweezers allow controlled placement without pressing fingers into adhesive. A rigid tray keeps finished designs level and prevents them from touching one another during drying.
When palette application is permitted, dispense only a small working amount. Large exposed puddles can thicken, collect debris, or become difficult to control. Replace a partly dried amount rather than forcing flowers into adhesive that has passed its intended working stage.
Safety and Storage
Read the label and available safety documentation before use. Ventilation, protective equipment, storage temperatures, flammability controls, first-aid measures, and disposal procedures depend on the formula. A product with low odor may still require airflow, and a transparent finish does not mean the uncured adhesive is suitable for skin contact.
Keep the adhesive in its original container. Do not transfer it into an unmarked bottle, especially in a studio where several liquids may be present. Clean the nozzle after each working session, replace the cap tightly, and follow the specified storage orientation.
Commercial teams should record the opening date and batch identification. Changes in viscosity, color, odor, separation, stringing, or dispensing pressure may indicate contamination, aging, or poor storage. A noticeably altered product should be retested before it is used on valuable event work.

How Do You Prepare Flowers and Bonding Surfaces?
Condition fresh flowers properly while keeping the exact bonding areas clean and dry. Remove condensation, sap, dust, oils, and loose material, then trim stems to create stable contact points. Dry-position the entire arrangement before gluing and allow refrigerated materials to acclimate under suitable conditions. Careful preparation reduces staining, sliding, visible residue, and premature bond failure.
Conditioning and Surface Dryness
Fresh flowers should be hydrated according to the needs of the variety before they are shortened for wearable designs or decorative work. Good conditioning supports appearance and longevity, but the point receiving adhesive must remain free from visible moisture.
Flowers removed from refrigerated storage can develop a fine layer of condensation as they enter a warmer room. The moisture may be difficult to see, especially on pale stems, smooth leaves, plastic wristlets, or coated ribbon. Allow the materials to acclimate and inspect the exact area where the joint will be made.
Blot moisture gently with a clean material rather than rubbing delicate tissue. If a freshly cut stem releases sap, give it time to stabilize before application. Repeatedly placing more adhesive over a wet stem usually creates a thicker, less dependable joint.
Artificial surfaces also require preparation. Remove dust from plastic, loose fibers from fabric, and residue from painted or coated parts. Adhesive cannot create a reliable assembly when it is attached to a weak coating that later peels away from the underlying component.
Trimming Stable Contact Points
Stem length should be chosen according to the design rather than a single standard measurement. Personal flowers often need short stems, but cutting too close to the flower head may remove the firm section needed for controlled handling and bonding.
A clean cut is preferable to a crushed or ragged end. Damaged tissue can release moisture and become structurally weaker beside the adhesive layer. The attachment area should be large enough to support the flower without becoming visible from the finished side.
Useful contact areas may include:
- A clean stem end
- The firm calyx area
- Wrapped wire around a weak stem
- Reinforced ribbon or fabric
- The structural socket of an artificial flower
- A firm foliage stem rather than a thin leaf edge
A heavy bloom attached through a tiny point creates leverage. The joint may remain bonded while the surrounding plant tissue tears. Improving the angle, trimming the stem, or adding wire support often provides better results than increasing the adhesive quantity.
Planning the Dry Layout
Position major flowers, greenery, ribbon, hardware, and decorative accents before applying adhesive. A dry layout reveals weight distribution, spacing, attachment angles, and hidden areas while corrections remain easy.
Start by preparing the base and confirming that fastening hardware remains accessible. Establish the center of gravity before adding focal flowers. Continue with secondary blooms and smaller fillers, checking the shape from the front, sides, back, and wearer-facing surface.
A practical sequence is:
- Prepare the base and hardware.
- Position structural foliage.
- Establish focal flowers.
- Add secondary blooms.
- Fill gaps with small accents.
- Inspect comfort and balance.
A wrist corsage with the main flower placed too far from the center may rotate during wear. A boutonniere with an oversized back may sit awkwardly against the lapel. Dry positioning identifies those problems before adhesive limits movement.
Managing the Work Environment
Temperature and humidity influence adhesive viscosity, tack development, flower condition, condensation, and drying time. Exact working ranges depend on the formula, but rapid temperature changes and extreme conditions should be avoided.
Cold adhesive can become harder to dispense, while a warm formula may flow too quickly. High humidity can slow drying in some adhesive systems. Direct sunlight may heat dark bases, accelerate flower stress, and change working behavior.
For repeatable professional work, record:
- Room temperature
- Relative humidity
- Flower temperature
- Adhesive temperature
- Time outside refrigerated storage
- Tack interval
- Drying interval
- Cooler exposure
- Transport conditions
The goal is not laboratory documentation for every small arrangement. Basic records help identify why a familiar process behaves differently during a humid summer event, a cold winter delivery, or a production run completed in another workspace.
| Preparation Check | Suitable Condition | Warning Sign |
|---|---|---|
| Flower contact point | Clean and visibly dry | Condensation, sap, or treatment residue |
| Ribbon or fabric | Tested and free from loose fibers | Darkening or rapid absorption |
| Plastic base | Clean and structurally sound | Dust, oil, or weak paint coating |
| Adhesive | Normal consistency and flow | Separation, stringing, or hard dispensing |
| Layout | Fully positioned before gluing | Poor balance or hidden hardware |
| Drying area | Level, protected, and ventilated | Stacking, crushing, or direct moisture |
How Do You Apply Floral Adhesive Step by Step?
Identify stable attachment points, dispense a small working amount, apply a thin layer, and wait for the tack stage specified by the product instructions. Position each flower directly without dragging, hold it gently until stable, and build the arrangement in structural order. Allow the design to dry undisturbed before refrigeration, packaging, transport, or wear.
Steps 1–3: Mark and Apply
Step 1: Identify the attachment points. Determine exactly where the flower and base will meet. Choose a firm area that provides sufficient contact while remaining hidden from normal viewing angles. Avoid expecting a delicate petal to support an entire bloom.
Step 2: Dispense a controlled amount. Use the precision nozzle or place a small quantity on a disposable palette when the product instructions permit dipping. Expose only enough adhesive for the immediate working period.
Step 3: Apply a thin layer. Coat the flower, base, or both contact areas according to the formula instructions. Some floral adhesives work through a one-sided application, while others develop better initial grab when small amounts are placed on both joining surfaces.
For small floral components, a test deposit approximately 2–4 millimeters across may be a reasonable starting point, depending on viscosity, stem size, and contact area. This is not a universal dosage. The correct amount should wet the joint without running, soaking through fabric, or forming a large visible bead.
Steps 4–6: Develop Tack and Position
Step 4: Wait for useful tack. Follow the product guidance rather than applying one universal waiting time. Adhesive thickness, temperature, humidity, flower moisture, and base absorbency can all change the interval.
Step 5: Position the flower directly. Move the flower into its planned location in one controlled action. Avoid sliding it across ribbon, foliage, petals, or visible surfaces because dragging spreads adhesive and creates shiny marks.
Step 6: Hold with gentle pressure. Support the stem, calyx, wire, or firm backing area until the flower remains in place. Do not press directly onto soft petals or crush the flower against the base.
When the flower keeps springing away, inspect the design geometry before adding more adhesive. The stem may be too long, the angle may be forcing movement, or the contact area may be too small. Wire reinforcement or a revised position can solve the problem more effectively than a heavier glue layer.
Steps 7–9: Build and Dry
Step 7: Continue in structural order. Add larger supporting elements before small fillers. Keep future contact areas accessible and inspect balance after each group of flowers.
Step 8: Dry the design undisturbed. Initial tack is not the same as handling strength or full cure. Place each finished piece on a rigid tray where the flowers are not compressed, stacked, or allowed to touch neighboring designs.
Step 9: Inspect every bond. Look for movement, exposed residue, unsupported flower weight, blocked fastening hardware, stiff wearer-facing areas, and visible mechanics.
Newly assembled pieces should not be moved into humid refrigeration simply because the adhesive surface feels dry. A joint can remain soft internally. Packaging should also avoid pressing directly against flowers, and wearable designs should have enough space to prevent rubbing during storage and delivery.
| Step | Practical Target | Common Warning Sign |
|---|---|---|
| Adhesive amount | Thin, controlled coverage | Large bead or squeeze-out |
| Tack stage | Grabs without immediate sliding | Wet movement or overly dry surface |
| Placement | One direct, planned motion | Smearing across visible material |
| Pressure | Gentle and steady | Crushed petals or bent stems |
| Drying | Level and undisturbed | Stacking or early refrigeration |
| Inspection | Stable from all viewing angles | Rotation, lifting, or exposed adhesive |
Final Quality Inspection
Inspect the arrangement from every angle rather than focusing only on the front. Professional floral work is worn, handled, transported, photographed, and viewed from the side and back.
Confirm that:
- Flower angles remain stable
- No adhesive appears on petals
- Ribbon shows no bleed-through
- Fastening hardware remains accessible
- The wearer-facing surface is smooth
- Heavy flowers have adequate support
- No sharp wire ends are exposed
- The design fits its package
- The bond has dried before cooling
- Repair materials are available during delivery
Gently rotate or move the finished design in the same direction it will experience during normal use. Avoid pulling petals or forcing the joint. The purpose is to detect ordinary movement problems without damaging a properly assembled arrangement.
How Do You Apply Floral Adhesive to Different Designs?
Adjust the adhesive method to the design’s movement, weight, base material, visibility, and contact area. Wearable flowers need lightweight and flexible construction, ribbon requires bleed-through testing, artificial flowers may need stronger surface preparation, and centerpieces need structural mechanics. One application method should not be repeated across every floral project without testing.
Corsages and Boutonnieres
Wrist corsages move throughout an event, making weight distribution as important as bond strength. Keep focal flowers near the center of the wristlet instead of extending them far beyond the base. Long stems and oversized blooms create leverage that can twist the arrangement or pull against the joint.
Prepare the wristlet, ribbon, or wrapped platform first. Confirm that the clasp, ties, or adjustable hardware remain accessible. Begin with lightweight foliage or ribbon, place the focal flower near the center, balance the design with secondary blooms, and fill remaining gaps with small accents.
The back should remain smooth and comfortable. Hardened adhesive, exposed wire, or bulky stem ends can irritate the wearer even when the front looks attractive.
Boutonnieres need a compact profile and a relatively flat back. The flower should sit naturally against the lapel without being forced into an unstable angle. Keep the lower section narrow enough for a pin, magnet, or clip, and test the completed piece on fabric similar to the customer’s garment.
Crowns and Headpieces
Flower crowns combine a flexible base with flowers that may dry, shift, or change shape. Complete the wire, tape, ribbon, or headband structure first and confirm the final size before attaching flowers.
Place heavier blooms near stronger parts of the base. Stagger flowers so each new stem conceals the previous mechanics. Small adhesive applications are helpful for filling narrow gaps where extra wrapping would create bulk.
Inspect the inner surface carefully. A crown should not contain sharp wire ends, hardened adhesive ridges, exposed stems, or gaps that catch hair. Weight should be distributed evenly rather than concentrated near the temples or one side of the head.
Test the finished crown through normal movement. Turning, tilting, and gently nodding can reveal flowers that remain stable on a table but shift when the flexible base bends. Fresh crowns should dry adequately before cooling or being enclosed in packaging.
Ribbon and Fabric
Ribbon and fabric can absorb, resist, or visibly reveal adhesive depending on their fiber, weave, coating, thickness, and color. Satin may develop dark marks, velvet may absorb unevenly, sheer material can display a clear bond line, and coated ribbon may provide limited grip.
Test a hidden sample before using adhesive on the final design. Inspect both sides under daylight, indoor light, and camera flash. Wedding flowers are frequently photographed closely, making glossy or darkened areas more visible than they appear on a busy worktable.
Use the smallest amount that produces a dependable connection. Whenever possible, apply the adhesive to a reinforced fold, wrapped section, backing layer, or concealed seam rather than a single visible layer.
Avoid creating a broad rigid patch on material that needs to flex. A smaller reinforced connection often performs better because it reduces stiffness and prevents stress from concentrating along the edge of the cured adhesive.
Artificial Flowers and Large Structures
Artificial flowers should be inspected to identify their strongest structural component. Many include polyester petals, molded plastic centers, foam, coated wire, detachable sockets, and painted stems.
Attach the flower through the molded socket, wrapped wire, or another structural area rather than relying on a decorative petal edge. Smooth plastic may need a formula compatible with low-porosity surfaces, while painted parts require testing to confirm that the coating will not peel away.
Large wreaths, arches, centerpieces, suspended displays, and installations should use adhesive as a finishing tool rather than the only structural system. Frames, wire, picks, clamps, cable ties, foam systems, and grids should carry the main weight.
| Design | Primary Stress | Practical Method |
|---|---|---|
| Wrist corsage | Repeated movement | Center the weight and keep the back smooth |
| Boutonniere | Lapel angle and handling | Use a compact backing with suitable hardware |
| Flower crown | Flexing and head movement | Reinforce the base and stagger flowers |
| Ribbon design | Absorption and staining | Test hidden material before assembly |
| Artificial wreath | Smooth surfaces and weight | Bond structural sockets and add wire |
| Large installation | Gravity, wind, and leverage | Use frames, clamps, ties, or cable |
How Do You Prevent Floral Adhesive Problems?
Most floral adhesive failures come from moisture, incompatible materials, excessive application, poor contact area, incorrect tack timing, premature movement, or incomplete drying. Inspect where the bond separated before adding more adhesive. Flowers that brown, slide, stain, soften, or detach usually reveal a specific preparation, compatibility, environmental, or structural problem that can be corrected through testing.
Flowers Falling Off
The location of failure often explains what went wrong. When adhesive remains on the base but not the stem, the flower surface may have been wet, waxy, contaminated, or incompatible. When the adhesive separates through its own layer, the deposit may have been too thick or insufficiently cured.
Common causes include:
- Condensation from refrigerated flowers
- Sap or moisture at a fresh cut
- Insufficient contact area
- Excessive flower weight
- Poor attachment angle
- Incorrect tack stage
- Heavy adhesive application
- Premature movement
- Immediate refrigeration
- Smooth plastic or coated surfaces
Avoid placing another thick layer over a partly cured joint. Remove loose material when this can be done without damaging the design, prepare a fresh contact area, and reconsider the angle or need for mechanical support.
Repeated failures should be recorded with the flower variety, base material, adhesive batch, application quantity, room conditions, drying time, cooling history, and failure location.
Browning and Visible Marks
Browning does not always prove that the adhesive damaged the flower. Natural aging, dehydration, bruising, temperature stress, moisture, or handling can produce similar symptoms. Compare the glued sample with an untreated flower stored under the same conditions.
Visible adhesive commonly results from excessive application, dragging during placement, pressing too hard, choosing a poorly concealed attachment area, or allowing adhesive to spread through absorbent fabric.
Clear adhesive can remain noticeable because it reflects light, darkens ribbon, forms a glossy edge, or collects dust. Pale wedding flowers deserve inspection under daylight, indoor light, and camera flash.
Prevention is safer than cleanup. Scraping or rubbing cured or partly cured adhesive from a delicate petal may bruise the tissue, tear the surface, or spread the residue. Precision application and planned contact points are more dependable than trying to remove visible excess after assembly.
Slow Drying and Soft Joints
Slow setting may result from a heavy adhesive layer, low temperature, high humidity, limited airflow, absorbent materials, surface moisture, or a formula unsuitable for the project.
Review the process before applying extra heat. Strong direct heat can damage fresh flowers, change adhesive flow, and create a dry outer skin while the material inside the joint remains soft.
A practical troubleshooting sequence is:
- Check the adhesive quantity.
- Confirm the room conditions.
- Review the product’s tack guidance.
- Inspect the contact point for moisture.
- Compare with a fresh adhesive sample.
- Test a thinner layer.
- Review the storage age and container seal.
An adhesive that has become unusually thick, stringy, separated, discolored, or difficult to dispense may have been affected by age, contamination, or unsuitable storage.
Refrigeration and Transport
Finished pieces should be placed on rigid trays with enough spacing to prevent contact. Corsages, crowns, and boutonnieres should not be stacked while the bond is developing.
Allow the adhesive to reach suitable handling strength before refrigeration. Protect designs from direct contact with water, ice, condensation, and wet packaging. A humid cooler can interfere with a joint that entered storage before it had dried adequately.
During transport:
- Secure each design against sliding.
- Keep boxes level.
- Avoid direct sunlight.
- Protect flowers from crushing.
- Maintain suitable flower temperature.
- Prevent contact with free water.
- Carry a small repair kit.
- Inspect designs at the destination.
| Problem | Likely Cause | Practical Correction |
|---|---|---|
| Flower slides immediately | Insufficient tack | Wait according to product guidance |
| Bond fails after cooling | Joint entered cooler too wet | Extend drying before refrigeration |
| Petal develops a mark | Excess adhesive or incompatibility | Reduce quantity and test the flower |
| Ribbon darkens | Adhesive absorbed through fabric | Reinforce or change the contact area |
| Plastic component releases | Low surface grip | Use compatible adhesive or add mechanics |
| Joint remains soft | Heavy layer or unsuitable conditions | Reduce dosage and review environment |
| Nozzle becomes blocked | Adhesive dried at the opening | Clean and recap after each session |
| Design rotates during wear | Poor weight distribution | Rebalance the flowers and shorten leverage |

How Do You Choose Reliable Floral Adhesive for Professional Use?
Professional evaluation should cover the formula, application control, packaging, flower compatibility, working time, flexibility, cooler performance, safety documentation, batch consistency, and supply reliability. A strong laboratory bond is not enough when the product leaks, dispenses poorly, stains ribbon, varies between batches, or lacks suitable labeling and technical support.
Evaluating Performance
“Strong bond” is too broad to function as a useful purchasing specification. Strength should be linked to a practical application, such as a wrist corsage worn throughout an event, a boutonniere stored and transported under cool conditions, or an artificial wreath displayed in a warm retail environment.
Important criteria include:
- Initial tack
- Open working time
- Handling time
- Full cure time
- Viscosity
- Nozzle precision
- Dispensing force
- Clear or discreet finish
- Cured flexibility
- Fresh-flower compatibility
- Ribbon staining
- Plastic adhesion
- Cooler performance
- Humidity tolerance
- Leakage resistance
- Shelf-life stability
- Batch consistency
- Odor profile
A florist may prioritize clean application and flower appearance. A distributor may focus on shelf life, carton stability, multilingual labeling, and repeatable filling. A private-label brand may also need specific package sizes, nozzle geometry, retail positioning, and regional documentation.
Qualifying Samples
Test a production-intent formula in the intended package rather than relying only on adhesive provided in a laboratory container. The tube, bottle, nozzle, cap, seal, and fill level all influence how customers experience the product.
A practical qualification matrix can include:
- One pale fresh flower
- One sturdy fresh flower
- One waxy foliage
- One sap-producing stem
- One satin ribbon
- One sheer ribbon
- One wrapped wire base
- One plastic wristlet component
- One artificial flower
- One dried or preserved material
Prepare at least three samples for critical material pairs. Record the application quantity, tack interval, hold time, room conditions, drying period, cooler exposure, and transport simulation.
Repeat the tests with another production sample or batch before approval. A single successful bond proves that the formula can work. Repeated results show whether the product and application process are commercially dependable.
Questions for a Supplier
A professional supplier should be prepared to discuss chemistry, packaging, testing, documentation, production, and delivery rather than relying on broad marketing language.
Useful questions include:
- Which fresh and artificial flower materials have been tested?
- What application method and quantity are recommended?
- How does the formula behave after cooling?
- Which viscosities and working times are available?
- Can the formula be adjusted?
- Which packaging sizes and nozzles are offered?
- What is the minimum order quantity?
- Which safety and transport documents are available?
- How is batch consistency checked?
- What leakage and packaging tests are performed?
- Can labels and instructions be localized?
- What are the sample and production lead times?
A useful response should connect each requirement to samples, test methods, packaging choices, quality controls, documentation, and realistic scheduling.
Preparing a Commercial Brief
A clear sourcing brief allows the manufacturer to determine whether an existing formula is suitable or whether the project needs adjustment and new validation.
Include:
- Target country or region
- Customer type
- Fresh or artificial flower use
- Main bonding materials
- Typical floral projects
- Preferred working time
- Required finish
- Package type
- Net content
- Initial order quantity
- Estimated annual demand
- Sales channel
- Required languages
- Safety documentation
- Benchmark product
- Target price position
It is also useful to confirm whether the supplier manages formula development, filling, packaging, label printing, and quality control within an integrated system. Better process visibility makes troubleshooting, change management, and seasonal production planning easier.
Conclusion
Reliable floral adhesive work depends on matching the formula to the materials, preparing dry contact points, controlling the application quantity, allowing proper tack, supporting the design, and completing drying before cooling or transport. Florists and commercial teams that test representative flowers and record repeatable conditions achieve cleaner designs, fewer failures, and more predictable production.
Practical Lessons
Fresh flowers need hydration, but the bonding point needs controlled dryness. That distinction prevents many avoidable failures caused by condensation, sap, and wet plant tissue.
A thin, correctly placed adhesive layer usually performs better than a large visible bead. Extra adhesive can increase staining, stiffness, squeeze-out, and drying time without correcting poor contact geometry.
Floral adhesive is particularly useful for lightweight, hidden connections. Heavy, moving, outdoor, or overhead components still need wire, frames, clamps, ties, foam systems, or other mechanical support.
Testing should reproduce real use. The flower variety, ribbon, plastic base, cooler condition, storage period, packaging, and transport movement should match the intended application as closely as practical.
Maintaining Consistency
Professional floral teams benefit from documenting successful procedures rather than relying entirely on memory. A simple worksheet can capture:
- Flower variety
- Base material
- Adhesive batch
- Application quantity
- Tack time
- Hold time
- Drying time
- Room conditions
- Cooler exposure
- Transport method
- Final result
These records make staff training easier and help identify whether a later problem comes from the flower, adhesive, packaging, environment, or application process.
Manufacturing consistency matters as well. Commercial evaluation should include viscosity, dispensing control, cap sealing, filling accuracy, packaging durability, labeling, and repeated batch performance alongside the bond itself.
Custom Floral Adhesive Development
Private-label floral adhesive projects often require more than adding a logo to an existing tube. Flower compatibility, working time, viscosity, cured flexibility, package size, nozzle design, regional labeling, and customer skill level can all influence the final product.
GleamGlee supports qualifying OEM and private-label adhesive projects through formulation review, sample preparation, packaging selection, graphic design, multilingual instructions, production, and international fulfillment planning. Its integrated capabilities include a research team of more than 25 chemists, material specialists, and process engineers, more than 18 packaging and graphic designers, four specialized manufacturing facilities, and annual finished-product capacity exceeding 12 million units.
Custom development may begin from 200 units when the formula, package, documentation, and production conditions are suitable. Typical design files may be prepared in as little as two days, while sample schedules commonly range from approximately 7–14 days. Standard production planning is generally around 20 days, with accelerated options considered for eligible projects.
Request a Quote or Sample
A detailed inquiry allows the technical and commercial teams to recommend a more relevant formula, package, testing plan, and quotation.
Please provide:
- Fresh, artificial, dried, or preserved flower use
- Main floral applications
- Required material compatibility
- Preferred viscosity
- Desired tack and working time
- Clear or flexible finish
- Package size
- Nozzle preference
- Private-label design requirements
- Target sales country
- Initial order quantity
- Estimated annual demand
- Required safety documents
- Benchmark product or performance target
For wholesale floral adhesive, OEM development, customized packaging, or private-label cooperation, contact GleamGlee with the intended application and commercial plan. A clear technical brief makes it easier to determine whether an existing formulation is suitable or whether additional testing and adjustment are required.





















