 Skip to content
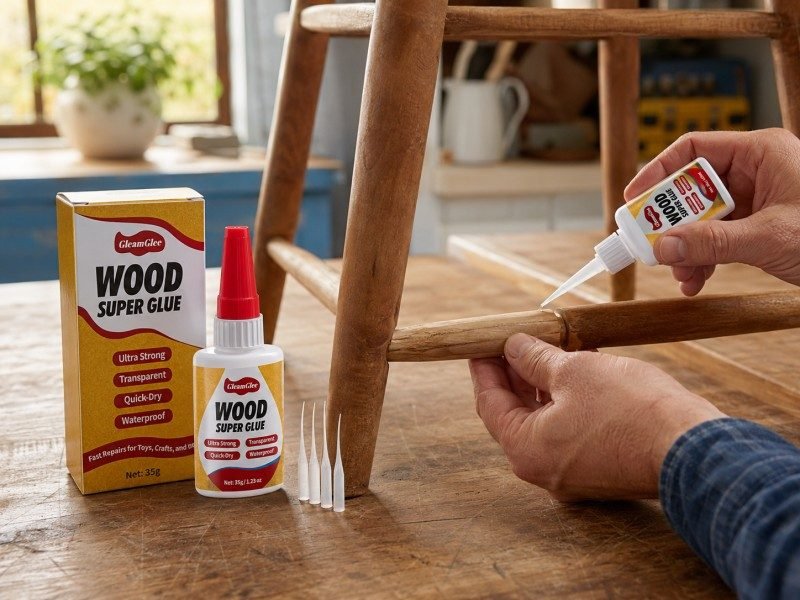
A messy wood glue repair can make a small job look much worse than it really is. A loose chair rung, a cracked drawer corner, a split wooden toy, or a lifting picture frame edge may only need a few drops of glue, but one heavy squeeze can leave shiny marks, thick beads, sticky fingers, and dried glue that later needs scraping or sanding. Many people blame the glue when the real problem is the way it was applied. Wood glue does not need to flood the joint to hold well. In most clean repairs, the strongest result comes from a thin, even layer placed exactly where the two wood surfaces touch.
To apply wood glue neatly, clean and dry the wood first, test the joint fit, then apply a thin line of glue with a precision nozzle. Spread only enough glue to cover the bonding surface, press the pieces together evenly, and remove small squeeze-out before it fully hardens. For visible repairs, clear-drying wood glue and controlled application help keep the seam clean.
The neatest repair often looks simple after it is done. There is no thick glue ridge around the joint, no cloudy patch near the edge, and no rough area that needs heavy correction. The chair feels firm. The cabinet panel sits flat. The wooden toy is fixed without glue covering the painted detail. The frame corner closes neatly. That clean result does not happen by luck. It comes from using the right amount, preparing the surface properly, and having a glue tip that gives the hand better control. This guide starts with the most overlooked part of wood glue work: understanding what “neat” really means before the tube is opened.
What Is Neat Wood Glue?
Neat wood glue is not about using almost no glue. It means using the right amount in the right place, so the wood surfaces touch fully while the outside seam stays clean. A neat glue job should leave only a small, controlled bead at the edge, not a wide smear, thick ridge, or cloudy patch around the repair.
For most small wood repairs, the glue layer should be thin enough to spread evenly, but complete enough to cover the bonding area. On a chair rung, picture frame corner, drawer edge, toy part, or cabinet trim, the glue line often needs only a narrow bead. If the bead is wider than the joint itself, the repair will usually need extra wiping, scraping, or sanding later.
A neat wood glue repair should save time after drying. The seam should close tightly, the surface should stay smooth, and the dried glue should not be the first thing people notice. Good control matters most on visible wood, light-colored wood, painted toys, decorative frames, cabinet edges, shelves, and furniture that will be stained or clear-coated.
What Is Wood Glue Squeeze-Out?
Wood glue squeeze-out is the extra adhesive that appears along the seam after two pieces are pressed together. A small amount is normal and can be useful because it shows the glue has reached the edge of the joint. The problem starts when squeeze-out becomes too large, runs down the surface, fills decorative gaps, or dries into a hard raised line. On raw wood, heavy squeeze-out can also spread into the grain and later show as pale or shiny marks after finishing. For neat repair work, squeeze-out should be controlled before clamping starts, not fixed only after the glue has already spread everywhere.
- Small bead is acceptable: A thin line along the seam usually means the glue coverage is enough.
- Large bead means waste: Thick overflow often shows that too much glue was applied.
- Wet smears can stain: Wiping too widely can push glue into raw wood grain.
- Raised glue needs rework: Hardened squeeze-out may require scraping or sanding.
| Squeeze-Out Size | What It Shows | Best Action |
|---|---|---|
| None at all | Glue may be too light, or the joint is very tight | Check if both surfaces were coated |
| Thin line under 1 mm | Usually clean coverage | Dab or scrape lightly |
| 1–3 mm bead | Slightly heavy but manageable | Remove before full cure |
| Thick ridge over 3 mm | Too much glue for most small repairs | Reduce glue amount next time |
| Running glue | Application was uncontrolled | Wipe carefully, then adjust method |
Why Does Wood Glue Get Messy?
Wood glue gets messy when the repair has more glue than the joint can hold. This usually happens on small projects where the opening of the tube is too wide, the user squeezes too hard, or the glue is placed on the visible face instead of the hidden bonding area. Mess also comes from poor joint fit. If a chair rung, frame corner, shelf split, or cabinet edge does not close properly, the glue collects in empty spaces and then squeezes out unevenly. Dirt, dust, wax, oil, old glue, and damp wood can make the adhesive slide instead of staying where it should. The result is not only a messy surface, but also a repair that may feel less stable.
- Too much glue: The most common reason for thick squeeze-out and slippery joints.
- Poor fit: Wide gaps make glue pool instead of forming a thin bond line.
- Dirty wood: Dust, old glue, polish, or grease can weaken contact.
- Wrong wiping: A wet cloth used too broadly can create invisible glue film.
| Messy Result | Likely Cause | Cleaner Method |
|---|---|---|
| Glue runs down the side | Too much pressure on tube | Use a fine nozzle and squeeze slowly |
| Parts slide while clamping | Glue layer is too thick | Apply less and spread thinner |
| Glue dries shiny around seam | Wet glue was smeared | Dab only the bead or scrape later |
| Joint still has gaps | Wood was not fitted first | Dry-fit before applying glue |
| Glue will not stay in crack | Surface has dust or old residue | Brush, scrape, and dry before gluing |
What Wood Glue Look Is Clean?
A clean wood glue look means the repair blends into the object instead of calling attention to itself. On furniture, the joint should close neatly, with no thick glue ring around chair legs, cabinet edges, drawer panels, or table corners. On craft pieces and toys, the glue should not cover painted details, small cutouts, carved lines, or decorative surfaces. On wood that will be stained, the area around the seam should stay free from hidden glue film because dried adhesive can block stain absorption. Clear-drying glue helps, but it cannot hide thick residue or raised lines. The cleanest look comes from narrow placement, even pressure, and timely cleanup.
- Tight seam: The wood pieces should meet closely with no wide gap.
- Thin glue line: The bond should not look bulky from the outside.
- Smooth surface: No raised glue bead should remain after drying.
- Natural finish: The repair should not leave cloudy, shiny, or pale marks.
| Project Area | Clean Wood Glue Result | Visible Problem To Avoid |
|---|---|---|
| Chair rung | Thin ring or no visible glue after cleanup | Thick dried collar around joint |
| Picture frame | Corner closes square and smooth | Glue on the front face |
| Cabinet edge | Panel sits flat with a clean seam | Glossy residue along edge |
| Wooden toy | Details stay clear and uncovered | Glue over paint or carved parts |
| Shelf split | Crack closes with limited bead | Raised line along the split |
| Outdoor planter | Seam is sealed but not flooded | Thick glue ridge collecting dirt |
How to Prep Wood Glue?
Prep wood glue by making the bonding area clean, dry, and closely fitted before applying adhesive. Dust, old glue, wax, damp wood, and loose fibers can stop the glue from sitting evenly on the surface. A few minutes of preparation can reduce squeeze-out, improve grip, and make the finished repair look much cleaner.
For small household repairs, preparation should be simple but careful. A dry cloth, small brush, cotton swab, plastic scraper, fine sandpaper, painter’s tape, and clamp are usually enough. The goal is not to overwork the wood. The goal is to expose a clean contact area, check how the pieces meet, and prepare the right holding method before glue is applied.
Good preparation also prevents panic during the repair. Once the glue is on the wood, the parts need to be aligned, pressed, cleaned, and left still. If the clamp, cloth, scraper, or nozzle is not ready, glue can dry in the wrong place. A clean repair starts with a clear work area and the right tools within reach.
| Prep Item | Best Use | Practical Tip |
|---|---|---|
| Dry cloth | Removes surface dust | Use before sanding and again after sanding |
| Small brush | Cleans cracks and holes | Useful for chair rungs, frames, and toys |
| Cotton swab | Cleans tight corners | Also useful for small glue cleanup |
| Plastic scraper | Removes loose old glue | Safer than metal on delicate wood |
| 120–220 grit sandpaper | Light surface smoothing | Use gently on visible areas |
| Painter’s tape | Protects visible edges | Keep tape away from the bonding surface |
| Clamp or rubber band | Holds parts still | Test position before glue is applied |
How to Clean Wood Glue Areas?
Clean wood glue areas by removing dust, loose fibers, old glue, wax, polish, oil, and any surface layer that stops the adhesive from touching real wood. Many failed or messy repairs start with a dirty joint. A chair rung may look ready, but the hole can hold dust and broken fibers. A cabinet edge may feel smooth, but old polish can sit on the surface. A wooden toy may have tiny paint chips around the crack. If glue is placed over these weak layers, it may bond to the debris instead of the wood. Clean contact gives the glue a better chance to spread evenly, grip properly, and dry without thick lumps around the seam.
- Remove loose dust first: Brush cracks, holes, and seams before applying glue.
- Scrape old failed glue: New glue should not sit on loose dried adhesive.
- Sand only where needed: Use light sanding on glossy or dirty contact areas.
- Protect visible surfaces: Avoid scratching finished wood around the repair.
| Repair Area | Common Surface Problem | Cleaning Method |
|---|---|---|
| Chair rung hole | Dust, broken fibers, old glue | Brush, scrape loose residue, wipe dry |
| Cabinet edge | Polish, grease, old finish | Light sanding on bonding area |
| Picture frame corner | Dust and chipped coating | Small brush and cotton swab |
| Wooden toy crack | Paint chips and dirt | Gentle brushing, minimal sanding |
| Shelf split | Sawdust inside crack | Brush along the split before gluing |
| Outdoor planter | Soil, moisture, rough fibers | Brush clean and let dry fully |
How to Dry Wood Glue Surfaces?
Wood glue should be applied to dry surfaces because trapped moisture can weaken contact, slow setting, and make the glue line harder to control. This matters most on outdoor wood, kitchen furniture, bathroom trim, garden planters, fences, benches, and any item recently wiped with water. Damp wood can make glue spread too far, especially in open grain or cracks. It can also make the repair look cloudy or uneven after drying. Waterproof wood glue is helpful after the bond has cured, but it still needs a dry starting surface. If the wood feels cool, wet, or recently washed, give it more time before gluing.
- Check by touch: The wood should not feel wet, cool, or sticky.
- Dry cracks longer: Moisture can stay inside splits after the surface looks dry.
- Avoid outdoor rain exposure: Repair in a dry area when possible.
- Let cleaned wood rest: After wiping, allow time before applying glue.
| Wood Condition | Risk During Gluing | Better Prep |
|---|---|---|
| Recently wiped wood | Glue may spread or dilute | Wait until fully dry |
| Outdoor bench | Hidden moisture in cracks | Move to dry shade before repair |
| Planter box | Soil moisture near seams | Empty, clean, and dry first |
| Bathroom trim | Humid surface | Ventilate and dry before gluing |
| Garage-stored wood | Damp or dusty surface | Brush clean and check dryness |
| Freshly sanded wood | Fine dust remains | Wipe with dry cloth before glue |
How to Fit Wood Glue Joints?
Fit wood glue joints before applying adhesive by pressing the parts together dry and checking whether the seam closes naturally. A tight-fitting joint needs less glue and creates less squeeze-out. A loose or uneven joint often leads to thick glue lines, sliding parts, and weak-looking repairs. Glue should bond two matching surfaces; it should not be expected to fill large empty spaces like putty. For a chair rung, the inserted part should sit straight. For a frame corner, both edges should meet cleanly. For a cabinet panel or shelf split, the crack should close under light, even pressure before glue is added.
- Dry-fit first: Press parts together without glue and check alignment.
- Look for gaps: Wide openings often need adjustment before gluing.
- Prepare the clamp early: Do not search for holding tools after glue is applied.
- Avoid over-tightening: Too much pressure can force out too much glue.
| Joint Type | Good Fit Looks Like | Problem Sign |
|---|---|---|
| Chair rung | Rung sits straight in the hole | Wobbles or leans to one side |
| Picture frame | Corner closes squarely | One edge lifts or leaves a V-gap |
| Drawer front | Panel sits flat | Corner springs open |
| Shelf split | Crack closes under pressure | One side stays raised |
| Table edge | Boards meet evenly | Surface feels uneven after pressing |
| Toy part | Pieces touch without force | Small part slides or rotates |
How to Prepare Wood Glue Tools?
Prepare wood glue tools before opening the tube so the repair can move smoothly from application to pressing and cleanup. Even a small repair can become messy when the user has to stop midway to find a clamp, cloth, scraper, or nozzle. Glue can spread while the parts are being adjusted, and squeeze-out can start drying before it is cleaned. A simple setup works best: keep the glue, precision nozzle, cloth, cotton swabs, scraper, tape, and holding tool within arm’s reach. For small items, use scrap paper or cardboard under the repair area. For furniture, protect the floor and nearby finished surfaces.
- Choose the nozzle first: Use a fine tip for cracks, corners, and small joints.
- Keep cleanup close: Cotton swabs and cloth should be ready before gluing.
- Set holding tools nearby: Clamps, tape, or rubber bands should be tested first.
- Protect the work surface: Use cardboard, paper, or plastic under the repair.
| Tool | When To Prepare It | Why It Helps |
|---|---|---|
| Precision nozzle | Before glue application | Controls glue line and reduces overflow |
| Cotton swab | Before pressing parts | Cleans small beads and corners |
| Damp cloth | Before clamping | Removes fresh excess quickly |
| Plastic scraper | Before drying stage | Lifts rubbery squeeze-out cleanly |
| Painter’s tape | Before glue touches wood | Protects visible edges |
| Clamp or rubber band | Before applying glue | Holds the repair still |

How to Apply Wood Glue?
Apply wood glue by placing a thin, controlled line on the bonding surface, spreading it evenly, then pressing the parts together with steady pressure. The glue should cover the contact area without flooding the seam. A neat application usually leaves only a small bead of squeeze-out, not thick overflow.
The best wood glue result comes from matching the glue amount to the repair size. A hairline crack, chair rung, drawer edge, picture frame corner, or wooden toy part needs much less glue than a shelf split or cabinet panel. Too much glue can make the pieces slide, increase cleanup, and leave raised marks after drying. Too little glue can leave dry spots inside the joint.
A fine-tip nozzle makes application easier because the glue can be placed inside the crack, corner, or joint instead of spreading across the visible surface. After applying the glue, the parts should be aligned before pressure is added. Pressing or clamping should close the joint firmly, but not force out nearly all the adhesive.
| Repair Type | Glue Placement | Best Amount | Clean Result |
|---|---|---|---|
| Hairline crack | Inside the crack line | Tiny dots or thin line | Glue enters crack with little overflow |
| Chair rung | Around the inserted end | Light coat | Small ring after pressing |
| Picture frame | Along the cut edge | Thin line | Corner closes without front smears |
| Drawer edge | On the hidden contact side | Thin bead | Edge sits flat and clean |
| Cabinet panel | Across the contact area | Thin spread | No puddles or dry patches |
| Wooden toy | On the broken contact point | Small dots | Details stay uncovered |
| Shelf split | Along the split | Narrow continuous line | Crack closes with limited bead |
| Outdoor planter | Along the seam | Thin waterproof line | Seam seals without thick ridge |
How Much Wood Glue Works?
The right amount of wood glue is enough to coat the bonding surface fully, but not so much that it pours out when the parts are pressed. In many small repairs, a bead between 1–2 mm wide is enough before spreading. For very small craft pieces, wooden toys, model parts, or thin cracks, even less may be needed. Larger joints such as cabinet panels, shelves, and tabletop splits need more coverage, but the glue should still be spread into a thin film instead of left as a thick rope. A good sign is a small, even bead appearing at the edge after pressing. If glue drips down the side or forms a thick collar, the amount is too heavy.
- Use less first: Add a second small line only if the wood still looks dry.
- Watch the seam: A thin bead after pressing usually means enough coverage.
- Avoid puddles: Thick glue can make parts slide and increase drying marks.
- Match the size: Small repairs need dots or thin lines, not full beads.
| Project Size | Practical Glue Amount | Common Mistake |
|---|---|---|
| Tiny crack | Pin-size dots or very thin line | Squeezing a full bead across the surface |
| Toy part | 1–3 small dots | Covering painted or shaped details |
| Frame corner | Thin line on the cut edge | Letting glue touch the front face |
| Chair rung | Light coat around the inserted part | Filling the hole with too much glue |
| Shelf split | Narrow line along the crack | Applying glue only at the opening |
| Cabinet panel | Thin spread over contact area | Leaving dry patches or puddles |
How to Spread Wood Glue?
Spread wood glue so the bonding area has a thin, even coat from edge to edge. Glue that sits only in the middle may not reach the corners after pressing. Glue that is too thick at the edges may squeeze out heavily and leave a visible mess. For small repairs, the fine nozzle itself may place the glue accurately enough. For wider surfaces, use a toothpick, cotton swab, small brush, flat stick, plastic card, or scrap cardboard. The surface should look lightly wet and continuous, not flooded. On raw wood, avoid brushing glue far beyond the seam because dried residue can affect staining or finishing later.
- Spread thinly: The surface should be coated, not buried.
- Cover corners: Dry corners can weaken frames, panels, and shelves.
- Use small tools: Toothpicks and swabs work better for tight repairs.
- Stay inside the joint: Keep glue away from visible faces when possible.
| Tool | Best Use | Clean Application Tip |
|---|---|---|
| Fine-tip nozzle | Cracks, narrow seams, chair joints | Keep the tip close to the wood |
| Toothpick | Tiny parts, toys, models | Move glue into corners gently |
| Cotton swab | Small edges and cleanup | Use a fresh swab once sticky |
| Small brush | Panels, shelves, wider joints | Brush thinly in one direction |
| Plastic card | Flat contact surfaces | Remove excess before spreading |
| Scrap wood stick | Furniture joints | Spread only on the hidden contact area |
How to Use Wood Glue Nozzles?
Wood glue nozzles are useful when the repair needs control more than volume. A wide opening can release too much adhesive in one squeeze, especially on cracks, frame corners, drawer edges, small trim, wooden toys, and model parts. A fine nozzle helps place glue exactly inside the seam, which reduces waste and keeps the surface cleaner. The nozzle should be held close to the wood, almost touching the repair line. Squeeze slowly and move the tip at a steady pace. If the glue does not come out, clean the nozzle instead of squeezing harder. A blocked tip can suddenly release a large blob and ruin a neat repair.
- Cut small: Keep the nozzle opening narrow for better control.
- Squeeze slowly: Fast pressure creates uneven glue lines.
- Stay close: A close tip keeps glue from landing on visible areas.
- Clean after use: Wipe the nozzle before glue dries inside it.
| Nozzle Use | Best Repair Scene | What To Avoid |
|---|---|---|
| Direct line | Cracks and frame seams | Holding the tube too high |
| Small dots | Toys and craft pieces | Applying dots too close to the edge |
| Inside joint | Chair rungs and loose holes | Flooding the socket |
| Edge bead | Drawer and cabinet edges | Letting glue roll onto the front |
| Corner fill | Small gaps in frames | Using glue as a large filler |
How to Press Wood Glue Joints?
Press wood glue joints with steady, even pressure so the surfaces stay in full contact while the glue sets. The pressure should close the seam, keep the parts aligned, and create only a small amount of squeeze-out. Pressing too lightly can leave gaps. Pressing too hard can force out too much glue and leave a weak, dry-looking joint. Small craft parts may only need finger pressure, tape, or rubber bands. Furniture parts, shelves, tabletops, and cabinet pieces usually need clamps or weights. Before leaving the repair to dry, check that the pieces have not shifted. Wood glue can act slippery at first, especially if too much was applied.
- Close the gap: Pressure should bring the wood surfaces together.
- Keep alignment: Check straightness before the glue begins to set.
- Do not crush: Over-tightening can force out too much glue.
- Hold still: Movement during drying can weaken the repair.
| Repair Item | Holding Method | Pressure Level | Check Before Drying |
|---|---|---|---|
| Wooden toy | Finger pressure or rubber band | Light | Parts are not sliding |
| Picture frame | Tape or corner clamp | Light to medium | Corner stays square |
| Chair rung | Clamp or strap | Medium | Rung sits straight |
| Drawer front | Clamp or weight | Medium | Panel is flat |
| Shelf split | Bar clamp | Medium to firm | Crack closes evenly |
| Table edge | Multiple clamps | Firm and even | Surface is level |
| Outdoor planter | Clamp plus weight | Medium | Seam stays sealed |
How to Apply Wood Glue on Small Cracks?
Small cracks need careful glue placement because the visible area is often larger than the actual bonding space. Do not squeeze a thick bead across the top and hope it sinks in. Instead, use a fine nozzle to place a narrow line directly along the crack. If the crack opens slightly, guide the glue inside with a toothpick or thin card. Press the crack closed gently and watch for a small line of squeeze-out. Clean only the extra bead, not the whole surface. This method works well for wooden toys, chair details, craft boards, small shelves, picture frames, and decorative wood pieces where a wide glue mark would stand out.
- Use a fine tip: It places glue inside the crack instead of over it.
- Help glue enter: A toothpick can guide glue into narrow spaces.
- Press gently: Too much force can push all glue out.
- Clean the bead: Remove excess while keeping glue inside the crack.
| Crack Size | Application Method | Cleanup Method |
|---|---|---|
| Hairline crack | Tiny dots along the line | Cotton swab or toothpick |
| Slight open crack | Thin line inside opening | Dab bead after pressing |
| Split edge | Continuous line along split | Scrape when slightly rubbery |
| Decorative crack | Fine nozzle only | Avoid wide cloth wiping |
| Outdoor crack | Thin waterproof line | Let cure before moisture exposure |
How to Clean Wood Glue?
Clean wood glue by removing excess at the right stage instead of wiping everywhere at once. Fresh glue should be dabbed carefully with a damp cloth or cotton swab. Larger squeeze-out is often easier to remove when it turns slightly rubbery. Fully cured glue may need light scraping or sanding, but that should be the last choice.
The biggest cleaning mistake is spreading wet glue across raw wood. A wide wipe may look clean for a few minutes, but it can leave a thin film inside the grain. After drying, staining, painting, or sealing, that film may appear as a pale patch, shiny mark, or rough edge. Clean glue work means touching only the extra glue, not washing the whole surface.
The cleaning method should match the repair. A chair rung needs careful work around a round joint. A picture frame needs clean corners. A cabinet edge needs a smooth visible line. A wooden toy needs paint and small details protected. A shelf split may need rubbery-stage scraping instead of wet wiping. Less movement, smaller tools, and better timing usually give the cleanest result.
| Glue Stage | Feel and Look | Best Cleaning Method | Good For |
|---|---|---|---|
| Fresh wet glue | Shiny, soft, easy to smear | Dab with damp cloth or cotton swab | Tiny beads, small repairs |
| Slightly thickened glue | Sticky but not runny | Lift carefully with swab or toothpick | Corners, toy parts, frame seams |
| Rubbery glue | Flexible bead, no longer liquid | Scrape with plastic tool | Raw wood, shelves, furniture joints |
| Fully cured glue | Hard, raised, dry | Light scraping or fine sanding | Final correction only |
| Hidden glue film | Shiny patch under side light | Fine sanding before finishing | Stained or clear-coated wood |
How to Wipe Wood Glue?
Wipe wood glue with a small, controlled motion instead of rubbing across the whole surface. When glue is fresh, it is soft enough to remove, but it is also easy to spread. A slightly damp cloth works well on sealed or painted surfaces, but raw wood needs more care. The cloth should touch the bead of excess glue, lift it away, and then be folded to a clean side before the next pass. On chair joints, frame corners, cabinet seams, toys, models, and trim pieces, cotton swabs often work better than a large cloth because they reach the glue line without wetting the surrounding wood. The goal is to remove overflow while keeping the glue inside the joint untouched.
- Use a damp cloth, not a wet cloth: Too much water can spread glue into open grain.
- Dab first, wipe second: Lifting the bead is cleaner than dragging it.
- Fold the cloth often: A sticky cloth can put glue back on the surface.
- Use swabs for corners: Small tools reduce smears on detailed repairs.
| Surface Type | Better Wiping Tool | Cleaning Tip |
|---|---|---|
| Raw wood | Cotton swab or lightly damp cloth | Avoid wide wiping across the grain |
| Painted wood | Damp cloth | Do not rub hard enough to move paint |
| Cabinet edge | Folded cloth corner | Wipe only along the seam |
| Chair rung | Cotton swab | Rotate around the joint slowly |
| Wooden toy | Swab or toothpick | Keep glue away from painted details |
| Picture frame | Swab plus dry cloth | Clean the front face immediately |
How to Scrape Wood Glue?
Scrape wood glue when the excess bead has become firm enough to lift, but not so hard that it needs force. This stage is useful because the glue is less likely to smear across the surface. On raw wood, scraping a rubbery bead is often cleaner than wiping wet glue with a damp cloth. Use a plastic scraper, old card, flat craft tool, or putty knife with a smooth edge. Hold the tool low, close to the surface, and move slowly along the seam. Do not dig downward. If the glue stretches or tears, wait a little longer. If it chips hard, it has cured too much and will need lighter, slower correction.
- Scrape low and flat: A steep angle can gouge the wood.
- Use plastic first: Metal tools can scratch soft wood and finished edges.
- Work along the seam: Do not drag glue across the visible face.
- Stop if fibers lift: Let the glue cure more before sanding lightly.
| Repair Area | When Scraping Helps | Tool Choice |
|---|---|---|
| Shelf split | Bead forms along long crack | Plastic scraper or old card |
| Chair joint | Ring appears around rung | Rounded plastic edge or swab first |
| Table edge | Glue line sits on flat seam | Putty knife with light pressure |
| Picture frame | Corner bead hardens slightly | Craft blade only with care |
| Cabinet panel | Glue gathers at edge | Plastic scraper |
| Outdoor planter | Thick bead at seam | Scrape before full cure |
How to Avoid Wood Glue Marks?
Avoid wood glue marks by keeping excess adhesive away from visible wood in the first place. Marks often appear after the repair seems finished, especially on raw wood that will be stained or clear-coated. A thin glue film can block stain absorption, creating lighter patches around the seam. On painted wood, dried glue may show as raised texture under the paint. On clear-drying glue, thick residue can still catch light even if the color is transparent. The cleanest method is to use a narrow bead, apply glue only to the contact area, protect edges with tape when helpful, and inspect the surface under side light before the repair fully cures.
- Use less glue near visible edges: Extra glue has fewer places to hide.
- Protect with painter’s tape: Place tape beside the seam, not inside the joint.
- Check under angled light: Glue film is easier to see from the side.
- Clean before finishing: Stain, paint, or clear coat can make residue more obvious.
| Visible Problem | Likely Cause | Prevention |
|---|---|---|
| Pale stain patch | Glue film in raw grain | Avoid wide wet wiping |
| Raised shiny line | Thick glue dried on seam | Remove bead before full cure |
| Rough painted edge | Glue lump under paint | Scrape and sand before painting |
| Cloudy corner | Too much glue in frame joint | Use fine nozzle and light pressure |
| Dirt-catching seam | Outdoor glue ridge left thick | Scrape excess before curing hard |
| Uneven clear coat | Residue left on surface | Inspect and sand lightly if needed |
How to Fix Wood Glue Mistakes?
Fix wood glue mistakes based on how dry the glue is. If the glue is still wet, remove it gently with a cotton swab or folded damp cloth. If it has turned rubbery, lift it with a plastic scraper. If it has cured hard, use light scraping and fine sanding, working slowly to avoid damaging the wood. The repair area should be checked before stain, paint, or clear coating. Once a finish is applied over glue residue, the mark becomes harder to hide. Small mistakes are easier to correct early, so inspect the seam after pressing, again after cleanup, and once more before the piece returns to use.
- Wet mistake: Dab with a swab and avoid spreading.
- Rubbery mistake: Lift the bead with a plastic tool.
- Cured mistake: Scrape lightly, then sand only if needed.
- Finish mistake: Remove residue before stain or paint goes on.
| Mistake | Best Fix | What To Avoid |
|---|---|---|
| Too much fresh glue | Dab bead with damp cloth | Rubbing across raw wood |
| Glue in a corner | Use toothpick or swab | Flooding with water |
| Dried raised bead | Scrape carefully | Cutting into the wood |
| Shiny patch | Fine sand before finishing | Staining over residue |
| Glue on painted toy | Swab while fresh | Scraping paint aggressively |
| Glue on furniture edge | Scrape rubbery bead | Waiting until fully hard |
How to Clean Wood Glue from Tools?
Clean wood glue from tools before it dries hard, especially nozzles, spreaders, brushes, clamps, and scraper edges. A blocked nozzle can ruin the next repair by releasing glue unevenly or forcing a sudden blob onto the surface. Wipe the nozzle tip after each use and cap the tube tightly. Small brushes and spreaders should be cleaned right away if they will be reused. Clamps should also be checked because dried glue on clamp pads can transfer marks to the next project. For fine repair work, clean tools are not a small detail. They directly affect how narrow, smooth, and controlled the next glue line will be.
- Wipe nozzle tips: Prevent dried plugs and uneven flow.
- Clean spreaders early: Dried glue creates ridges during the next use.
- Check clamp pads: Glue on pads can mark finished wood.
- Store upright when possible: Reduces leaking and clogged caps.
| Tool | Cleaning Time | Practical Method |
|---|---|---|
| Fine nozzle | Right after use | Wipe tip and cap tightly |
| Cotton swab | Replace during use | Do not reuse once sticky |
| Brush | Before glue dries | Rinse or discard depending on type |
| Plastic scraper | After scraping bead | Wipe edge clean |
| Clamp pads | Before storage | Remove glue spots |
| Work surface | After repair | Lift paper or wipe protected area |

Which Wood Glue Works Best?
The best wood glue is the one that matches the repair surface, use environment, drying finish, and application control. For neat wood repairs, the glue should bond firmly, dry clear, resist moisture when needed, and come with a fine-tip applicator that helps place glue accurately without flooding the seam.
A good wood glue should solve two problems at the same time: strength and appearance. A strong bond is important, but a clean finish matters just as much on chairs, cabinets, drawers, picture frames, wooden toys, shelves, craft pieces, and home décor. If the glue dries cloudy, leaves a thick ridge, or spreads onto visible wood, the repair may look rough even if it holds.
Different projects need different glue features. Indoor furniture needs a clean seam and firm hold. Outdoor garden wood needs waterproof and weather-resistant performance after curing. Small crafts need a narrow glue line and low overflow. Mixed-material repairs need stronger compatibility beyond wood alone. GleamGlee Wood Glue is designed for these daily repair scenes with clear drying, waterproof strength, multi-purpose bonding, and precision nozzles for cleaner application.
| Repair Need | Best Glue Feature | Good Project Match | What To Avoid |
|---|---|---|---|
| Clean visible seam | Clear-drying finish | Frames, cabinets, toys, décor | Cloudy or yellow glue line |
| Small detail work | Fine-tip nozzle | Models, crafts, cracks | Wide tube opening |
| Strong furniture hold | Durable bond | Chairs, tables, shelves | Thin coverage with dry spots |
| Damp or outdoor use | Waterproof formula | Planters, fences, benches | Using indoor-only glue outside |
| Mixed-material repair | Multi-purpose adhesion | Wood with metal, plastic, ceramic | Switching glue for every small part |
| Fast small repair | Quick setting | Trim, drawer edges, toys | Moving parts before bond sets |
Which Wood Glue Dries Clear?
Clear-drying wood glue works best when the repaired area can still be seen after the job is finished. This includes chair rungs, table corners, picture frame joints, cabinet panels, drawer fronts, wooden toys, handmade signs, model parts, and decorative boxes. A clear finish helps the repair look cleaner because the glue line does not create a dark, yellow, or cloudy edge. This is especially useful on light-colored wood, painted wood, natural craft wood, and pieces that will not be fully covered with paint. However, clear glue still needs careful application. If too much glue dries on the surface, the color may be transparent, but the raised edge can still catch light, collect dust, or feel rough to the touch.
- Best for visible repairs: Frames, toys, cabinets, shelves, trim, and décor.
- Helpful on light wood: Clear glue reduces obvious dark or yellow seams.
- Still needs cleanup: Transparent glue can still leave raised texture.
- Better with fine nozzles: A narrow line keeps the clear finish cleaner.
| Wood Item | Why Clear Glue Helps | Clean Application Tip |
|---|---|---|
| Picture frame | Keeps front corner less noticeable | Apply glue only on the cut edge |
| Cabinet panel | Helps visible seam blend in | Remove squeeze-out before full cure |
| Wooden toy | Protects painted or shaped details | Use dots, not a long bead |
| Decorative box | Keeps handmade look clean | Spread thinly inside the joint |
| Chair rung | Reduces visible glue ring | Clean the small bead around the joint |
| Wood sign | Avoids cloudy surface marks | Keep glue away from the front face |
Which Wood Glue Is Waterproof?
Waterproof wood glue is the better choice for wood that may face damp air, splashes, humidity, or outdoor weather after the repair cures. Garden benches, wooden fences, planter boxes, gates, outdoor signs, patio decorations, and storage boxes usually need more protection than indoor crafts or drawer repairs. Waterproof performance is most useful after the glue has dried and cured properly. It does not mean glue should be applied on wet, dirty, or muddy wood. The surface should still be dry, clean, and closely fitted before application. Outdoor repairs also need more patience because rain, heavy weight, soil moisture, or daily movement can stress the joint too soon if the glue has not fully cured.
- Use for damp areas: Planters, garden furniture, fences, gates, and patio wood.
- Dry first: Waterproof glue still needs a clean, dry bonding surface.
- Cure before exposure: Keep repaired items away from rain during curing.
- Check pressure: Outdoor joints should stay clamped or weighted firmly.
| Outdoor Repair | Common Damage | Glue Feature Needed | Practical Note |
|---|---|---|---|
| Garden bench | Split slat or loose brace | Waterproof bond | Let cure before sitting on it |
| Fence board | Cracked edge or loose trim | Weather resistance | Clean dirt from the seam first |
| Planter box | Open corner joint | Moisture resistance | Empty and dry before repair |
| Wooden gate | Loose panel or split strip | Strong outdoor hold | Clamp until stable |
| Patio décor | Broken decorative part | Clear waterproof finish | Remove excess before it collects dust |
| Storage box | Separated edge | Water-resistant seam | Keep covered during curing |
Which Wood Glue Fits DIY?
A suitable DIY wood glue should be easy to control, strong enough for daily repairs, clean after drying, and useful across more than one project type. Most home repairs are small but visible. A loose drawer edge, cracked toy, lifting trim strip, broken frame corner, shelf split, or garden planter seam does not need complicated tools. It needs glue that comes out smoothly, reaches the joint, holds the parts together, and does not leave a large mess. A fine-tip nozzle is especially important because many DIY mistakes come from applying too much adhesive too quickly. Clear drying also matters because many repairs are done on finished or decorative wood that will stay visible.
- Good control: Fine-tip nozzles help with cracks, corners, and small parts.
- Clean finish: Clear drying helps visible repairs look less patched.
- Wide use: One tube can handle furniture, crafts, toys, shelves, and planters.
- Less waste: Thin lines and small dots reduce overflow and cleanup.
| DIY Project | Main Concern | Glue Feature That Helps |
|---|---|---|
| Loose chair rung | Strong hold inside a round joint | Durable bond and fine nozzle |
| Broken wooden toy | Small detail protection | Clear finish and small dots |
| Picture frame | Clean corner seam | Thin line control |
| Drawer edge | Flat surface alignment | Even spread and steady pressure |
| Shelf split | Closed crack with firm hold | Continuous thin bead |
| Wooden planter | Outdoor moisture | Waterproof performance |
| School model | Easy hand control | Precision tip and quick setting |
Why Choose GleamGlee Wood Glue?
GleamGlee Wood Glue is made for clean, practical wood repair work at home, in craft rooms, in workshops, and around outdoor spaces. It is suitable for repairing toys, chairs, cabinets, tables, shelves, wood joints, picture frames, home décor, planters, fences, and garden furniture. The formula is designed to create a strong and durable bond while drying completely transparent, which helps visible seams look cleaner. It also offers waterproof and weather-resistant performance after curing, making it useful for indoor and outdoor repair scenes. The included precision nozzles are important for neat application because they help place glue into cracks, edges, and tight joints without covering the surrounding surface.
- Strong bond: Useful for chairs, tables, cabinets, shelves, and wood joints.
- Clear finish: Helps visible repairs look cleaner after drying.
- Waterproof use: Suitable for garden furniture, fences, planters, and damp areas.
- Precision nozzles: Helps control glue on cracks, corners, and small parts.
- Multi-purpose adhesion: Bonds wood and can also work with metal, plastic, ceramic, and more.
| GleamGlee Feature | Practical Benefit | Common Use |
|---|---|---|
| Fast-drying formula | Helps small repairs set quickly | Toys, trim, frames |
| Transparent finish | Reduces visible glue lines | Cabinets, décor, light wood |
| Waterproof strength | Supports outdoor use after curing | Planters, fences, benches |
| Durable bond | Handles regular household use | Chairs, tables, shelves |
| Fine-tip nozzles | Reduces messy overflow | Cracks, corners, joints |
| Multi-material bonding | Handles mixed repair scenes | Wood with plastic, metal, or ceramic |
Which Wood Glue Should You Keep at Home?
The wood glue kept at home should handle the repairs that happen most often: loose chair parts, cracked toys, lifting trim, split shelves, picture frame corners, small cabinet problems, wooden décor, and outdoor wood pieces. A useful home glue should not be limited to one narrow job. It should be easy to apply in small amounts, dry cleanly, and resist moisture for pieces that may be used near kitchens, bathrooms, patios, or gardens. A compact tube with precision nozzles is often more practical than a large bottle because small repairs need control, not volume. The glue should also store well, with the nozzle wiped and capped after use to prevent clogging.
- Keep one clear-drying glue: It fits more visible repairs.
- Choose waterproof performance: It gives more flexibility indoors and outdoors.
- Pick a fine nozzle: Small repairs are easier to control.
- Store it cleanly: Wipe the tip and close the cap tightly after use.
| Home Repair Situation | Useful Glue Quality | Application Tip |
|---|---|---|
| Chair feels loose | Strong durable bond | Apply around the inserted joint |
| Toy breaks | Clear finish | Use tiny dots only |
| Cabinet edge lifts | Thin controlled line | Clamp or tape while setting |
| Frame corner opens | Precision placement | Keep glue off the front face |
| Shelf starts splitting | Even coverage | Press crack closed steadily |
| Planter corner separates | Waterproof formula | Dry the wood before gluing |
How to Get Better Wood Glue Results?
Better wood glue results come from cleaner surface contact, controlled glue amount, steady pressure, and enough curing time before the repaired item is used again. A repair may look simple, but strength is built through small details: dry wood, tight fit, thin glue layer, clean squeeze-out removal, and no movement while the bond develops.
For small repairs, the biggest improvement usually comes from using less glue and placing it more accurately. A loose chair rung, drawer edge, picture frame corner, wooden toy, or shelf split does not need heavy glue. It needs full contact between the broken surfaces. A thin, even layer gives the joint better contact and leaves less residue around the seam.
The repair should also match the way the item will be used. A decorative wood sign needs a clean surface and clear finish. A chair joint needs strong pressure and longer rest time. A garden planter needs dry wood before gluing and moisture resistance after curing. Better results come from treating each project by size, stress level, and exposure, not from using the same glue amount every time.
| Result Goal | What To Do | What To Avoid |
|---|---|---|
| Stronger bond | Clean dust, old glue, and loose fibers | Gluing over dirt or failed glue |
| Cleaner seam | Use a thin line with a fine nozzle | Squeezing a thick bead |
| Less squeeze-out | Spread glue evenly before pressing | Applying glue only in one large spot |
| Straighter repair | Dry-fit and align before gluing | Adjusting parts after glue starts setting |
| Better outdoor hold | Let glue cure before moisture exposure | Putting repaired wood outside too soon |
| Smoother finish | Remove residue before it hardens | Sanding heavy glue lumps later |
How Long Should Wood Glue Dry?
Wood glue drying time depends on glue amount, wood type, joint size, room temperature, humidity, and how much pressure is used. A small craft repair may set quickly enough to stay in place within minutes, but a chair, shelf, cabinet, table edge, or outdoor planter should rest longer before normal use. Fast setting does not mean the repair has reached full strength. A joint can feel stable on the outside while the glue inside is still building strength. Thick glue beads, damp wood, cold rooms, and deep cracks can slow drying. For repairs that carry weight or face movement, waiting longer is safer than testing the bond too soon.
- Small craft repairs: Allow the piece to sit still until it no longer shifts when touched lightly.
- Furniture joints: Keep pressure on the joint longer because chairs, tables, and shelves face repeated stress.
- Outdoor repairs: Let the bond cure before rain, soil moisture, or heavy handling.
- Thick glue areas: Expect slower drying when too much glue is trapped inside the seam.
| Repair Type | Minimum Rest Before Moving | Better Wait Before Normal Use | Extra Note |
|---|---|---|---|
| Small wood craft | 15–30 minutes | Several hours | Keep parts flat and still |
| Picture frame corner | 30–60 minutes | 12–24 hours | Check corner stays square |
| Wooden toy | 30–60 minutes | 24 hours | Avoid pulling small parts early |
| Chair rung | 1–2 hours clamped | 24 hours or more | Do not sit on it too soon |
| Shelf split | 1–2 hours clamped | 24 hours or more | Do not load weight early |
| Outdoor planter | 2 hours or more | 24–48 hours | Keep dry during curing |
| Fence or gate repair | Several hours supported | 24–48 hours | Avoid stress from wind or use |
How Can You Avoid Weak Wood Glue Repairs?
Weak wood glue repairs often happen when the glue cannot reach clean, matching wood surfaces. Dust, old glue, wax, polish, dampness, loose fibers, and wide gaps all reduce contact. More glue does not fix these problems. In fact, extra glue can create a thick layer that squeezes out unevenly and leaves the joint less stable. A strong repair needs surface contact first. Before gluing, press the parts together dry and check whether the seam closes. If it does not close, clean the joint, remove loose material, adjust the fit, or use better pressure. For high-stress pieces such as chairs, shelves, stair parts, and outdoor gates, glue may need support from clamps, dowels, screws, or replacement parts depending on the damage.
- Clean first: Remove dust, dirt, and old failed glue from the bonding area.
- Dry-fit the parts: Make sure the seam closes before adding adhesive.
- Use steady pressure: Hold the joint still while the glue sets.
- Wait before stress: Do not load, sit on, pull, or hang weight from the repair too early.
| Weak Repair Sign | Likely Cause | Better Method |
|---|---|---|
| Joint opens again | Poor fit or not enough curing time | Dry-fit, clamp longer, wait before use |
| Glue peels off surface | Dust, wax, or old finish blocked contact | Clean and lightly sand bonding area |
| Thick soft glue inside gap | Too much glue or wide opening | Improve fit before applying glue |
| Parts slide while drying | Glue layer too heavy | Use less glue and clamp evenly |
| Repair feels loose after curing | Movement during drying | Hold still with clamps, tape, or weight |
| Outdoor repair fails early | Moisture exposure too soon | Cure fully in a dry area first |
How Can You Keep Wood Glue Lines Small?
Wood glue lines stay small when the joint fits tightly and the adhesive is applied in a narrow, even layer. Large glue lines usually come from wide gaps, too much glue, uneven pressure, or applying adhesive too close to the visible face. On furniture, cabinets, picture frames, toys, and décor pieces, the glue line is part of the final appearance. If it is thick, shiny, or raised, the repair can look rough even when the bond holds. A fine-tip nozzle gives better control because it lets the glue enter the seam instead of spreading across the surface. For wider contact areas, spreading the glue thinly before pressing helps prevent heavy squeeze-out.
- Use a fine nozzle: Place glue inside the seam, crack, or joint.
- Apply a narrow bead: Start small and add more only when dry spots remain.
- Spread before pressing: Thin coverage controls overflow better than one thick bead.
- Clamp evenly: Uneven pressure can force glue out on one side.
| Project | Small Glue Line Method | What Makes The Line Too Large |
|---|---|---|
| Picture frame | Thin line on cut edge only | Glue placed on front face |
| Chair rung | Light coat around inserted part | Filling the hole with glue |
| Wooden toy | Tiny dots on contact points | Covering the full broken area heavily |
| Cabinet edge | Narrow bead on hidden contact side | Glue squeezed too close to visible edge |
| Shelf split | Thin line worked into crack | Thick bead left on top surface |
| Model piece | Toothpick or fine nozzle | Tube opening too wide |
| Outdoor planter | Thin continuous waterproof line | Overfilling seam and leaving ridge |
How Can You Test Wood Glue Repairs?
Test wood glue repairs gently and in stages instead of forcing the joint immediately. A repair can feel firm at first touch but still need more time before it handles daily stress. Start with a light visual check: the seam should be closed, the pieces should not have shifted, and the surface should not have thick dried glue that interferes with fit. Then use a light touch test. If the part moves, the bond is not ready. For furniture, shelves, outdoor wood, and anything that carries weight, wait longer before applying real force. Testing too aggressively can break a repair that would have held well after full curing.
- Check alignment first: Make sure the part dried in the correct position.
- Use light pressure only: Do not twist, pull, or load the joint too early.
- Inspect the seam: Look for gaps, lifted edges, or soft glue pockets.
- Delay heavy use: Weight-bearing repairs need a longer rest period.
| Repair Item | Early Check | Full-Use Check |
|---|---|---|
| Wooden toy | Parts stay attached with light touch | No movement during gentle play |
| Picture frame | Corner stays square | Frame can be handled without opening |
| Chair rung | Rung does not rotate by hand | Chair supports sitting after full cure |
| Shelf split | Crack remains closed | Shelf holds light load first, then normal load |
| Cabinet panel | Edge stays flat | Door or drawer opens without lifting |
| Planter box | Seam stays sealed | Box holds soil only after full cure |
| Fence slat | Board stays aligned | Holds under outdoor movement after curing |
How Can GleamGlee Wood Glue Improve Results?
GleamGlee Wood Glue helps improve repair results by combining strong bonding, clear drying, waterproof performance, and precision application. The fine-tip nozzles are especially useful for neat repair work because many wood glue problems start with poor control. A narrow nozzle allows small dots, thin lines, and clean placement inside cracks, corners, and joints. This helps reduce squeeze-out on visible repairs such as chairs, toys, cabinets, frames, shelves, trims, and wooden décor. The clear finish supports a cleaner look after drying, while the waterproof and weather-resistant formula makes the glue practical for garden furniture, planters, fences, and other outdoor wood items once properly cured.
- Precision nozzles: Better control for cracks, tight seams, and small parts.
- Clear drying: Helps visible repairs look cleaner after curing.
- Waterproof strength: Useful for indoor and outdoor wood repairs.
- Multi-purpose use: Bonds wood and can also work with metal, plastic, ceramic, and more.
| GleamGlee Feature | Repair Benefit | Suitable Use |
|---|---|---|
| Fine-tip nozzles | Less overflow and cleaner lines | Cracks, frames, toys, trim |
| Strong durable bond | Better daily-use repair | Chairs, tables, shelves, cabinets |
| Fast setting | Easier handling on small jobs | Craft work, toy repair, drawer edges |
| Transparent finish | Less visible glue line | Décor, frames, light wood, cabinets |
| Waterproof formula | Better outdoor resistance after cure | Planters, fences, garden furniture |
| Multi-material adhesion | More repair flexibility | Wood with plastic, metal, or ceramic |
Conclusion
Applying wood glue neatly comes down to a few practical habits: clean the wood, keep the surface dry, test the fit, apply a thin line, press evenly, and clean the squeeze-out before it becomes a hard ridge. A neat repair does not need a large amount of glue. It needs accurate placement and full contact between the wood surfaces. For everyday repairs such as loose chairs, cracked shelves, cabinet edges, picture frames, wooden toys, planters, and garden furniture, these small details can make the repair look cleaner and last longer.
GleamGlee Wood Glue is designed for this kind of clean, controlled repair work. Its strong bond, clear finish, waterproof performance, and precision nozzles help reduce mess while supporting indoor and outdoor wood projects. For homeowners, DIY users, craft makers, and repair-focused shoppers, it offers a practical way to fix wood pieces without messy glue lines. To order GleamGlee branded wood glue or request customized packaging, formula options, wholesale pricing, or sample support, contact the GleamGlee team for product details and cooperation options.





















