 Skip to content
A metal fence usually fails in small ways before it becomes a big repair bill. A bracket starts to rattle after months of wind. A decorative spear loosens on the top rail. A small crack appears near a welded joint. A gate latch plate shifts a few millimeters and suddenly the gate does not close smoothly. These problems look small, but they are annoying because metal fencing is not always easy to repair at home. Welding may be too expensive for a minor issue. Screws may leave ugly holes. Replacement parts may be hard to match, especially on older garden fences, balcony railings, pool fences, or decorative gates.
Metal fence adhesive gives homeowners, repair shops, hardware retailers, and private-label brands a cleaner way to solve light-duty metal fence problems. It is not a replacement for professional welding in structural repairs, but it can be a practical no-weld solution for small cracks, loose trim, lightweight brackets, decorative metal parts, and mixed-material fence accessories. When the surface is clean, dry, sanded, and tightly fitted, adhesive can create a neat repair without heat, sparks, drilling, or repainting a large section.
Metal fence adhesive can fix small non-structural fencing damage such as loose caps, trim pieces, decorative metal parts, narrow cracks, and light brackets. The repair works best when rust, grease, dust, and loose paint are removed first. Apply a thin layer, press the parts firmly, hold them still, and allow full curing before outdoor use.
The real question is not whether adhesive is “strong enough” in a general sense. The better question is whether the damaged fence part is the right type of part for adhesive repair. A loose decorative scroll on a garden fence is very different from a cracked main gate hinge. One can often be handled with a controlled adhesive repair. The other may need welding, bolting, or full replacement. This guide explains that difference in plain language, so the repair decision feels easier, safer, and more practical.
What Can Metal Fence Adhesive Fix?
Metal fence adhesive is best used on small, close-fitting fence damage where the metal part still has its original shape and does not carry major weight. It is suitable for loose caps, decorative pieces, light trim, small brackets, narrow cracks, and minor gaps around non-structural fence accessories. These are common problems on garden fences, patio railings, balcony rails, pool fence accessories, metal gates, and outdoor decorative fencing.
The repair works best when the two bonding surfaces can touch tightly. If the metal is badly bent, missing, deeply rusted, or under constant pulling force, adhesive alone is not the right repair. A good bond depends on clean metal contact, enough surface area, low movement, and full curing time. In many small repairs, adhesive can save the cost of replacing a fence section or calling a welder for a minor issue.
Before choosing adhesive, check the damage in a practical way. Ask whether the part is decorative or structural, whether it moves often, whether it supports weight, and whether rust has weakened the metal. Metal fence adhesive is a smart no-weld fix for light repairs, but broken posts, heavy hinges, gate frames, and safety rails need bolts, welding, replacement parts, or professional repair.
Metal Fence Adhesive for Cracks
Metal fence adhesive can repair small cracks when the cracked metal still fits closely together and the crack is not carrying major weight. These cracks often appear on decorative fence caps, thin ornamental scrolls, light rail covers, small metal trims, and non-structural panels. A narrow crack is usually easier to bond than a wide open split because adhesive works best when the bond line is thin and the two surfaces touch firmly. If the crack has spread through a main rail, gate frame, post, or security bar, adhesive should not be treated as the main repair because those areas handle load, bending, impact, or repeated movement.
A practical crack repair starts with checking the crack length, gap width, rust level, and movement. If the metal moves when pressed by hand, adhesive may need support from a backing plate, screw, clamp, or replacement part. If orange rust powder keeps falling from the crack, the surface needs brushing and sanding before any glue is applied.
| Crack Location | Adhesive Fit | Practical Repair Advice |
|---|---|---|
| Decorative top cap | High | Clean, sand, apply thin glue, tape while curing |
| Ornamental scroll | High | Bond at several contact points if possible |
| Thin trim strip | High | Use a fine nozzle and avoid excess glue |
| Light rail cover | Medium | Add temporary clamp during curing |
| Gate latch area | Medium to low | Use adhesive only if the part is not load-bearing |
| Main fence rail | Low | Use welding, bolting, or replacement |
| Fence post crack | Very low | Structural repair is needed |
| Security bar crack | Very low | Do not rely on adhesive alone |
Key checks before gluing a cracked fence part:
- The crack should be narrow enough for close contact.
- The damaged area should not support body weight, gate weight, or safety protection.
- Loose rust and paint must be removed before bonding.
- The part should stay still during curing.
- If the crack opens when pushed, add mechanical support or choose another repair method.
Metal Fence Adhesive for Loose Parts
Loose fence parts are one of the best uses for metal fence adhesive because the damage is usually small but highly visible. A loose cap, trim strip, decorative spear, scroll detail, address plate, or bracket cover may not affect the whole fence structure, but it can make the fence look old, noisy, or poorly maintained. Adhesive works well in these repairs when the loose part still sits flat against the original surface and has enough contact area for bonding. It is especially useful when drilling new holes would damage the finish or when replacement parts are hard to match.
For these repairs, the main goal is clean contact. The loose part should be removed if possible, cleaned on both sides, lightly sanded, and tested before gluing. If it rocks, bends, or leaves a wide gap, the bond may be weak. A small amount of adhesive is usually enough. Too much glue can lift the part, squeeze out around the edges, and leave a messy line on visible fencing.
| Loose Part | Adhesive Suitability | What To Watch |
|---|---|---|
| Metal fence cap | High | Make sure the cap sits flat |
| Decorative spear | High | Bond the base, not the visible face |
| Scroll ornament | High | Apply glue only at contact points |
| Trim strip | High | Tape along the strip during curing |
| Address plate | High | Keep it level while curing |
| Bracket cover | Medium | Check whether it carries any force |
| Latch cover | Medium | Avoid stress until fully cured |
| Loose hinge plate | Poor | Use bolts or welding |
Good loose-part repair habits:
- Test the fit before opening the adhesive.
- Use a thin layer instead of a thick bead.
- Keep glue away from visible outer edges.
- Use masking tape to hold light parts steady.
- Do not use the fence or gate until curing is complete.
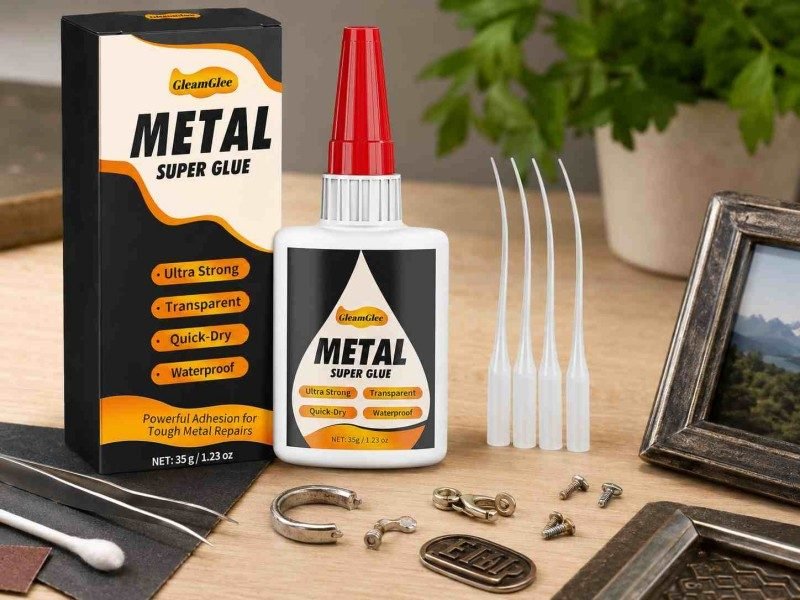
GleamGlee Metal Glue is useful here because the precision nozzle helps place adhesive in narrow contact areas without flooding the repair. The clear finish also helps keep visible fence details cleaner after bonding.
Metal Fence Adhesive for Gates
Metal fence adhesive can help with gate repairs, but only on the right parts. A gate is different from a fixed fence panel because it moves, swings, shakes, and receives repeated pulling force. Every time a gate opens, closes, or slams, the latch, hinge area, trim, covers, and frame experience vibration. Adhesive can work well on light gate accessories such as decorative plates, trim strips, small caps, number plates, latch covers, and non-load-bearing bracket covers. It should not be used alone on heavy hinges, sagging frames, broken gate corners, main latch plates, or any part that keeps the gate safely attached.
A simple safety rule is useful: if the gate could fall, sag, unlock, or become unsafe when the bond fails, adhesive is not enough. In those cases, use screws, bolts, welding, replacement hardware, or a reinforced plate. Adhesive can still help as a secondary support to reduce rattling, seal a small gap, or hold a cover in place, but it should not carry the main force.
| Gate Area | Can Adhesive Help? | Better Choice When Load Is High |
|---|---|---|
| Decorative gate trim | Yes | Tape or clamp while curing |
| Gate cap | Yes | Adhesive works if fit is tight |
| Number plate | Yes | Keep level during curing |
| Light latch cover | Yes, with caution | Add screw if touched often |
| Hinge cover | Sometimes | Only if decorative |
| Main hinge plate | No | Bolts, welding, or replacement |
| Sagging gate frame | No | Structural repair |
| Broken gate corner | No | Welding or reinforced repair |
Best uses around gates:
- Reattaching decorative trim that does not carry force.
- Securing a loose cap at the top of a gate.
- Fixing a small cover plate around a latch.
- Bonding a metal sign or number plate to the gate.
- Reducing minor rattling on a lightweight accessory.
Gate repairs need extra curing care. Even if the adhesive grips quickly, the gate should not be opened and closed too soon. Movement during curing can weaken the bond before it reaches full strength.
Metal Fence Adhesive Limits
Metal fence adhesive has clear limits, and knowing those limits prevents wasted time and unsafe repairs. Adhesive is best for small bonding tasks where the surfaces touch closely and the repaired part does not carry major load. It is not designed to replace missing metal, rebuild a broken post, hold a heavy gate hinge, repair a bent security rail, or fix a fence section that moves under body weight. Even a strong adhesive can fail if the joint is under peel force, repeated bending, strong impact, or heavy outdoor vibration.
The most common overuse happens when a small-looking problem is actually structural. A cracked hinge plate, rusted post base, or broken gate frame may look like a simple gap, but the part may be supporting weight or resisting movement every day. If adhesive is used there as the only repair, the bond may fail suddenly. A safer approach is to use welding, bolts, brackets, replacement parts, or professional metal repair for those areas.
| Damage Type | Adhesive Alone? | Reason |
|---|---|---|
| Loose decorative part | Yes | Low load and good contact |
| Small cap or trim gap | Yes | Light-duty repair |
| Narrow non-structural crack | Often | Works if metal fits tightly |
| Light bracket cover | Sometimes | Only if it does not carry force |
| Main hinge damage | No | High load and movement |
| Broken post | No | Structural support issue |
| Bent gate frame | No | Needs realignment and reinforcement |
| Deep rust hole | No | Base metal is too weak |
| Security fence break | No | Safety-critical repair |
Use another repair method when:
- The fence part supports weight or safety.
- The metal is deeply rusted or thinning.
- The part bends or flexes during normal use.
- The gap is too wide for close contact.
- The repair point is hit, pulled, or twisted often.
- The damaged area is part of a gate hinge, post, or main rail.
The best role for metal fence adhesive is practical and specific: neat, fast, no-weld repair for small metal fence problems. When used on the right damage, it can reduce replacement costs, improve appearance, stop rattling, and extend the life of outdoor fencing parts.
Which Metal Fence Adhesive Works Best?
The best metal fence adhesive is not always the thickest or the strongest-looking product. A good choice depends on the fence material, crack size, contact area, outdoor exposure, movement level, and repair purpose. For small, close-fitting metal fence parts, a fast clear metal glue with a precision nozzle is often easier to use than bulky construction adhesive or mixed epoxy.
For outdoor fencing, the adhesive should bond clean metal, resist moisture after curing, stay stable through normal weather changes, and apply neatly without leaving a heavy visible line. Decorative fence parts, trim strips, caps, small brackets, and narrow cracks usually need controlled application more than large-volume filling. If the repair has a wide gap, missing metal, heavy load, or constant movement, adhesive alone may not be enough.
A practical choice starts by matching the adhesive to the repair. Fast metal glue is suitable for small precise jobs. Epoxy may fit larger gaps or reinforced patches. Mechanical fasteners are better for hinges and moving gate parts. Welding or replacement is still the safest option for posts, main rails, security bars, and structural gate frames.
Metal Fence Adhesive Types
Metal fence adhesive comes in several useful types, and each one fits a different repair situation. A fast clear metal glue is usually best for small fence cracks, loose caps, decorative pieces, trim strips, light brackets, and narrow metal-to-metal contact points. It is easy to apply, needs no mixing, and works well when two surfaces fit closely together. A two-part epoxy is better when the repair has a larger gap or needs more filling thickness. Construction adhesive may help with larger mixed-material surfaces, but it is usually less neat for tiny fence details. Welding and bolts are still better when the part carries weight or controls gate safety.
The wrong adhesive often fails because the repair type was mismatched. A thin instant metal glue should not be expected to rebuild missing metal. A thick adhesive should not be squeezed into a tiny decorative seam where a fine nozzle is needed. Before choosing, look at the gap, surface contact, movement, and visibility of the repair.
| Adhesive Type | Best Fence Use | Main Advantage | Main Limit |
|---|---|---|---|
| Fast clear metal glue | Caps, trim, small cracks, ornaments | Quick, clean, precise | Not for wide gaps |
| Two-part epoxy | Larger gaps, patches, reinforced fixes | Better filling ability | Needs mixing and longer cure |
| Construction adhesive | Large mixed-material contact areas | Covers more surface | Can look messy on small metal parts |
| Polyurethane adhesive | Some outdoor mixed-material jobs | Slight flexibility | May expand and need cleanup |
| Screws or bolts | Hinges, latches, brackets | Strong mechanical hold | Leaves holes or visible hardware |
| Welding | Posts, main rails, gate frames | Structural strength | Requires tools and skill |
Best selection habits:
- Use fast clear metal glue when the parts fit tightly.
- Use epoxy when there is a larger gap to fill.
- Use screws or bolts when the part is touched or pulled often.
- Use welding when the repair affects safety or structure.
- Avoid using one adhesive for every type of metal fence damage.
Clear Metal Fence Adhesive
Clear metal fence adhesive works best when the repaired area is visible and appearance matters. Many metal fences are placed in front yards, gardens, patios, balconies, pools, and shop entrances. A rough dark glue line on a black fence, a cloudy patch on a silver railing, or a thick bead around a decorative cap can make the repair look cheap. A clear adhesive helps the repair blend better with different fence colors and finishes, especially when applied in a thin controlled layer.
Clear adhesive is especially useful on ornamental metal fencing because the repair points are often small and exposed. Decorative scrolls, spear tops, caps, trim lines, signs, and thin rail covers usually do not need a large amount of adhesive. They need a neat bond that does not draw attention. GleamGlee Metal Glue dries clear and is designed for precise application, making it suitable for visible outdoor fence repairs where a clean finish is important.
| Fence Surface | Why Clear Adhesive Helps |
|---|---|
| Black metal fence | Reduces obvious white or gray repair marks |
| Silver aluminum rail | Keeps the bond line less noticeable |
| White painted railing | Avoids dark patch lines |
| Bronze garden gate | Helps preserve decorative appearance |
| Pool fence accessory | Keeps visible repair cleaner |
| Metal address plate | Avoids messy glue around edges |
| Ornamental scroll | Supports small contact points with less residue |
Clear adhesive works best when:
- The repair area is visible from normal viewing distance.
- The part is decorative or light-duty.
- The adhesive can be applied in a thin layer.
- Excess glue can be avoided before curing.
- The surface is clean enough for the bond to sit flat.
Clear drying does not mean careless application will disappear. If too much adhesive is used, the repair may still show as a raised line. A fine nozzle, light pressure, and quick cleanup around the edge help create a cleaner final result.
Waterproof Metal Fence Adhesive
Waterproof metal fence adhesive is important because outdoor fencing is constantly exposed to moisture. Even if the fence is not directly under rain every day, it may face morning dew, sprinklers, humidity, washing, soil splash, and temperature changes. A good outdoor repair adhesive should resist water after curing and stay firm under normal outdoor conditions. This is especially important for garden fences, balcony railings, pool fence accessories, patio gates, metal edging, and yard dividers.
The most important detail is that waterproof performance starts after proper curing. Adhesive should not be applied to wet metal, and the repair should not be soaked before it has developed strength. If the surface is damp, oily, rusty, or covered with loose paint, water resistance will not save the repair. The adhesive may remain strong, but the weak layer underneath can separate from the fence. A waterproof metal fence adhesive needs a dry, clean, stable surface to work properly.
| Outdoor Condition | Adhesive Requirement | Practical Repair Note |
|---|---|---|
| Rain exposure | Water resistance after cure | Avoid bonding right before rain |
| Morning dew | Fully dry surface before use | Repair later in the day if needed |
| Sprinklers | Moisture resistance | Turn off sprinklers during curing |
| Pool area | Waterproof performance | Use only for non-structural parts |
| Garden soil splash | Strong surface contact | Clean dirt and minerals first |
| Humid weather | Stable curing time | Allow more patience before stress |
| Bare sanded metal | Rust protection after cure | Paint or seal surrounding metal if needed |
Good waterproof repair habits:
- Choose a dry repair window.
- Do not apply adhesive on wet metal.
- Remove rust before bonding.
- Keep water away during curing.
- Protect exposed bare metal after the repair.
- Do not use adhesive alone on safety-critical pool fence or balcony rail damage.
GleamGlee Metal Glue is suitable for small outdoor metal fence repairs where waterproof performance, clean application, and precise bonding are needed. The strongest results come from using it on the right repair area and giving the bond enough time to cure before rain, washing, or movement.
Multi-Surface Metal Fence Adhesive
A useful metal fence adhesive should bond more than metal alone because many fence systems include mixed materials. A garden fence may connect metal trim to wood. A gate may have rubber stops, plastic caps, PVC sleeves, wall-mounted plates, or concrete contact points. A patio railing may include metal parts attached to stone, brick, or painted surfaces. In these cases, a multi-surface adhesive is more practical than a product that only works on one material.
GleamGlee Metal Glue is designed for metal-to-metal bonding and can also bond metal with plastic, rubber, wood, concrete, PVC, and wall surfaces. This gives the product more daily repair value. One tube can handle a loose fence cap, a metal sign plate, a garden tool, a small appliance panel, or a decorative outdoor fixture. For small home repairs, this reduces the need to buy several different adhesives for different materials.
| Material Combination | Common Fence Repair | Adhesive Use |
|---|---|---|
| Metal to metal | Caps, trim, brackets, scrolls | Strong match if surfaces fit closely |
| Metal to wood | Decorative trim on wooden fence | Sand and clean both surfaces |
| Metal to concrete | Light bracket cover or sign plate | Remove dust from concrete first |
| Metal to PVC | Fence sleeve or accessory | Lightly roughen smooth PVC |
| Metal to rubber | Gate stop or pad | Clean oil and dirt carefully |
| Metal to wall surface | Small plate or outdoor sign | Check paint stability first |
| Metal to plastic | Cap, cover, or accessory | Sand smooth plastic if needed |
Multi-surface repair tips:
- Roughen smooth plastic, PVC, or painted metal before bonding.
- Remove concrete dust completely before applying adhesive.
- Do not bond to loose wall paint or weak coating.
- Avoid oily rubber surfaces unless they can be cleaned well.
- Test fit mixed materials before applying adhesive.
- Use clamps or tape when materials have different shapes or flexibility.
The main advantage of multi-surface adhesive is convenience, but the surface condition still decides the result. Metal, wood, concrete, PVC, rubber, and painted surfaces all behave differently. A careful repair begins with cleaning, light sanding where needed, controlled adhesive application, and steady pressure during curing.

How Do You Prep Metal Fence Adhesive Repairs?
Prepare metal fence adhesive repairs by making the bonding area clean, dry, firm, and slightly rough. Remove loose rust, oil, dust, old adhesive, peeling paint, and moisture before applying glue. The adhesive should bond to stable metal or a stable coated surface, not to dirt, powder, weak paint, or rust flakes.
Good preparation usually takes longer than applying the adhesive itself. A small decorative cap may need only 3–5 minutes of cleaning and sanding, while an old rusted bracket may need 10–20 minutes. That time directly affects the result. A rushed repair may look fixed on the first day but loosen after rain, gate movement, or temperature change.
The main goal is simple: create close contact between two stable surfaces. If the metal is greasy, wet, flaky, badly rusted, or bent out of shape, the bond will be weaker. Before opening the adhesive, check the fit, clean both sides, remove weak layers, lightly sand the contact zone, wipe away dust, and prepare tape or clamps to hold the repair still.
Clean Metal Fence Adhesive Surfaces
Clean surfaces are the base of every strong metal fence adhesive repair. Outdoor fencing collects more contamination than it appears to have at first glance. A black garden fence may look clean from a few feet away, but the repair point can still carry dust, pollen, hand oil, rain minerals, soil splash, spider web residue, old paint powder, and rust dust. If adhesive is applied directly over those layers, it may stick to the contamination instead of the actual fence surface. The repair may feel firm for a short time, then loosen after rain, wind, or light pulling. Cleaning should be done on both sides of the repair, not only on the visible fence surface.
For small repairs, a dry cloth and brush may be enough to remove loose dirt. For greasy areas, use a suitable degreasing cleaner and let the surface dry fully before sanding or gluing. Around gates, latches, and hinges, oil or lubricant may spread onto nearby metal, so those areas need extra attention. If the fence has old adhesive residue, remove as much as possible with a scraper or blade before applying new glue.
| Surface Condition | What It Means | Prep Needed Before Adhesive |
|---|---|---|
| Dry dust | Light powder on surface | Brush and wipe clean |
| Soil splash | Brown marks near lower rails | Wipe, scrub lightly, dry fully |
| Hand oil | Smooth or slightly shiny touch area | Degrease and dry |
| Grease near hinge | Oily film around moving parts | Clean repeatedly until no slick feel |
| Old glue | Raised clear, yellow, or hard residue | Scrape off before sanding |
| Loose paint | Flakes or powder come off when rubbed | Remove weak paint first |
| Wet surface | Rain, dew, washing water, condensation | Wait until fully dry |
Practical cleaning points:
- Clean an area slightly larger than the planned bond line.
- Clean both the loose part and the fence surface.
- Do not apply adhesive over oily hinge residue.
- Do not glue over soil, dust, chalky paint, or old loose glue.
- Let the surface dry fully before applying metal fence adhesive.
- Avoid touching the cleaned area with bare fingers before bonding.
A simple test is useful. After cleaning, rub the area with a clean white cloth. If the cloth still picks up orange rust, black dust, grease, or paint powder, the surface is not ready. Keep cleaning or sanding until the contact area feels firm and dry.
Rust and Metal Fence Adhesive
Rust is one of the biggest reasons metal fence adhesive repairs fail outdoors. The problem is not only appearance. Rust creates a weak layer between the adhesive and the solid metal. If glue is applied over loose rust, the adhesive may bond strongly to the rust layer, but the rust itself can break away from the fence. From the outside, the repair looks like the glue failed. In reality, the base layer failed. Before using metal fence adhesive, rust must be checked carefully, especially near lower rails, fence post bases, gate latches, screw holes, old welded areas, and places where water sits after rain.
Light surface rust can often be prepared by brushing and sanding. Flaking rust needs more work because every loose piece must be removed before bonding. Deep rust is different. If the metal has become thin, soft, cracked, or holed, adhesive alone is not a reliable repair. In that case, use a replacement part, reinforcement plate, bolts, welding, or another structural method. Metal fence adhesive is useful when there is enough solid material left to bond.
| Rust Level | What You See | Adhesive Decision |
|---|---|---|
| Light surface rust | Thin orange stain, metal still firm | Good after sanding and cleaning |
| Powder rust | Orange dust comes off when touched | Brush and clean until stable |
| Flaking rust | Raised scales break away | Remove flakes; bond only if solid metal remains |
| Rust near screw holes | Orange ring around hardware | Clean carefully; check if holes are enlarged |
| Rust at gate hinge | Corrosion plus movement | Do not rely on adhesive for hinge strength |
| Deep rust hole | Metal is thin, broken, or perforated | Adhesive alone is not enough |
| Post base rust | Lower metal feels weak | Structural repair or replacement needed |
Rust preparation points:
- Use a wire brush for flaky rust.
- Use sandpaper or an abrasive pad for surface rust.
- Clean again after sanding because rust dust weakens adhesion.
- Do not leave orange powder inside the crack or seam.
- Check whether the metal still feels firm after rust removal.
- Protect exposed metal after the adhesive has cured if the area will remain outdoors.
A good repair surface should not shed rust when rubbed. If rust keeps returning as powder during sanding, the metal may be too deteriorated for adhesive alone. For decorative parts, this may still be manageable with a backing piece or replacement accessory. For posts, hinges, and main rails, weak rusted metal needs a stronger repair plan.
Sanding for Metal Fence Adhesive
Sanding helps metal fence adhesive grip by creating a slightly rough contact surface. Many fence parts are smooth, painted, powder-coated, galvanized, or polished. These surfaces can look neat but may not give adhesive enough grip if left untouched. Light sanding dulls the surface, removes weak coating, and improves contact. The goal is not to damage the fence or remove paint everywhere. The goal is to prepare only the area where the adhesive will sit, so the bond has a stable surface beneath it.
For most small fence repairs, sandpaper in the 120–220 grit range is practical. Use a coarser grit if there is rust or old adhesive, and a finer grit if the surface is painted and only needs light roughening. For tiny decorative details, fold a small piece of sandpaper and work only on the contact point. For narrow cracks, a small abrasive strip or file can help reach the inside edge. After sanding, always wipe away dust. Sanding dust can behave like a dry powder layer and weaken the repair.
| Fence Material or Finish | Sanding Goal | Practical Method |
|---|---|---|
| Painted steel | Remove loose paint and dull stable paint | Light sanding around bond area |
| Powder-coated metal | Create slight texture | Scuff gently, avoid over-sanding visible areas |
| Bare steel | Remove oxidation and brighten contact area | Sand until firm surface appears |
| Aluminum | Dull the smooth surface | Light sanding, then wipe clean |
| Stainless steel | Break the slick surface | Scuff with abrasive pad |
| Galvanized metal | Prepare carefully without over-removing coating | Light sanding only where bonding |
| Old glue area | Remove raised residue | Scrape first, then sand flat |
Useful sanding points:
- Sand only the bonding zone, not the whole fence section.
- Use masking tape around visible areas to protect the finish.
- Keep the surface flat enough for close contact.
- Do not create deep scratches outside the repair area.
- Wipe away all dust after sanding.
- Test the fit again after sanding before applying adhesive.
The surface should feel dry, firm, and slightly dull. If it still feels slick, glossy, greasy, or powdery, keep preparing. A few extra minutes of sanding and wiping can improve the repair more than adding extra glue later.
Tools for Metal Fence Adhesive
The right tools make a metal fence adhesive repair cleaner, faster, and less stressful. Many small repairs go wrong because the adhesive is applied before the work area is ready. The part shifts, the glue squeezes out, the user searches for tape, or the repair moves before curing. A simple setup prevents those problems. Before opening the tube, prepare cleaning tools, sanding tools, holding tools, and cleanup tools. This is especially important on vertical fence parts, curved rails, gate accessories, and decorative metal pieces that are difficult to hold by hand.
For a small cap or trim repair, the tool list can be simple. For rusted brackets or older fencing, more preparation may be needed. GleamGlee Metal Glue includes precision nozzles, which are useful for small cracks, narrow seams, and hard-to-reach areas. A fine tip helps place adhesive only where it belongs, reducing waste and visible overflow. Tape or a clamp is also important because the repair should stay still while curing.
| Tool | Use | Practical Detail |
|---|---|---|
| Gloves | Keeps hands clean | Useful when working with rust and adhesive |
| Dry cloth | Removes dust and moisture | Use before and after sanding |
| Wire brush | Removes rust flakes | Best for rough or old metal |
| Sandpaper | Roughens bonding area | 120–220 grit works for many small repairs |
| Small scraper | Removes old glue or loose paint | Keep the surface flat |
| Masking tape | Protects paint and holds light parts | Helpful on visible fence areas |
| Clamp | Holds brackets or caps steady | Use light pressure, not crushing force |
| Cotton swab | Cleans small overflow | Use carefully before full cure |
| Precision nozzle | Applies glue in tight spots | Best for cracks and narrow seams |
A repair kit for metal fence adhesive should solve four needs:
- Clean the surface.
- Remove weak layers.
- Apply adhesive accurately.
- Hold the part still during curing.
For small fence parts, masking tape can be enough to hold the piece in place. For a cap or bracket cover, a clamp may give better pressure. For a curved decorative scroll, tape at two points may stop twisting. The holding method should be ready before glue is applied. Once adhesive touches the surface, the repair should be aligned, pressed, and left alone.
Fit Check Before Metal Fence Adhesive
A dry fit check should be done before applying metal fence adhesive. This step is simple but often skipped. Put the loose or cracked part back into position without glue and check how it sits. If the part does not touch closely, the adhesive may have to fill too much space. If it rocks, bends, or pulls away, the repair may need reshaping, clamping, a backing plate, or mechanical support. Glue should not be used as a thick filler to replace missing metal or correct a badly bent piece.
A good fit means the parts align naturally with light hand pressure. The gap should be small, the surface should not wobble, and the part should stay in position long enough to be taped or clamped. This is especially important for fence caps, decorative scrolls, trim strips, gate plates, and bracket covers. On vertical repairs, gravity may pull the piece down before curing, so the holding method must be tested before adhesive is added.
| Fit Problem | What It Means | Better Action |
|---|---|---|
| Part sits flat | Good contact | Adhesive repair is more suitable |
| Small gap under one edge | Slight misalignment | Sand, reshape, or clamp |
| Part rocks when pressed | Uneven contact | Adjust shape before gluing |
| Wide open gap | Adhesive must fill too much space | Use backing, epoxy, or replacement |
| Part springs away | Stored tension in metal | Clamp or choose mechanical support |
| Part carries weight | Adhesive may be overloaded | Use bolts, welding, or hardware |
| Surface crumbles after fitting | Rust or weak coating | Remove weak material first |
Fit check points:
- Test the part before opening the adhesive.
- Make sure both surfaces touch as much as possible.
- Check whether the part moves when lightly pressed.
- Plan tape, clamp, or support before applying glue.
- Do not use extra adhesive to hide a poor fit.
- If the gap is large, consider a backing plate or different repair method.
For metal fence adhesive repairs, a clean fit is often more important than a thick glue layer. The better the contact, the cleaner the bond line and the stronger the repair.
Weather for Metal Fence Adhesive Prep
Weather affects metal fence adhesive repair more than many people expect. Outdoor metal can hold moisture from rain, dew, fog, washing, sprinklers, or condensation. Even when the fence looks dry, water can remain inside cracks, under caps, around screw holes, or behind bracket covers. If adhesive is applied while moisture is trapped inside the joint, the bond may weaken or cure unevenly. A dry repair window is one of the easiest ways to improve the result.
The best time to prepare and bond is when the fence is dry, the air is not too damp, and rain is not expected soon. Morning repairs can be risky if dew is still on the metal. Midday or afternoon may be better after the surface has dried. If the fence is extremely hot from direct sun, let the repair area cool before applying adhesive so the glue is easier to control. Wind can also blow dust onto freshly cleaned surfaces, so keep the bonding area protected after prep.
| Weather Condition | Repair Risk | Better Practice |
|---|---|---|
| Morning dew | Moisture in seams | Wait until fully dry |
| Rain coming soon | Water may disturb curing | Choose another repair time |
| Sprinkler schedule | Water hits repair too early | Turn off or redirect sprinklers |
| High humidity | Slower drying of cleaned areas | Allow more drying time |
| Strong wind | Dust lands on cleaned metal | Clean again before gluing |
| Hot direct sun | Metal surface may be too warm | Work in shade if possible |
| Cold weather | Cure may need more patience | Avoid early stress on repair |
Weather prep points:
- Do not glue wet metal.
- Check hidden seams for moisture.
- Repair after dew has dried.
- Keep sprinklers away during curing.
- Clean again if wind blows dust onto the surface.
- Let overheated metal cool before adhesive application.
A good outdoor repair is not only about the adhesive tube. It is also about timing. Dry metal, stable weather, and enough curing time give the repair a much better chance of staying firm.
How Do You Use Metal Fence Adhesive?
Use metal fence adhesive by applying a thin, controlled layer to a clean and dry bonding area, then pressing the parts together firmly and keeping them still during curing. The repair should not be pulled, bent, rained on, or exposed to gate movement before the adhesive has reached full strength.
The best repair is usually not the one with the most glue. It is the one with the best contact. A narrow crack, loose cap, trim strip, or decorative fence piece needs enough adhesive to wet the bonding surface, but not so much that the part floats, slides, or leaves a thick visible line. For small metal fence repairs, a fine nozzle gives better control than a wide opening.
Before applying glue, prepare everything within reach: adhesive, nozzle, cloth, tape, clamp, gloves, and support tools. Once the adhesive is placed, the part should be aligned quickly and pressed without repeated shifting. A calm, clean, one-time placement gives a stronger and neater result than squeezing glue first and trying to adjust everything afterward.
Apply Metal Fence Adhesive
Metal fence adhesive should be applied in a thin, even layer only on the real contact area. For most small fence repairs, the adhesive should not cover the entire visible surface. It should sit where two parts actually touch: inside a cap, behind a trim strip, along the edge of a crack, under a loose decorative piece, or on the back of a small bracket cover. Too much adhesive can reduce contact, create squeeze-out, collect dust, and leave a raised repair line after curing. A controlled amount is especially important on black painted fences, silver aluminum rails, balcony fencing, garden gates, and visible ornamental details.
A dry fit check should be done before applying adhesive. Put the part in place without glue and check where it touches. These contact points are where adhesive belongs. If only one small edge touches, the repair may be weak. If the part rocks, bends, or springs away, it may need reshaping, tape, clamp support, or a different repair method.
| Repair Type | Where to Apply Adhesive | Amount to Use | Helpful Tip |
|---|---|---|---|
| Loose fence cap | Inside contact walls or base | Thin line | Avoid glue on outer edges |
| Decorative scroll | Small contact points | Small dots | Press at each contact point |
| Trim strip | Back side of strip | Thin continuous line | Tape strip straight while curing |
| Narrow crack | Along crack edge | Very thin bead | Do not flood the surface |
| Bracket cover | Flat contact zone | Thin layer | Clamp lightly if possible |
| Metal sign plate | Back side of plate | Small dots or lines | Keep level before curing |
Application points:
- Use less adhesive on close-fitting metal parts.
- Apply only where the surfaces touch.
- Avoid thick glue piles in narrow cracks.
- Keep adhesive away from visible outer edges.
- Wipe small overflow carefully before it hardens.
- Do not use adhesive to fill missing metal or large gaps.
GleamGlee Metal Glue is useful for this step because the precision nozzle helps place glue into narrow seams and small contact areas without overapplying. The goal is a clean bond line, not a heavy patch.
Press Metal Fence Adhesive
Pressing is the step that turns adhesive from a wet layer into a real bond. After applying metal fence adhesive, the two surfaces need firm and steady contact. If the parts only touch lightly, the bond line may be uneven. If the parts slide around after contact, the adhesive layer can smear, become too thin in one area, and too thick in another. For small fence repairs, it is better to align the part carefully, press once, and hold it steady instead of adjusting it repeatedly.
GleamGlee Metal Glue is designed for quick initial bonding on suitable small repairs. For close-fitting metal parts, press the surfaces together firmly for about 5–10 seconds. This helps the adhesive spread across the contact area and gives the part an initial hold. However, initial hold is not the same as full cure. The repair still needs to stay still afterward, especially outdoors.
| Pressing Issue | What Happens | Better Method |
|---|---|---|
| Light pressure only | Gaps remain inside the joint | Press firmly and evenly |
| Part shifts after pressing | Bond line becomes weak or messy | Align first, then press once |
| Too much adhesive | Part floats instead of sitting flat | Use a thinner layer |
| No support after pressing | Repair moves during curing | Use tape, clamp, or prop |
| Pressing only one side | Uneven contact | Press across the whole repair area |
| Gate moves too soon | Vibration weakens the bond | Keep gate still until cured |
Pressing points:
- Press the part firmly for the first 5–10 seconds.
- Keep the surfaces aligned while pressing.
- Do not slide the part back and forth after contact.
- Use tape or clamps if the part tries to move.
- Do not test strength too early by pulling on the repair.
- For vertical parts, support from below if gravity may shift the piece.
For a loose trim strip, press along the full length rather than only at one end. For a decorative scroll, press each bonded contact point. For a small cap, press down evenly so the adhesive spreads inside the contact area. The repair should feel seated, not floating.
Precision Metal Fence Adhesive Nozzles
Precision nozzles are important because many metal fence adhesive repairs are small, narrow, and visible. A fence crack may be only 1–2 mm wide. A decorative scroll may touch the rail at two tiny points. A loose cap may need glue inside a hidden edge. A bracket cover may sit close to painted metal where excess adhesive would be hard to clean. In these situations, a large nozzle can release too much glue, causing drips, overflow, and a messy finish. A fine nozzle gives better control and helps place adhesive exactly where it is needed.
GleamGlee Metal Glue includes precision tips for small cracks and hard-to-reach spaces. Each tube comes with 4 fine nozzles, and a 2-pack includes 8 nozzles. This is useful when one nozzle becomes worn, blocked, or contaminated during outdoor repair. The fine tip also helps reduce waste because the adhesive is applied in a narrow line instead of a large uncontrolled bead.
| Fence Repair Area | Why a Fine Nozzle Helps |
|---|---|
| Hairline crack | Places glue inside the crack instead of over the whole surface |
| Loose cap | Applies adhesive inside the cap without coating visible edges |
| Decorative scroll | Targets small contact points |
| Thin trim strip | Creates a narrow line on the back side |
| Bracket cover | Keeps glue away from screw holes and outer edges |
| Gate latch cover | Reaches tight corners more easily |
| Metal-to-concrete plate | Places adhesive only on the contact zone |
Nozzle use points:
- Cut or open the nozzle carefully for a small flow.
- Start with a small amount; add more only if needed.
- Keep the nozzle close to the repair line.
- Do not drag dirt, rust, or paint flakes into the nozzle.
- Replace the nozzle if the flow becomes uneven.
- Close the cap tightly after use to reduce drying and clogging.
A clean nozzle gives a cleaner repair. For visible fencing, this can be just as important as strength because a neat finish makes the repaired part look intentional rather than patched.
Cure Metal Fence Adhesive
Curing is where patience matters. Metal fence adhesive may grip quickly, but the repair should not be treated as fully strong immediately. Outdoor fencing is exposed to wind, rain, vibration, gate movement, and accidental contact. If the repaired part moves before curing is complete, the bond may weaken even if the adhesive seemed to hold at first. A small repair should be kept still, dry, and protected until the adhesive has cured according to the product instructions.
Curing conditions can change the result. Cold weather may slow curing. High humidity may keep surfaces damp longer. Direct sun can make metal hot and harder to work with. Rain or sprinklers can disturb the repair too soon. For outdoor fence adhesive use, choose a dry time window and avoid applying glue when rain is expected shortly afterward. If the repair is on a gate, avoid opening and closing the gate during early curing.
| Curing Factor | Risk | Better Practice |
|---|---|---|
| Rain before cure | Water can weaken the bond | Repair during dry weather |
| Sprinkler water | Moisture hits the joint too soon | Turn off or redirect sprinklers |
| Gate movement | Vibration breaks early bond strength | Keep gate unused during cure |
| Wind | Light parts may shift | Tape or clamp the repair |
| Cold weather | Curing may take longer | Allow extra time before stress |
| Hot metal | Adhesive may be harder to control | Work in shade if possible |
| Thick glue layer | Slower and messier curing | Use a thin controlled layer |
Curing points:
- Keep the repair still after initial pressing.
- Do not pull, test, or twist the bonded part too early.
- Keep water away until the adhesive has fully cured.
- Use tape, clamps, or temporary support for vertical parts.
- Allow more time in cold, damp, or high-stress areas.
- Inspect the repair before returning the fence or gate to normal use.
After curing, check the repair with light pressure. Look for gaps, lifting edges, or movement. If the part moves, do not simply add more adhesive over the outside. Remove weak material, clean the area again, and rebuild the repair properly. If the repair area was sanded down to bare metal, protect the surrounding exposed metal after curing to reduce future rust.
Step-by-Step Metal Fence Adhesive Repair
A clear step-by-step process helps avoid the most common mistakes: gluing over dirt, using too much adhesive, moving the part too soon, and exposing the repair to water before curing. The process below works well for small non-structural metal fence repairs such as caps, trim, decorative pieces, light bracket covers, small signs, and narrow cracks. It should not be used as the only repair method for broken posts, heavy hinges, gate frames, main rails, or safety-critical fence parts.
The full process may take only a few minutes of active work, but curing time should be respected. Rushing the repair usually creates weaker results. A careful repair starts before the adhesive is opened and ends only after the bonded part has been checked.
| Step | Action | Time Needed | Main Purpose |
|---|---|---|---|
| 1 | Inspect the damage | 1–2 minutes | Confirm adhesive is suitable |
| 2 | Test the fit | 1 minute | Check surface contact |
| 3 | Clean both surfaces | 2–5 minutes | Remove dirt, oil, and dust |
| 4 | Remove rust or loose paint | 2–10 minutes | Reach a stable surface |
| 5 | Sand the bonding area | 1–3 minutes | Improve grip |
| 6 | Wipe away sanding dust | 1 minute | Keep bond line clean |
| 7 | Apply adhesive | 30–60 seconds | Create a thin bond layer |
| 8 | Press firmly | 5–10 seconds | Set initial contact |
| 9 | Tape or clamp | 1–2 minutes | Stop movement during cure |
| 10 | Let cure fully | Follow label | Build final strength |
| 11 | Inspect and protect | 2–5 minutes | Check bond and reduce rust risk |
Repair points:
- Start with the smallest amount of adhesive that covers the contact area.
- Keep the bonded part still after pressing.
- Do not expose the repair to water too early.
- Do not use the gate too soon if the repair is on a moving part.
- Add screws, bolts, or reinforcement if the part carries force.
- Stop and choose a different repair method if the metal is deeply rusted or structurally damaged.
This process keeps the repair simple and practical. The goal is a clean, controlled no-weld fix that restores small fence parts without creating a bulky patch or an unsafe repair.
Do Metal Fence Adhesive Repairs Last?
Metal fence adhesive repairs can last well when the repair is small, clean, dry, and not under heavy load. The strongest repairs are usually on fixed fence parts with wide contact areas, such as caps, trim, decorative pieces, small plates, and light bracket covers. A repair on a moving gate, hinge, latch, or cracked main rail will face much more stress and may need screws, bolts, welding, or replacement parts.
Repair life depends more on preparation than on glue quantity. Loose rust, old paint, oil, dust, water, and poor surface contact can shorten the repair quickly. A thin adhesive layer on clean sanded metal usually performs better than a thick layer placed over rust or paint flakes. The repaired part should also stay still during curing because early movement can weaken the bond before it reaches its full strength.
A realistic expectation is important. Metal fence adhesive is a good no-weld option for small outdoor repairs, but it is not a structural metal rebuild method. On the right repair, it can stop rattling, reattach loose parts, improve appearance, and extend the life of fencing accessories. On the wrong repair, especially posts, hinges, heavy rails, or safety areas, it should only be used with mechanical support or not used at all.
Outdoor Metal Fence Adhesive
Outdoor metal fence adhesive repairs last longer when the bonded part is fixed, protected from heavy movement, and prepared on solid metal. A loose decorative cap on a garden fence may stay stable for a long time because it does not carry much force after bonding. A trim strip on a patio railing can also hold well if it has a long contact area and is taped or clamped during curing. A gate latch cover, however, may loosen faster because it is touched, pulled, and vibrated every day. The outdoor setting adds extra stress from wind, rain, heat, cold, dust, soil splash, and repeated expansion and contraction of metal.
The best way to estimate repair life is to look at where the part sits and how often it moves. Fixed fence areas usually last better than gate areas. Wide flat contact areas usually last better than tiny edge-only joints. Clean bare or stable coated metal lasts better than rusty or powdery surfaces.
| Repair Area | Expected Stress | Adhesive Outlook |
|---|---|---|
| Decorative fence cap | Low | Strong fit if cleaned and taped during cure |
| Metal trim strip | Low | Good when contact area is long and flat |
| Ornamental scroll | Low to medium | Good if bonded at several contact points |
| Bracket cover | Medium | Better with clamp or tape support |
| Gate latch cover | Medium to high | Use only if it does not carry latch force |
| Gate hinge area | High | Adhesive alone is not suitable |
| Main fence rail | High | Needs stronger repair method |
| Fence post base | Very high | Adhesive alone is not safe |
Key points for longer outdoor use:
- Choose fixed fence parts over moving gate parts.
- Use adhesive only where the metal has enough contact area.
- Keep the repair still during curing.
- Avoid gluing over rust, loose paint, or wet metal.
- Add screws, bolts, or a backing plate if the part is touched often.
Waterproof Metal Fence Adhesive
Waterproof metal fence adhesive can handle normal outdoor moisture after curing, but the repair must be dry during application and early bonding. Rain, dew, sprinklers, washing water, and poolside moisture can all shorten repair life if they reach the joint too soon. A common mistake is repairing a fence in the morning when dew is still trapped inside a crack or under a cap. The surface may look dry outside, but hidden moisture can remain in the joint and weaken the bond. Another mistake is gluing over rust or loose paint, then expecting waterproof adhesive to solve the problem. Water can still travel under weak layers and lift them from the metal.
For outdoor repairs, water resistance should be treated as part of a process. The fence should be dry, the rust should be removed, the bonding area should be sanded, and the repair should be protected until curing is complete. If sanding exposes bare steel, that nearby metal may need paint or rust protection after the adhesive cures.
| Water Situation | Repair Risk | Better Practice |
|---|---|---|
| Light rain after full cure | Usually acceptable for suitable repairs | Check the bond after the first rain |
| Rain during repair | High risk | Wait for a dry window |
| Morning dew | Hidden moisture inside joints | Repair later after full drying |
| Sprinklers | Water hits before cure | Turn off or redirect temporarily |
| Pool fence accessory | Moisture exposure is frequent | Use only on non-structural parts |
| Bare sanded steel | Future rust can start | Protect after adhesive cures |
| Rust under paint | Paint layer may lift | Remove weak coating first |
Useful waterproof repair habits:
- Do not apply adhesive to wet metal.
- Keep water away until curing is complete.
- Clean under caps, covers, and seams where water hides.
- Remove rust before bonding instead of sealing over it.
- Recheck the repair after rain, especially around edges.
Vibration and Metal Fence Adhesive
Vibration has a big effect on how long a metal fence adhesive repair lasts. A fence may seem still, but wind can shake loose parts all day. A gate can slam several times a week. A latch may click against a plate every time it closes. Lawn equipment, pets, children, and daily use can also create small repeated impacts. These small movements can slowly weaken a repair, especially if the adhesive joint is narrow or placed on only one edge. Adhesive usually performs better when the force is spread across a flat surface instead of pulling from one corner.
Before using adhesive, check whether the part moves during normal use. If it rattles in the wind, presses against another part, or receives repeated hand contact, the repair may need more than glue. Tape or clamps help during curing, but they do not replace long-term support. For moving or vibrating areas, screws, small brackets, backing plates, or bolts can work with adhesive to create a more stable repair.
| Movement Type | Example | Adhesive Risk |
|---|---|---|
| No movement | Fixed cap or ornament | Low |
| Light vibration | Trim strip in wind | Low to medium |
| Repeated rattle | Loose bracket cover | Medium |
| Daily hand contact | Gate plate or sign | Medium |
| Gate slamming | Latch area or frame | High |
| Pulling force | Handle or hinge area | High |
| Bending force | Cracked rail or post | Very high |
Ways to reduce vibration problems:
- Bond across the widest contact area possible.
- Use tape or clamps until the adhesive cures fully.
- Add a screw or backing strip if the part is touched often.
- Avoid edge-only bonding on parts that pull outward.
- Do not test the repair by shaking it too early.
Protect Metal Fence Adhesive
A metal fence adhesive repair lasts longer when the area around it is protected after curing. Preparation often removes paint, rust, or coating from the bonding area. That is good for adhesion, but it can leave nearby metal exposed to moisture. If bare steel is left open outdoors, rust may start again around the repair. The adhesive bond may still be strong, but rust can spread under the coating beside it and slowly weaken the surrounding area. For older fences, protection after repair is just as important as the glue step itself.
After the adhesive has cured, inspect the bond line, surrounding paint, and exposed metal. If the repair is stable, repaint or seal nearby bare metal with a suitable outdoor metal coating when needed. Do not rush this step before curing is complete. Also check whether water pools around the repair area. Caps, brackets, and gate covers can trap moisture, so drainage and regular inspection help prevent future problems.
| After-Repair Check | What To Look For | What To Do |
|---|---|---|
| Bond line | Gaps, lifting edges, or movement | Rework if the joint is loose |
| Bare metal | Scratches or sanded steel | Paint or protect after cure |
| Rust dust | Orange powder near the repair | Remove early before spreading |
| Water pooling | Moisture trapped under caps or plates | Improve drainage or seal edges |
| Paint edge | Flaking around the repair | Remove weak paint and refinish |
| Gate use | Repair moves when opened | Add mechanical support |
| Appearance | Glue overflow or rough edge | Trim carefully only when safe |
Simple maintenance points:
- Check the repair after the first heavy rain.
- Check again after 1–2 weeks of normal outdoor use.
- Protect exposed metal after the adhesive cures.
- Do not keep adding glue over a failed dirty surface.
- Reclean and rebuild the repair if movement appears.
Metal Fence Adhesive Lifespan
The lifespan of a metal fence adhesive repair can range from a short temporary fix to a long-lasting small repair, depending on the job. A clean decorative cap with wide contact and low movement may stay firm for a long time. A latch cover that is touched daily may need extra support. A cracked main rail or post should not be judged by adhesive lifespan at all because that is the wrong repair type. The most useful way to think about lifespan is by repair condition rather than by one fixed number.
Several factors shorten repair life: rust under the bond, wide gaps, thick glue layers, movement before curing, water exposure during bonding, and high peel force. Several factors improve repair life: clean sanding, close fit, thin adhesive layer, firm pressing, steady curing, wide contact area, and after-repair rust protection. A small amount of good preparation can add much more durability than simply applying more adhesive.
| Repair Condition | Likely Result | Practical Note |
|---|---|---|
| Clean, dry, flat, fixed part | Best lifespan | Ideal for adhesive repair |
| Clean but slightly vibrating part | Moderate lifespan | Add tape during cure or support |
| Painted but stable surface | Good to moderate | Sand lightly before bonding |
| Light surface rust removed | Good | Protect exposed metal later |
| Loose rust left behind | Poor | Bond may lift with rust layer |
| Wide gap or bent part | Poor | Reshape, reinforce, or replace |
| Gate hinge or post repair | Not suitable | Use structural repair method |
Good lifespan habits:
- Match adhesive to small non-structural damage.
- Prepare the surface instead of adding extra glue.
- Let the repair cure before outdoor stress.
- Reinforce parts that move or receive contact.
- Protect sanded metal from future rust.
For suitable small repairs, GleamGlee Metal Glue offers a fast clear bond, waterproof performance after curing, precision nozzle control, and an anti-clog cap for repeat use. These features are most useful when the repair needs to look neat, hold firmly, and stay practical for everyday outdoor fence maintenance.

Is GleamGlee Metal Fence Adhesive Right?
GleamGlee Metal Glue is right for small metal fence adhesive repairs that need a fast, clean, and controlled bond. It fits loose fence caps, decorative scrolls, trim strips, light bracket covers, small metal plates, narrow non-structural cracks, and mixed-material outdoor accessories. It is not meant to replace welding on posts, heavy gate hinges, main rails, or safety-critical fence parts.
The main advantage is easy handling. The adhesive dries clear, bonds quickly on suitable close-fitting parts, resists water after curing, and comes with precision nozzles for small cracks and narrow repair points. For visible outdoor fencing, these details matter because the repair needs to hold firmly without leaving a thick, messy, obvious glue line.
GleamGlee is also a good fit when the product needs to solve more than one home repair problem. Besides metal fencing, it can be used on metal items, tools, household hardware, décor, craft pieces, and mixed surfaces such as plastic, rubber, wood, concrete, PVC, and wall surfaces. One tube can stay useful in a toolbox after the fence repair is finished.
GleamGlee Metal Fence Adhesive Jobs
GleamGlee Metal Glue is most useful when the fence repair is small, visible, and close-fitting. A loose metal cap, a rattling decorative scroll, a narrow crack on a non-structural trim piece, or a bracket cover that has started to lift can often be repaired without drilling, welding, or replacing the whole part. These jobs are common on garden fences, balcony railings, patio gates, pool fence accessories, and decorative metal panels. The adhesive works best when the part still keeps its original shape and the bonding surfaces can touch firmly. If the repair point carries gate weight, supports a post, or handles repeated pulling, adhesive should be used only as a light support or avoided entirely.
| Repair Job | GleamGlee Fit | Practical Note |
|---|---|---|
| Loose metal fence cap | High | Apply inside the cap, then tape during cure |
| Decorative scroll repair | High | Bond at the real contact points |
| Thin trim strip | High | Use a narrow line and keep it straight |
| Small metal plate | High | Keep the plate level while curing |
| Light bracket cover | Medium to high | Suitable if it does not carry force |
| Narrow non-structural crack | Medium | Works best when the crack closes tightly |
| Gate latch cover | Medium | Use only if not under pulling force |
| Main hinge plate | Low | Use bolts, welding, or replacement |
| Cracked fence post | Very low | Structural repair is needed |
Best-use points:
- Use it for fixed fence parts with low movement.
- Choose it when the repair needs a neat, clear finish.
- Use it when drilling would damage the fence appearance.
- Apply it only after rust, dust, oil, and loose paint are removed.
- Do not use it alone on posts, hinges, security rails, or heavy gate frames.
For everyday outdoor repairs, the strongest fit is simple: small metal parts that need to be reattached, stabilized, or kept from rattling. A controlled adhesive repair can reduce replacement cost and keep the fence looking tidy.
Clear Metal Fence Adhesive Bond
A clear bond is important because most metal fence repairs happen on visible surfaces. A front garden fence, patio railing, balcony guard, pool fence, or decorative gate is part of the home’s appearance. A thick gray patch, yellow glue mark, or dark repair line can make a small problem look worse after fixing. GleamGlee Metal Glue dries clear, so it is better suited for visible metal fence adhesive repairs where appearance matters. The clear finish is especially useful on black fences, silver aluminum rails, bronze gates, white painted panels, and ornamental fence details. It does not make excess adhesive invisible, but it helps the repair look cleaner when the glue is applied in a thin, controlled layer.
| Fence Color or Finish | Why a Clear Bond Helps |
|---|---|
| Black metal fence | Avoids obvious pale repair marks |
| Silver aluminum railing | Keeps the repair line less noticeable |
| White painted fence | Reduces dark or dirty-looking seams |
| Bronze garden gate | Preserves decorative appearance |
| Pool fence accessory | Keeps small repairs cleaner |
| Ornamental scroll | Works well on small contact points |
| Metal address plate | Reduces visible glue around edges |
Clear-bond use points:
- Apply less glue than you think you need.
- Keep adhesive behind the part, not on the front face.
- Wipe small overflow before it fully hardens if safe to do so.
- Use masking tape around visible edges for cleaner placement.
- Do not depend on clear drying to hide thick glue buildup.
For visible fencing, the repair should look controlled from normal viewing distance. A clear adhesive, fine nozzle, and thin bond layer help keep the repaired area from drawing attention.
Precision Metal Fence Adhesive Nozzles
Precision nozzles make GleamGlee Metal Glue easier to use on real fence repairs because many damaged areas are narrow, awkward, vertical, or partly hidden. A loose cap may need adhesive inside a tight channel. A decorative scroll may touch the fence at only two small points. A thin crack may need a tiny bead, not a large blob. A bracket cover may sit close to painted metal, where overflow is difficult to remove cleanly. GleamGlee includes 4 fine-tip nozzles per tube, and a 2-pack includes 8 nozzles. This helps place adhesive more accurately, reduce waste, and keep the repair cleaner.
| Repair Area | Nozzle Benefit |
|---|---|
| 1–2 mm narrow crack | Places glue into the gap instead of over the surface |
| Fence cap interior | Reaches hidden contact edges |
| Decorative scroll base | Targets small bonding points |
| Trim strip back side | Creates a thin, straight glue line |
| Bracket cover | Reduces overflow near screw holes |
| Gate plate corner | Reaches tight edges more easily |
| Metal-to-concrete accessory | Applies glue only where contact is needed |
Nozzle-use points:
- Start with a small flow opening.
- Keep the nozzle close to the bond line.
- Apply glue slowly instead of squeezing hard.
- Replace the nozzle if the flow becomes uneven.
- Keep rust dust and paint flakes away from the nozzle tip.
- Close the anti-clog cap tightly after use.
The nozzle affects the whole repair experience. A strong adhesive can still feel frustrating if it comes out too fast, clogs early, or leaves a messy edge. Fine-tip control makes small fence repairs feel easier and helps the final result look more professional.
Multi-Surface Metal Fence Adhesive
GleamGlee Metal Glue is useful beyond simple metal-to-metal fence repair because many outdoor fence areas include mixed materials. A metal plate may be attached to wood. A bracket cover may touch concrete. A gate stop may include rubber. A decorative panel may sit against PVC, plastic, stone, or a painted wall surface. In these situations, a multi-surface adhesive gives more repair flexibility. GleamGlee Metal Glue bonds metal with metal and can also work with plastic, rubber, wood, concrete, PVC, and wall surfaces when the materials are properly cleaned and prepared. This makes it practical for fence accessories, garden hardware, outdoor décor, tools, and household repair items.
| Material Combination | Common Repair Example | Prep Reminder |
|---|---|---|
| Metal to metal | Fence cap, trim, scroll, bracket cover | Remove rust and sand lightly |
| Metal to wood | Decorative metal strip on wooden fence | Clean dust and roughen smooth wood |
| Metal to concrete | Light plate or sign mount | Remove powder and loose grit |
| Metal to PVC | Fence sleeve or cap accessory | Lightly roughen smooth PVC |
| Metal to rubber | Gate stop or small pad | Remove oil and dirt carefully |
| Metal to wall surface | Outdoor sign or small plate | Check paint stability first |
| Metal to plastic | Cover, cap, or garden accessory | Sand slick plastic if needed |
Mixed-material repair points:
- Roughen smooth plastic, PVC, or painted surfaces before bonding.
- Do not glue onto loose concrete dust or chalky wall paint.
- Keep rubber surfaces clean and oil-free.
- Test the fit before applying adhesive.
- Use tape or clamps when the two materials have different stiffness.
Multi-surface bonding is helpful when the same tube needs to handle several small jobs around the fence, garden, garage, and home. The key is still the same: clean surface, tight contact, thin adhesive layer, steady pressure, and full curing time.
GleamGlee Metal Fence Adhesive Features
GleamGlee Metal Glue is designed for repairs that need speed, neatness, and control. It forms a fast bond on suitable small metal parts, dries clear, resists water after curing, and comes with precision nozzles for narrow cracks and hard-to-reach areas. The anti-clog cap helps keep the tube reusable between repairs, which matters because most people do not use a full tube on one fence job. After fixing a loose fence cap or trim strip, the same adhesive may later be used on a metal handle, lamp frame, garden tool, small appliance panel, jewelry clasp, model project, or outdoor décor item.
| Feature | Practical Value in Fence Repair |
|---|---|
| Fast high-strength bonding | Helps small parts hold quickly after pressing |
| Clear drying | Keeps visible repairs cleaner |
| Waterproof after curing | Suitable for normal outdoor exposure |
| Precision nozzles | Easier application in cracks and seams |
| 4 nozzles per tube | More control for repeated small repairs |
| 8 nozzles in 2-pack | Better for larger repair kits or multiple jobs |
| Anti-clog cap | Helps reduce drying between uses |
| Multi-material bonding | Useful for metal, plastic, rubber, wood, concrete, PVC, and wall surfaces |
| 5–10 second press | Helpful for close-fitting small repairs |
Feature-use points:
- Best for small, close-fitting repairs.
- Strongest results come from clean, dry, sanded surfaces.
- Clear finish is useful on decorative fencing.
- Precision nozzles reduce mess on visible areas.
- Waterproof performance matters only after proper curing.
- Not suitable as the only repair for structural fence damage.
The product is especially useful when the repair area is small but appearance matters. Instead of using a bulky adhesive or making new holes, the user can place a controlled amount exactly where the part touches.
Choose GleamGlee Metal Fence Adhesive
GleamGlee is a practical choice when the goal is a clean, easy-to-use metal fence adhesive for small outdoor repair work. The product fits common home repair needs: fast bonding, clear finish, waterproof performance after curing, precise application, and repeat-use packaging. It works well for people who want to fix a loose metal fence part without welding tools, drilling, or replacing a whole section. It is also useful for sellers and repair-product brands looking for a product that can be positioned across fencing, hardware, home repair, crafts, tools, garden items, and small outdoor accessories.
| GleamGlee Support Area | What It Helps With |
|---|---|
| Mature metal glue formula | Ready product direction for small repair use |
| Packaging options | Tubes, boxes, labels, and repair kit formats |
| Precision nozzle design | Better user control during small repairs |
| Multilingual label design | English, German, French, Spanish, Italian, Dutch, Japanese, and more |
| Low MOQ from 200 units | Easier first product testing |
| Sample time around 7–14 days | Practical evaluation before larger order |
| Design draft as fast as 2 days | Faster packaging and label preparation |
| Bulk production around 20 days | Better planning for normal orders |
| Rush production around 15 days | Useful for urgent launch schedules |
| Compliance support | CLP, REACH, UKCA, GHS, SDS-related preparation |
Good reasons to choose GleamGlee:
- The product is suitable for small metal fence adhesive repairs.
- The clear finish supports visible outdoor repairs.
- Fine nozzles make narrow fence cracks and seams easier to handle.
- Multi-surface bonding gives the product more daily repair uses.
- Packaging and label options can match different markets and sales channels.
- Low starting quantity makes small market testing more flexible.
For repair users, GleamGlee Metal Glue offers a simple way to fix small metal fence problems cleanly. For product operators, it offers a flexible metal adhesive product that can be developed into branded tubes, repair kits, home repair bundles, or market-specific packaging.
Conclusion
Metal fence adhesive is a practical no-weld repair option for small fencing problems such as loose caps, decorative scrolls, trim strips, light bracket covers, narrow non-structural cracks, and mixed-material outdoor accessories. A lasting repair starts with the right judgment: the part should be clean, dry, close-fitting, and not responsible for holding gate weight, fence structure, or safety protection. When rust is removed, the surface is lightly sanded, the adhesive is applied in a thin layer, and the repair is held still during curing, metal fence adhesive can help restore appearance, reduce rattling, and extend the life of outdoor fencing parts without drilling or welding.
GleamGlee Metal Glue is well suited for these small, precise fence repairs because it dries clear, bonds quickly on suitable surfaces, resists water after curing, and includes fine nozzles for narrow cracks and tight contact points. It is also useful beyond fencing, covering metal items, tools, décor, garden hardware, and mixed surfaces such as plastic, rubber, wood, concrete, PVC, and wall surfaces. For branded product orders, private-label metal adhesive projects, sample testing, packaging design, or custom repair kit development, GleamGlee can provide practical product options and quotation support based on the target market, first order quantity, and label requirements.





















