 Skip to content
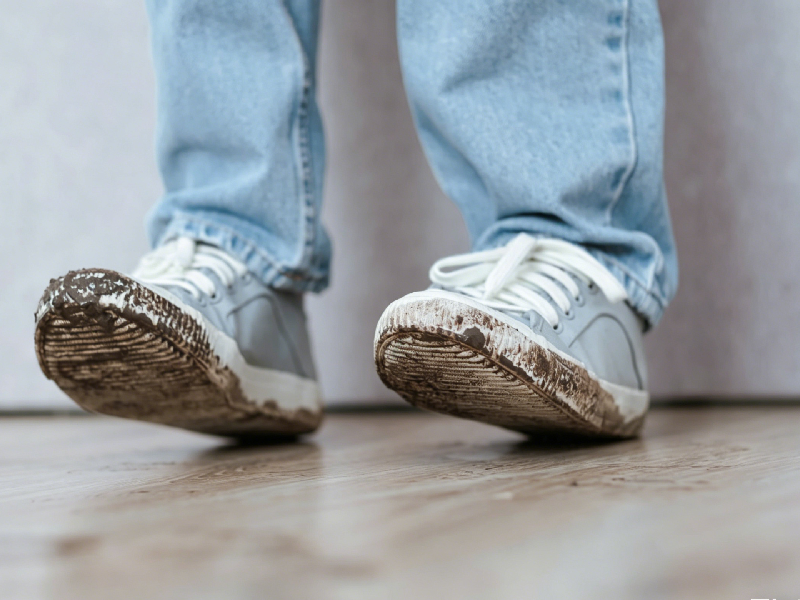
Kids’ shoes get dirty in a very different way from adult shoes. A child may drag toes on concrete, kneel on the playground, run through wet grass, spill juice at lunch, and step into mud all in one day. That is why many parents feel frustrated when a pair of school shoes looks worn out after only a few weeks. In many cases, the shoes are not actually worn out. They are carrying layers of dirt, grass pigment, food residue, scuff transfer, and yellow-looking buildup that were cleaned the wrong way or left too long before treatment. The real goal is not to scrub harder. It is to clean earlier, match the method to the material, and control moisture so the stain lifts without damaging the shoe.
To remove stains from kids’ shoes well, start by brushing off loose dirt while the shoe is dry, then clean the stained area according to the material. Mesh and canvas usually respond well to a controlled foam cleaner or mild soap solution. Leather needs lighter wiping and less water. Suede needs the most caution and should never be soaked. Most stains come out better with spot cleaning, soft brushing, and full air-drying than with harsh chemicals, heavy soaking, or heat.
This matters because children often wear the same pair again and again. School shoes may be worn 20 to 25 days in a single month. A weekend sports pair may go through mud, grass, dust, and snack spills in the same afternoon. If cleaning is too rough, the uppers fuzz, the adhesive edges weaken, and the shoes start looking old before they should. If cleaning is too weak, the stains stay and build up. Once parents understand which stains matter most, which material needs which method, and how to clean in short, repeatable steps, the whole process becomes easier. One quick evening clean can save a pair that looked ready to be replaced.
What Stains Matter When You Remove Stains from Kids’ Shoes?
The stains that matter most on kids’ shoes are the ones that either sink into the upper fast, spread easily, or make the whole pair look old even when the shoe still has plenty of wear left. In real family use, that usually means mud, grass, food, drink, dark scuffs, and white-shoe yellow-looking buildup. The key is not only what the stain is, but where it lands, how long it has been there, and whether it sits on mesh, canvas, leather, suede, or rubber. A stain on the rubber toe cap is usually easier to fix than the same stain on white mesh. A fresh juice spot is much easier than one that dried, got stepped on again, and sat for three days.
For most parents, the real problem is not “dirty shoes” in general. It is that a few high-visibility areas make the whole pair look bad. On children’s shoes, the dirtiest-looking zones are usually the toe box, sidewall, sole edge, lace area, and outer side panel. If those areas are cleaned well, the shoe often looks 70% to 90% better even before a full refresh. That is why stain type matters so much. Some stains only need dry brushing and a quick wipe. Others need more careful spot treatment. Some stains should be handled immediately. Others are better left to dry first before touching them.
A practical way to think about kids’ shoe stains is this:
- Mud looks dramatic, but is often manageable if dried first
- Grass looks smaller, but can sink deeper and leave shadow marks
- Food and drink may look mild at first, but can darken and attract more dirt later
- Gray or black scuffs often sit on the surface and respond well to targeted cleaning
- Yellow-looking buildup on white shoes is usually the slowest and most stubborn problem because it builds over time
The table below shows which stain types usually create the biggest cleaning problems for families:
| Stain Type | Where It Shows Most | How Fast It Sets | Cleaning Difficulty | Why Parents Notice It So Much |
|---|---|---|---|---|
| Mud | Toe box, sidewall, sole edge | Medium | Low to medium | Makes shoes look messy immediately |
| Grass | Mesh, canvas, stitching | Fast | Medium to high | Leaves green/brown shadow on light shoes |
| Food / drink | Upper, laces, toe area | Fast | Medium | Can leave sticky residue and dark patches |
| Gray scuffs | Rubber edge, toe cap, leather | Slow | Low to medium | Makes white shoes look worn fast |
| Yellow-looking buildup | White midsoles, toe caps, sidewalls | Slow but constant | High | Gives the shoe an old, dull look |
| Dust / road grime | Whole shoe, especially sole edge | Medium | Low | Builds quietly until the pair looks flat and dirty |
Parents usually get better results when they stop treating every stain the same way. A child’s white sneaker can have dried mud on the toe, green grass transfer on the side, and gray sole buildup all at once. If all three are scrubbed with the same force and the same amount of cleaner, the result is often disappointing. The dirt may lighten, but the shoe still looks tired. Better cleaning starts with knowing what kind of stain you are dealing with first.
What stains are most common on kids’ shoes?
The most common stains on kids’ shoes come from everyday life, not unusual accidents. School runs, recess, playground slides, gym floors, snack spills, bike pedals, wet grass, and dusty sidewalks create the same pattern again and again. In most households, shoes do not become “bad” because of one major stain. They become gradually dirtier from repeated small marks that build on top of each other.
The most common marks usually include:
- Mud splashes from wet school grounds and parks
- Grass stains from recess, sports, and sitting or kneeling outdoors
- Food stains from ketchup, chocolate, yogurt, fruit, or milk spills
- Gray road dust from sidewalks, parking lots, and school entrances
- Black scuffs from desks, steps, scooters, bike pedals, and curbs
- White-shoe dullness from repeated wear and trapped grime on the sole edge
What makes kids’ shoes harder than adult shoes is the way stains pile up in the same few areas. A parent may clean the upper and still feel the shoes look dirty because the sole edge, toe guard, or laces are still carrying buildup. In real use, those smaller details have a big visual effect.
The shoes that show staining fastest are usually:
| Shoe Type | Most Common Stain Pattern | Why It Gets Dirty Fast |
|---|---|---|
| White school sneakers | Gray sole edge, toe dirt, food spots | Worn often and stains show clearly |
| Mesh running shoes | Dust, grass, mud in weave | Open fabric traps fine dirt |
| Canvas shoes | Food, dust, grass, side-panel marks | Fabric absorbs visible staining |
| Leather school shoes | Scuffs, dust, toe marks | Smooth surface shows transfer quickly |
| Mixed-material fashion sneakers | Uneven dirty patches | Different materials hold dirt differently |
For most families, the “common stain” problem is really a frequency problem. A child may wear the same pair 4 to 6 times a week. Over one month, that can mean 20 or more wears before parents realize how much dirt has collected. That is why regular short cleaning usually works better than waiting for the shoes to become obviously dirty.
Which stains are hardest to clean from kids’ shoes?
The hardest stains are usually grass stains, greasy food marks, old mud shadows, and yellow-looking buildup on white shoes. These are the stains that tend to stay visible even after parents do a basic clean. They are harder because they either sink into the material, leave color behind, or attract new dirt after the first stain appears.
Grass stains are one of the biggest complaints because they often leave a faint green-brown cast, especially on white mesh and canvas. Even when the visible dirt is removed, the shoe may still keep a shadow.
Greasy food stains are difficult because oil grabs onto the fabric and then catches more dirt later. One small snack stain can become a darker patch over time.
Old mud shadows happen when the dry dirt is removed but a dull brown or gray cast remains underneath.
Yellow-looking buildup is often the most frustrating problem on white shoes because it develops slowly and makes the whole shoe look older.
Here is a more practical way to rank them:
| Stain | Difficulty | Why It Stays | Best Response |
|---|---|---|---|
| Fresh mud | 3/10 | Mostly surface-level | Let dry first, then brush and clean |
| Fresh food spill | 5/10 | Can soak in quickly | Blot early, then spot-clean |
| Grass stain | 7/10 | Pigment settles into fibers | Treat early and clean in stages |
| Greasy snack stain | 7/10 | Oil attracts more dirt | Clean early with controlled product |
| Old dirt shadow | 8/10 | Residue remains after first clean | Repeat gentle cleaning |
| White yellow-looking buildup | 9/10 | Mixed cause: grime, wear, residue | Regular upkeep and repeated targeted cleaning |
Parents often think the darkest stain is the hardest. That is not always true. A large mud splash may clean better than a small old grass mark. A black scuff on the rubber edge may come off faster than a pale yellow patch on the white sidewall. The hardest stains are usually the ones that combine time, friction, and the wrong surface.
A good rule is this:
If the stain has already been dried, walked on again, or left for several days, expect it to need more than one pass. That does not mean the shoe is ruined. It just means the stain has moved past the “quick wipe” stage.
Do old stains need a different cleaning method?
Yes. Old stains usually need a more patient and more controlled method. Fresh stains are often still sitting close to the surface. Old stains have had time to settle into the weave, mix with body oils, trap dust, or dry into the stitching and rubber texture. That is why quick wiping often works well on a same-day mark but does much less on a stain that has been there all week.
For old stains, the biggest mistake is trying to force a fast result. Parents often do this by:
- using too much cleaner
- scrubbing too hard
- soaking the whole shoe
- repeating the same motion too long on one area
- not wiping away loosened dirt before adding more product
A better method for older stains is to work in layers:
- Remove all loose dry dirt first
- Treat only the stained area
- Clean once to remove the outer dirt layer
- Wipe away what has lifted
- Go back for a second pass if the shadow remains
This matters a lot on children’s white shoes. If the shoe has a week-old grass mark on mesh, the first round may remove 60% to 80% of the visible staining. The second round often improves what is left. The same is true for dirty rubber edges that have turned gray over time. A single quick scrub may brighten them, but repeated controlled cleaning is what makes the pair look properly refreshed.
Here is a useful comparison:
| Fresh Stain | Old Stain |
|---|---|
| Usually easier to lift in one session | Often needs two rounds |
| Less product required | More patience required |
| Lower risk of shadow marks | Higher risk of dull residue or lingering discoloration |
| Often responds to quick spot cleaning | Often needs staged cleaning by section |
For busy parents, this is why low-water or foam-based cleaning is often easier to manage. It helps treat older stains without turning the whole shoe into an overnight drying project.
Why does stain timing change the result?
Stain timing changes the result because stains do not stay the same after they land. A mud spot at 4 p.m. is not the same stain by the next morning if the child kept wearing the shoes, the dirt dried into the upper, and dust settled on top. A juice drop that looked harmless at lunchtime can become darker by evening and then sticky enough to attract more dirt the next day.
In simple terms, stain timing affects three things:
- how deep the stain sits
- how much cleaner is needed
- how much scrubbing the shoe will have to take
The earlier the stain is treated, the more likely it is that the parent can use:
- less product
- less moisture
- less force
- less time
That matters because the gentler the cleaning process, the better the shoe usually looks afterward. A quick 3-minute evening clean often preserves appearance better than a heavy deep clean after two weeks of buildup.
This is especially important for children who wear one favorite pair again and again. A school sneaker worn 5 days a week can collect layer after layer of:
- hallway dust
- lunch stains
- playground dirt
- grass transfer
- road grime on the sole edge
If parents wait until the shoes look very dirty, the cleaning job becomes much harder. If they clean small stains earlier, the shoes usually stay much brighter with far less effort.
A simple family care pattern often works best:
| Timing | Result |
|---|---|
| Clean same day | Fastest and easiest result |
| Clean within 1–2 days | Usually still manageable |
| Wait a week | More residue, more effort |
| Wait until shoes look heavily dirty | Hardest result, most time needed |
That is why timing is not just a detail. It changes the whole cleaning job. Early care keeps stains from becoming set-in stains, and set-in stains are what usually make parents feel the shoes are beyond saving.

How Do You Remove Stains from Kids’ Shoes by Material?
The safest way to remove stains from kids’ shoes is to clean by material, not just by stain color or how dirty the shoes look. This is where many parents go wrong. A white mesh sneaker, a canvas school shoe, a leather uniform shoe, and a suede-trim fashion sneaker may all look “dirty,” but they do not need the same amount of moisture, the same brush pressure, or the same cleaning time. If the method does not match the material, two bad things usually happen: either the stain stays, or the shoe gets cleaner but looks more worn afterward.
For most families, the goal is not laboratory-level restoration. The goal is much more practical: get the shoes looking clean enough for school, sports, family outings, and daily wear without damaging the upper or wasting too much time. In real use, different materials hold dirt differently. Mesh traps fine dust inside tiny openings. Canvas absorbs spills and mud into the fabric. Leather often shows scuffs and dull patches more than deep stains. Suede may look ruined after one messy cleaning attempt even if the original stain was small.
A simple way to think about it is this:
- Mesh needs control
- Canvas needs balance
- Leather needs gentleness
- Suede needs patience
That one idea alone can save parents a lot of frustration.
The table below gives a quick home-use view of how each material behaves:
| Material | How It Usually Gets Dirty | Main Cleaning Risk | Best Approach |
|---|---|---|---|
| Mesh | Dust, grass, mud in the weave | Overwetting and surface fuzzing | Low-moisture spot cleaning |
| Canvas | Food, dirt, grass, general dullness | Spreading stains or leaving residue | Controlled brushing and wiping |
| Leather | Scuffs, dust, toe marks, gray transfer | Dulling the finish or over-wetting | Light wiping with mild cleaner |
| Suede | Dry dirt, mud, dark patches | Water marks and texture damage | Dry-first cleaning, minimal moisture |
Parents usually care about three things when choosing a cleaning method by material:
- Will the stain come out enough to make the shoes look good again?
- Will the material stay smooth, soft, and presentable after cleaning?
- Will the shoes dry fast enough to wear again soon?
Those concerns are completely practical. A cleaner that removes a stain but leaves mesh rough, leather dull, or suede patchy does not really solve the problem. That is why cleaning by material matters so much in everyday family shoe care.
How do you remove stains from mesh kids’ shoes?
Mesh is one of the most common materials in kids’ shoes because it is lightweight, breathable, and comfortable for long days at school or active play. It is also one of the easiest materials to make look dirty. The reason is simple: mesh is full of tiny openings that catch dust, grass residue, dried mud, and fine dirt. On white or light-colored mesh, even a small amount of trapped dirt can make the whole shoe look older.
The safest method for mesh starts with dry cleaning before wet cleaning. If there is visible loose dirt on the shoe, brush it off first. This step sounds basic, but it changes the result a lot. When parents skip it, they often turn dry dirt into muddy streaks by adding cleaner too early. Once that happens, the dirt spreads deeper into the mesh and takes longer to remove.
A good mesh-cleaning process usually looks like this:
- Brush off all loose dry dirt first
- Apply a small amount of foam cleaner to the brush or cloth, not directly in excess onto the shoe
- Work in short circular motions on the stained area
- Wipe away loosened dirt before it spreads
- Repeat once or twice if needed, instead of scrubbing harder
- Let the shoe air-dry fully
For most families, the most common mesh stains are:
| Mesh Stain Type | Where It Usually Shows | Difficulty |
|---|---|---|
| Dust and gray dullness | Side panels, toe box | 3/10 |
| Mud specks | Toe and lower side panel | 4/10 |
| Grass transfer | Outer side, front edge | 7/10 |
| Food drops | Toe box, lace area | 5/10 |
| Old grime shadow | High-wear areas | 8/10 |
Mesh needs light pressure. That is one of the biggest points parents need to remember. If the brush is too stiff or the scrubbing is too aggressive, the fibers can start looking fuzzy or slightly lifted. At that point, the shoe may be cleaner but still look worn. For school shoes worn 4 to 6 times a week, this matters a lot. A child’s favorite pair may go through 20 or more wears in a month, so harsh cleaning adds up quickly.
Another common parent concern is drying time. Mesh dries faster than heavily soaked canvas, but only if it was cleaned with restraint. A lightly spot-cleaned mesh shoe may dry in 2 to 6 hours, while a heavily wetted one can take 12 hours or more. That difference matters on school nights.
How do you remove stains from canvas kids’ shoes?
Canvas is common on casual sneakers, school shoes, summer shoes, and simple white everyday footwear. Many parents like canvas because it feels sturdy and usually looks easier to clean than suede. That is true to a point. Canvas can tolerate more work than suede, but it also absorbs stains faster than leather or smooth synthetic surfaces. Once food, muddy water, or grass residue settles into the fabric, the shoe can start looking flat and dull even after basic cleaning.
The best way to clean canvas is to treat the visible stain first, then clean the surrounding area if needed. This matters because canvas can pull moisture outward. If parents wet the whole area too soon, a small stain can spread wider and create a pale ring or uneven patch after drying.
A strong canvas-cleaning routine usually includes:
- Removing laces if the front of the shoe is dirty
- Dry brushing loose dirt first
- Treating the darkest area before cleaning the full panel
- Using moderate cleaner, not too much
- Wiping residue away carefully
- Letting the shoe dry fully with airflow
Canvas is one of the materials where parents often wonder whether machine washing is easier. Sometimes it is, but it depends on the shoe and how often this is done. Frequent machine washing can shorten shoe life by causing:
- shape loss
- sole edge stress
- rougher fabric feel
- slower drying
- duller white areas over time
For that reason, hand cleaning is often the better routine for canvas shoes that are worn often.
Here is a practical comparison for parents:
| Cleaning Method for Canvas | Time Needed | Drying Time | Wear Risk | Best Use |
|---|---|---|---|---|
| Spot cleaning | 5–10 min | 4–8 hrs | Low | Small stains, weekly upkeep |
| Full hand clean | 10–20 min | 8–18 hrs | Low to medium | Moderate all-over dirt |
| Machine wash | 5 min setup | 12–24 hrs | Medium | Only for select washable pairs |
The most common canvas problems are not dramatic stains, but buildup. That means:
- light dust turning the shoe gray
- old food spots attracting more dirt
- repeated grass contact leaving faint green-brown marks
- dirty laces making the whole pair look worse
This is why a canvas shoe may look “still dirty” even after the upper was scrubbed. Sometimes the real issue is the lace area, sole edge, and toe front, not the center of the side panel.
Canvas usually handles light to medium brush pressure well, but it still does better with controlled cleaning than heavy soaking. For white canvas school shoes, a short maintenance routine every few wears can make a big difference. Even just cleaning the toe area and sole edge once or twice a week can keep the pair looking noticeably fresher over a month of use.
What is the safest way to clean leather kids’ shoes?
Leather kids’ shoes are often used for school uniforms, formal occasions, church, events, or daily school wear where parents want a neater look. Leather is different from mesh and canvas because most dirt sits more on the surface. That can make it easier to clean, but it also means damage from wrong cleaning shows up faster. If parents use too much water or scrub too hard, the shoe may lose its even finish, develop dull patches, or look dry in one area and shiny in another.
The safest leather-cleaning method is based on wiping, not soaking.
That usually means:
- Remove dust first with a dry cloth or soft brush
- Apply a small amount of cleaner to a cloth or brush
- Work on the stained area gently
- Wipe off residue cleanly
- Let the shoe dry naturally
- If needed, lightly buff the surface after drying
Most leather shoe dirt in family use is one of these:
| Leather Shoe Problem | Where It Shows Most | Difficulty |
|---|---|---|
| Gray transfer marks | Toe and side areas | 4/10 |
| Dust buildup | Entire upper | 2/10 |
| Black scuffs | Front and outer side | 5/10 |
| Dull toe area | Front high-contact zone | 5/10 |
| Sticky food spot | Lower upper or side | 6/10 |
The biggest cleaning mistake with leather is treating it like fabric. Leather usually does not need repeated heavy brushing. It needs light pressure and cleaner wiping. In many cases, parents can improve the look of leather shoes by focusing only on the toe, sole edge, and visible mark zones. That may take just 5 to 8 minutes for a school pair.
Another important point is that many children’s “leather” shoes are actually:
- coated synthetic leather
- PU leather
- mixed leather-look materials
These can still clean well, but they may respond badly to overly strong household products. That is why a balanced shoe cleaner is usually safer than random home mixtures. Parents mainly want the shoes to look neat, even, and school-ready. They usually do not need extreme cleaning. They need the finish to stay intact while the marks come off.
For heavily used school shoes, parents often care most about:
- keeping the toe from looking gray and scraped
- preventing dull buildup around stitched edges
- cleaning fast enough for next-day wear
- avoiding patchy-looking surfaces after drying
Leather responds very well to regular light care. A quick wipe every few wears is often more effective than waiting until the shoes look heavily scuffed.
How do you remove stains from suede kids’ shoes?
Suede is the material that parents are most nervous about, and for good reason. It stains easily, shows moisture marks easily, and can look worse after the wrong kind of cleaning. The good news is that suede is not impossible to clean. It just needs a different mindset. With suede, the job is not to “wash the dirt away.” The job is to lift dirt carefully while protecting the texture.
The first rule with suede is simple:
Do not rush into wet cleaning.
If the shoe has mud on it, let the mud dry first. Wet mud and wet suede are a bad combination because the dirt smears and the nap flattens. Once the area is dry, brush off as much loose dirt as possible before deciding whether any damp cleaning is needed at all.
A safe suede routine often looks like this:
- Let wet mud dry fully
- Brush gently to remove surface dirt
- Check whether the stain is still visible or if it was mostly surface soil
- Use very small, controlled stain treatment only if needed
- Avoid soaking the area
- Let the suede dry and then brush lightly again to restore the texture
Suede problems are usually one of four types:
| Suede Problem | What It Looks Like | Difficulty |
|---|---|---|
| Dry dirt | Dusty or gray surface | 4/10 |
| Mud stain | Brown patch or crust | 6/10 |
| Water mark | Uneven darker patch | 8/10 |
| Rubbed flat nap | Smooth-looking worn zone | 7/10 |
Parents often damage suede by doing one of these things:
- using too much water
- pressing too hard with the brush
- scrubbing one spot too long
- trying to make the stain disappear in one session
- cleaning the suede section the same way as the rubber or mesh next to it
This last point is especially important because many children’s sneakers now mix suede trim with mesh or synthetic panels. That means one shoe may need three cleaning styles on one pair:
- suede: very light, low-moisture treatment
- mesh: low-moisture brushing
- rubber edge: firmer cleaning
When parents separate the sections, the result is usually much better.
In real household use, suede is not usually the fastest shoe to clean, but it can still be managed well with patience. A lightly dirty suede panel may improve in 2 to 5 minutes if treated correctly. A stain that has been rubbed in or wet-cleaned badly before may take multiple gentle sessions. The goal is not to make suede look brand new in one try. The goal is to improve the stain without harming the texture.
Which material usually takes the most time to clean well?
For most households, the materials that take the most time are usually suede and white mesh. Suede takes longer because it must be handled carefully and often cannot be rushed. White mesh takes longer because it shows every shadow, and dirt settles inside the weave in a way that often needs more than one pass.
Canvas usually sits in the middle. It is easier to work with than suede, but if the shoe is white and heavily used, the sole edge, laces, and toe area can still take time. Leather is often the quickest to improve visually because many marks stay on the surface.
A practical time estimate for parents looks like this:
| Material | Quick Spot Clean | Moderate Clean | Notes |
|---|---|---|---|
| Mesh | 5–8 min | 10–15 min | Keep moisture low |
| Canvas | 6–10 min | 12–20 min | Wipe residue carefully |
| Leather | 4–8 min | 8–12 min | Focus on scuffs and toe area |
| Suede | 5–12 min | 12–20 min | Patience matters most |
This is why material-based cleaning is so useful. It helps parents budget time better and avoid frustration. If a suede-trim shoe is going to take longer, that is normal. If a leather school shoe can be cleaned in under 10 minutes, that is also normal. Better expectations usually lead to better results.
What is the best material-based routine for busy parents?
For busy parents, the best routine is not the most detailed one. It is the one that is realistic enough to repeat. A shoe-care routine only works if it fits into real family life. That usually means short, targeted cleaning instead of weekend-only deep cleaning.
A practical weekly material-based routine could look like this:
| Material | Best Weekly Routine |
|---|---|
| Mesh | Dry brush after dirty outings, spot-clean visible stains 1–2 times a week |
| Canvas | Wipe toe and sole edge every few wears, deeper clean only when needed |
| Leather | Quick wipe and toe check every few wears |
| Suede | Dry brush when needed, careful spot treatment only for real stains |
For most parents, the most useful material-based habits are:
- keep one soft brush for uppers
- keep one stronger brush for rubber edges
- do not overwet fabric shoes at night if they are needed the next morning
- clean white areas more often than darker areas
- treat suede as its own section, not as part of the general shoe
That kind of system is what usually keeps children’s shoes looking cleaner over time. Not perfect, not showroom-level, but clean enough to look cared for, last longer, and avoid the constant cycle of “these shoes already look old.”
That is why cleaning by material matters so much. It makes the work more accurate, protects the shoe, and gives parents a better result with less wasted effort.

How Do You Remove Stains from Kids’ Shoes Step by Step?
The best way to remove stains from kids’ shoes step by step is to keep the process simple, controlled, and material-aware. In most homes, the biggest problem is not lack of effort. It is that parents either clean too little and leave the stain behind, or clean too aggressively and leave the shoe rough, over-wet, or slow to dry. A good routine should solve both problems. It should remove the stain well enough to make the shoes look fresh again, while still keeping the upper, shape, stitching, and sole in good condition.
In real use, most children’s shoes do not get “equally dirty” all over. The front 20% to 30% of the shoe often carries most of the visible dirt. The toe box, lace area, outer side panel, and sole edge usually make the pair look much dirtier than the rest of the shoe. That is why step-by-step cleaning works better than random all-over scrubbing. When parents clean in the right order, they usually get a much better result in 8 to 15 minutes than they would from a rushed 20-minute soaking session.
A strong step-by-step routine usually follows this order:
| Step | Main Goal | Why It Matters |
|---|---|---|
| 1 | Check the stain and material | Prevents using the wrong method |
| 2 | Remove dry dirt first | Stops mud and grit from smearing |
| 3 | Clean by section | Gives better control and faster improvement |
| 4 | Wipe away loosened residue | Prevents dirt from spreading back |
| 5 | Dry correctly | Protects shape, finish, and next-day wearability |
Parents usually care about four things during this process:
- Will the stain actually come out enough to make the shoes look presentable again?
- Will the shoes dry in time for school or sports?
- Will the upper still look smooth after cleaning?
- Can this routine be repeated every week without wearing the shoes out too fast?
That is exactly why the details matter. Small choices like whether to brush mud while wet, whether to remove the laces first, or whether to wipe away residue before applying more cleaner can change the final result by a lot.
What should you do before cleaning kids’ shoes?
Before cleaning, the first job is to slow down and read the shoe properly. This takes only 30 to 60 seconds, but it often decides whether the clean will go smoothly or become messy. Many parents go straight to foam or water because the stain looks obvious. The problem is that visible dirt is not always the real problem. Sometimes the shoe looks heavily stained, but half of that dirt is loose and could come off dry. Other times, the stain is small but already set into the upper and needs more careful handling.
A good pre-clean check should answer three questions:
- What is the stain? Mud, grass, food, drink, gray scuff, or white-shoe buildup
- Where is it? Upper, lace area, toe front, sole edge, or mixed-material trim
- What is the shoe made of? Mesh, canvas, leather, suede, or a combination
This matters because the wrong first move causes many common cleaning problems. For example:
- Wetting fresh mud too early turns it into a larger brown smear
- Scrubbing suede like canvas flattens the texture
- Cleaning white mesh too hard can make the fibers look fuzzy
- Ignoring the sole edge can leave the shoe still looking dirty even after the upper is cleaned
A practical pre-clean setup at home should include:
| Item | Why You Need It |
|---|---|
| Soft brush | Removes dry dirt and protects uppers |
| Medium brush | Helps on rubber toe caps and sole edges |
| Microfiber towel | Wipes residue better than tissue or paper towel |
| Cleaner | Main stain-removal step |
| Good light | Helps you see whether the stain is lifting evenly |
After that, remove loose dirt first. This step is more important than most people think. On heavily used school shoes, dry brushing alone can improve the appearance by 20% to 40% before any cleaner is applied. Mud, sidewalk dust, dry sand, and flaky dirt often sit on the surface. If those are not removed first, they mix with cleaner and create a dirty film that spreads into stitching and fabric.
If the lace area is dirty, take the laces out. This usually adds only 1 to 2 minutes, but it makes cleaning much easier because the tongue and eyelet area are often darker than they look. On white kids’ shoes, dirty laces can make the whole pair still look worn even after the upper is cleaned.
Another useful habit is to clean on a towel or flat surface instead of holding the shoe in one hand. That gives better pressure control and helps parents work section by section instead of rushing.
How much cleaner should you use on kids’ shoes?
Most parents use too much cleaner, not too little. This is one of the most common reasons shoes stay damp too long, develop residue marks, or end up looking uneven after drying. In real home cleaning, more product does not automatically mean better stain removal. Once the shoe is too wet, the job usually becomes slower, messier, and harder to control.
A better rule is this: use enough cleaner to loosen the stain, not enough to flood the shoe.
That matters because different materials respond very differently to moisture:
- Mesh can trap wet dirt deeper in the weave
- Canvas can spread the stain outward if over-wet
- Leather can lose its even finish
- Suede can mark or darken unevenly
For most everyday kids’ shoes, the best method is to apply cleaner in small amounts and work in sections. Do not coat the whole shoe unless the entire shoe is truly dirty. If the visible problem is the toe box and sidewall, clean those first. If the shoe already looks much better, stop there.
A practical product guide looks like this:
| Cleaning Situation | Cleaner Amount | Best Approach |
|---|---|---|
| One small stain | Very low | Spot-clean only |
| Mud on toe and sidewall | Low to medium | Work one section at a time |
| White shoes with several dirty zones | Medium, controlled | Clean in parts, wipe between sections |
| Leather school shoe scuffs | Low | Use cleaner on cloth or brush, not heavy direct application |
| Suede trim stain | Very low | Minimal spot treatment only |
Parents can usually tell they are using too much cleaner when:
- the brush is dripping
- the shoe surface looks soaked instead of lightly worked
- dirt starts spreading to clean areas
- the towel keeps lifting foam long after the stain work is done
- drying time goes beyond what the level of dirt should require
A lightly spot-cleaned shoe may dry in 2 to 6 hours. A heavily over-wet shoe may take 12 to 24 hours. For busy families, that difference is huge. A child may need the shoes again the next morning, which means moisture control is not only about appearance. It is also about usability.
Another helpful point is that cleaner should often go onto the brush or cloth first, not directly onto the shoe in large quantity. This gives better control, especially on white uppers and around stitching. It also makes it easier to judge whether the stain is lifting before adding more product.
In real household use, a controlled foam format often works well because it keeps the product where parents want it. That reduces waste, reduces mess, and makes the cleaning job feel easier to repeat.
How do you scrub kids’ shoes without damage?
Scrubbing without damage comes down to pressure, tool choice, and patience. A child’s shoe often contains more delicate surfaces than it looks like from a distance. Even affordable everyday sneakers may combine mesh, knit, printed overlays, foam, rubber, and glued trim in one pair. If parents attack the whole shoe with the same brush pressure, one area may improve while another starts looking worn.
The safest way to scrub is to divide the shoe into zones:
| Shoe Zone | Best Pressure Level | Main Goal |
|---|---|---|
| Mesh / knit upper | Light | Lift dirt without roughening fibers |
| Canvas upper | Light to medium | Remove stain while controlling spread |
| Leather / synthetic leather | Light | Wipe and loosen marks without dulling finish |
| Rubber sole edge | Medium | Lift gray buildup and scuffs |
| Toe bumper / rubber front | Medium | Remove heavy visible grime |
The step most parents miss is checking after each short pass. They scrub continuously because the stain is still there, but the better habit is:
- Work the area for a few seconds
- Stop
- Wipe away loosened dirt
- Look at what actually remains
- Decide whether the stain needs another pass or just better wiping
This matters because many stains are partly removed much earlier than parents realize. What is left behind may not be “more dirt.” It may be residue, a light shadow, or an old stain that needs a second gentle round rather than stronger force.
Here are the most common scrubbing mistakes:
- using a sole brush on the upper
- pressing harder instead of cleaning in stages
- scrubbing one spot too long
- not wiping away dirt between passes
- using the same dirty brush on clean white sections
A two-brush system usually works best in real family use:
| Brush Type | Best Use |
|---|---|
| Soft brush | Uppers, mesh, canvas, general stain work |
| Medium brush | Sole edges, toe caps, textured rubber |
This small change improves results more than many parents expect because it keeps gray sole dirt from getting pushed back into the upper.
The brushing motion also matters. On mesh and canvas, short circular motions often lift stains well. On rubber edges, short back-and-forth passes usually work better. On leather, wiping with a cloth may be more effective than repeated brushing. On suede, brushing should be very gentle and limited.
A useful real-life target is not “make it perfect in one session.” A better target is “remove 70% to 90% of the visible stain without damaging the shoe.” That usually gives the best balance between appearance and long-term wear. Shoes that are cleaned carefully several times often look better over time than shoes that are cleaned harshly once.
How do you wipe away dirt and cleaner residue properly?
Wiping is one of the most underrated parts of shoe cleaning. Many parents focus on brushing because it feels like the main cleaning step, but wiping is what finishes the job. If loosened dirt and excess cleaner are not removed properly, the shoe can dry with dull patches, sticky sections, or a faint ring around the cleaned area.
A microfiber towel usually works best because it lifts dirt without leaving much lint behind. The towel should be used in stages:
- after the first stain pass to remove loosened dirt
- between repeated cleaning rounds
- at the end to remove surface moisture and leftover cleaner
This step is especially important on:
- white mesh
- white rubber edges
- canvas uppers
- leather school shoes
- any shoe with visible stitching or texture
Why? Because residue tends to collect in those areas. On white shoes, that leftover film is easy to see once dry. Parents sometimes think the stain came back overnight, but the real problem is often that dirty cleaner residue dried on the surface.
A simple wipe-down process looks like this:
| Wiping Stage | What It Does |
|---|---|
| Mid-clean wipe | Removes loosened dirt before it spreads |
| Final wipe | Clears away remaining cleaner film |
| Drying wipe | Removes extra moisture and speeds air-drying |
Parents often get a much cleaner-looking result just by wiping more carefully between passes. In some cases, a second brushing round is not even needed once the lifted dirt is removed properly.
How do you dry kids’ shoes after cleaning?
Drying is where many decent cleaning jobs go wrong. A shoe can look much cleaner while damp, then dry with uneven texture, residue marks, stiffness, or odor because too much moisture stayed inside. The safest drying method is natural air-drying with shape support.
After cleaning:
- blot away surface moisture with a microfiber towel
- lightly stuff the shoe with paper to help it hold shape
- leave it in a well-ventilated indoor space
- avoid direct high heat
- do not put the shoes away until they are fully dry
The most common drying mistakes are:
| Drying Mistake | What Usually Happens |
|---|---|
| Heater or radiator drying | Shape stress, glue stress, stiffness |
| Hair dryer on high heat | Uneven drying, finish damage |
| Too much direct sun | Fading or surface dryness on some materials |
| No towel wipe before drying | Residue marks stay on the shoe |
| Wearing before fully dry | Odor, discomfort, faster re-soiling |
Drying time depends on how much moisture was used:
| Cleaning Type | Typical Drying Time |
|---|---|
| Light spot clean | 2–6 hours |
| Moderate section clean | 6–12 hours |
| Heavier canvas or mesh clean | 12–24 hours |
| Over-wet cleaning | 24+ hours |
For parents cleaning shoes at night, this matters a lot. A light, controlled clean at 7 p.m. may leave the shoes ready by morning. A heavily soaked clean at 10 p.m. may leave them still damp the next day. That is why step-by-step cleaning should always be tied to real family schedules. The best cleaning method is the one that makes the shoes look better and still lets the child wear them when needed.
What is the best step-by-step routine for busy parents?
For busy parents, the best routine is the one that can actually be repeated. It should not feel like a big project every time. In most households, a 5- to 12-minute controlled clean is much more realistic than a full wash.
A strong quick routine looks like this:
| Step | Time | What to Focus On |
|---|---|---|
| Check stain and material | 30–60 sec | Decide what kind of clean is needed |
| Dry brush loose dirt | 1–2 min | Remove mud, dust, and grit first |
| Spot-clean main dirty areas | 3–6 min | Toe box, sidewall, lace area, visible stains |
| Wipe away residue | 1–2 min | Prevent dullness and cleaner marks |
| Set up for drying | 30–60 sec | Paper inside, ventilated area |
This routine works especially well for:
- white school sneakers
- daily casual shoes
- lightly muddy playground shoes
- sports shoes with visible grass or dust marks
- family shoes that need quick next-day use
The key is not doing everything. The key is doing the right things in the right order. If the shoe looks 70% cleaner after focusing on the toe, upper stain, and sole edge, that is often enough to make the pair look fresh again. Parents do not need to turn every clean into a full restoration job.
That is why step-by-step cleaning matters so much. It saves time, reduces damage, and gives a result that fits real family life. When parents follow a smart order instead of guessing, kids’ shoes usually look better, dry faster, and stay in good condition longer.

How Can You Remove Stains from Kids’ Shoes More Easily Next Time?
The easiest way to remove stains from kids’ shoes next time is to stop treating shoe cleaning like a rescue job. In most homes, stains become difficult because they are left too long, cleaned too roughly, or allowed to build up in the same areas again and again. A better routine is much simpler: clean small marks earlier, focus on the parts that make the shoe look dirty fastest, and use a setup that is easy enough to repeat during a normal week.
For most families, the hardest part is not the cleaning itself. It is timing. Parents are busy, children need the shoes again quickly, and nobody wants to do a full deep clean every few days. That is why the best long-term method is not “clean harder.” It is “clean sooner, clean smaller, and clean smarter.” A 3- to 5-minute touch-up usually removes a lot more than people expect. In real use, once the toe, sidewall, sole edge, and visible upper marks are handled, the shoes often look 60% to 85% better without a full wash.
A good prevention-focused routine helps with four real problems parents care about:
- keeping school shoes looking acceptable for longer
- reducing the time needed for each cleaning session
- lowering the risk of rough fabric, dull leather, or water marks
- helping one pair survive more wears before looking “too dirty”
This is especially important for children who wear one favorite pair most days of the week. If the same school sneakers are worn 4 to 6 days a week, that pair can go through 16 to 24 wears in a month. Without maintenance, dirt does not just sit on the surface. It layers into the shoe little by little. That is why shoes often seem to get dirty “all at once,” even though the buildup actually happened over many days.
A useful way to think about easier future cleaning is this:
| Habit | Immediate Benefit | Long-Term Benefit |
|---|---|---|
| Wipe visible marks early | Less stain setting | Shorter cleaning time later |
| Clean sole edges often | Shoes look brighter faster | Less gray buildup over time |
| Use the right brush for the right surface | Safer cleaning | Less material wear |
| Avoid over-wetting | Faster drying | Better shoe shape and finish |
| Keep a simple cleaning kit nearby | More likely to clean regularly | Fewer full rescue jobs |
Parents usually do not need a complicated system. They need one that fits normal life. A cleaner, brush, and towel stored near the entry, laundry area, or shoe rack will get used far more often than supplies hidden in a cabinet across the house. Ease of access matters because the best shoe care routine is the one that actually happens.
How often should you clean kids’ shoes?
The right cleaning frequency depends on how often the shoes are worn, where the child wears them, and how visible the dirt is. Most parents do not need to deep clean children’s shoes every week. But most parents do benefit from doing light cleaning more often. That is the difference that keeps shoes manageable.
A practical schedule looks like this:
- After heavy outdoor use: brush off visible dirt the same day
- Every few wears: wipe the toe area and sole edge
- Once a week for frequently worn white shoes: do a quick stain check
- Before school events, photos, travel, or outings: do a more careful refresh
For a pair of white school sneakers worn 5 times a week, even 5 minutes of upkeep twice a week can make a big difference. Over one month, that is often enough to prevent the heavy gray buildup that makes white shoes look old. On darker shoes, parents can stretch the schedule more because dirt is less visible, but hidden grime still builds around the sole edge and toe front.
Here is a realistic care rhythm by shoe type:
| Shoe Type | Wear Pattern | Suggested Care Routine |
|---|---|---|
| White school sneakers | 4–6 wears a week | Quick wipe every 2–3 wears, deeper touch-up weekly |
| Sports shoes | Heavy activity, grass, dust, sweat | Brush after use, clean visible stains within 1–2 days |
| Casual dark sneakers | Regular errands and school | Light wipe weekly, deeper clean when needed |
| Canvas shoes | Daily or warm-weather wear | Spot-clean visible marks early |
| Suede-trim shoes | Less frequent wear, more sensitive material | Dry brush as needed, careful stain treatment only |
The main goal is to stop stains before they turn into buildup. Parents often wait because the shoes are “not dirty enough yet.” But once the dirt is obvious from a distance, the cleaning job usually takes more product, more wiping, and more drying time. A lighter routine keeps the work smaller and more manageable.
What mistakes make kids’ shoes harder to clean?
Most difficult shoe-cleaning jobs start with a few repeat mistakes. In real family use, the problem is usually not that parents do not care. It is that they are cleaning while rushed, using the wrong pressure, or waiting until the shoe is already carrying several layers of dirt.
The most common mistakes are:
- waiting too long
- cleaning wet mud immediately
- using too much water
- using one brush for both the dirty sole and the upper
- drying too fast with heat
- treating all materials the same way
These mistakes create very practical problems. Wet mud spreads wider. Too much liquid slows drying and can leave rings. A dirty sole brush transfers gray grime back onto white fabric. Heat can make a shoe dry unevenly or feel stiff. Harsh scrubbing may remove part of the stain, but it can also make mesh look fuzzy or worn.
Here is a clear side-by-side comparison:
| Mistake | What Usually Happens | Better Choice |
|---|---|---|
| Wait until shoes look heavily dirty | Stains set deeper and combine | Clean smaller marks earlier |
| Scrub muddy shoes while still wet | Mud smears into fabric | Let mud dry first, then brush |
| Use too much cleaner | More residue, slower drying | Apply small amounts in stages |
| Use one dirty brush everywhere | Upper gets re-soiled | Keep one brush for uppers, one for rubber |
| Use heat to dry fast | Stiffness, shape stress, patchy drying | Air-dry naturally |
| Scrub one spot too long | Surface wear, uneven look | Work in short passes and check progress |
For many households, one of the biggest hidden mistakes is trying to make the shoe perfect in one session. That often leads to over-cleaning. A better target is to make the shoes clearly cleaner, brighter, and more presentable, then repeat light maintenance later. That approach protects the shoe better and usually saves time across the month.
Parents also often forget that the dirtiest-looking part may not be the most deeply stained part. A white shoe may look terrible mainly because the sole edge is dark gray. Clean that one area well, and the pair can look much newer in just a few minutes. That is why targeted cleaning usually works better than random all-over scrubbing.
Which products help remove stains from kids’ shoes faster?
The products that help most are the ones that reduce mess, shorten setup time, and make parents more likely to clean shoes before the stains build up. In daily family use, the best product is rarely the one that sounds the strongest. It is the one that fits real habits.
A practical shoe-cleaning setup usually includes:
- a controlled foam cleaner or low-water cleaner
- a soft brush for uppers
- a stronger brush for sole edges and toe caps
- a microfiber towel for wiping away dirt and moisture
This combination works well because each tool solves a different part of the problem. The cleaner loosens the stain. The brush creates friction. The towel removes what has lifted. When one of those three is missing, the job usually takes longer.
Here is why each item matters:
| Product | Why It Helps | Best Use |
|---|---|---|
| Foam cleaner | Easier to control than a soaking wash | White shoes, school shoes, quick touch-ups |
| Soft brush | Cleans uppers without roughening them too fast | Mesh, canvas, knit |
| Medium brush | Removes gray buildup more efficiently | Sole edges, toe bumpers, rubber sections |
| Microfiber towel | Lifts residue and helps with drying | All shoe types |
| Complete kit | Reduces setup time | Homes with frequent shoe cleaning |
For parents, speed matters. A cleaner that takes too long to prepare or creates too much mess often gets delayed until the shoes look much worse. That is why low-water or no-water cleaning formats are practical. They reduce sink use, reduce dripping, and usually make it easier to clean only the section that needs help.
This is also why a complete shoe care kit tends to work better in family homes than a bottle alone. When the right brush and towel are already there, parents are more likely to clean a pair in 5 to 10 minutes instead of putting it off for another week.
For example, a parent handling two children’s pairs on a Sunday evening often cares about:
- whether the job can be finished quickly
- whether the shoes will dry overnight
- whether one product can work across several materials
- whether the cleaner leaves the shoes looking cleaner without feeling like a big chore
That is where a family-friendly kit has a real advantage. It makes the routine feel manageable.
How do you keep kids’ shoes cleaner for longer?
Keeping kids’ shoes cleaner for longer is mostly about reducing buildup, not preventing all dirt. Children will still run, kneel, spill, drag their toes, and step into muddy areas. The goal is not to keep shoes spotless. The goal is to stop normal daily dirt from turning into heavy stains that need full restoration.
The most effective habits are simple:
- brush off visible dirt after heavy outdoor use
- wipe white sole edges before they turn dark gray
- clean food or drink spots the same day
- let muddy shoes dry before brushing them
- give shoes time to air out fully before putting them away
- rotate pairs when possible
Parents often see the biggest difference from just two habits:
- Cleaning sooner
- Cleaning smaller areas more often
That is because most shoes do not suddenly become dirty everywhere. They get dirty in layers. First the toe area darkens. Then the sidewall gets gray. Then the upper starts looking flat. Then the laces look dingy. If those stages are interrupted earlier, the shoes stay looking fresher much longer.
A useful long-term comparison looks like this:
| Routine Style | Weekly Time Needed | How Dirty Shoes Get Over Time | Overall Result |
|---|---|---|---|
| Wait until shoes look very dirty | Low at first, high later | Dirt builds fast | Harder cleaning, older-looking shoes |
| Quick touch-ups during the week | Low and steady | Dirt stays manageable | Better appearance with less effort |
| Frequent heavy washing | Medium to high | Dirt removed, but wear risk increases | Cleaner shoes, but may shorten shoe life |
| Controlled foam + brush routine | Low to medium | Good control of buildup | Best balance for many families |
Another smart habit is to treat high-visibility zones as priority zones. In most children’s shoes, the parts that affect appearance most are:
- toe box
- sidewall
- white midsole edge
- laces
- outer side panel
If those areas are kept reasonably clean, the whole pair usually looks much better. Parents do not always need to clean every centimeter of the shoe. They need to clean the parts people notice first.
For busy families, a very practical routine is to do a 2-minute visual check when shoes come off after school or sports. If there is fresh mud, let it dry. If there is a food spot, wipe it that day. If the white sidewall is looking gray, clean it before it becomes heavily set. These small decisions save much more time later.
That is why future cleaning gets easier when parents stop thinking only about stain removal and start thinking about stain control. Once dirt is managed earlier, the shoes need less product, less scrubbing, and less drying time. That makes the routine faster, safer, and much easier to keep up week after week.
What Should You Know First About Kids’ Shoe Stains?
Before getting into the common questions, the main thing to understand is that kids’ shoe stains are rarely just one problem. On the same pair, you may see dried mud on the toe, grass marks on the side, gray buildup on the sole edge, and a few food spots near the laces. These stains may look similar at first glance, but they do not clean the same way. That is why shoe cleaning often feels harder than it should.
Most parents do not actually need a complicated routine. They need to know three things: what kind of stain they are dealing with, what material the shoe is made of, and whether the stain is fresh or already set in. Once that becomes clear, the cleaning job usually gets much easier. In many cases, a short, targeted clean works better than washing the whole pair.
Can you remove stains from kids’ shoes without washing the whole pair?
Yes, and in many cases that is the smarter choice. Most kids’ shoes do not get equally dirty all over. Usually, the part that looks worst is the toe area, the outer side panel, the laces, or the white sole edge. When those spots are cleaned well, the whole pair often looks much fresher right away.
This is why spot cleaning works so well for school shoes and everyday sneakers. A full wash takes more time, creates a longer drying window, and can put more stress on the upper and sole. A focused clean is usually enough when the stain is limited to one or two areas, or when the shoe looks dirty mainly because of the toe and sidewall.
A simple home rule works well here. If the shoe has one visible mud patch, one food stain, or one dirty sole edge, start with section cleaning first. If the whole pair looks flat, dusty, and uneven from top to bottom, then a broader hand clean may be worth it.
| Shoe Condition | Best Cleaning Choice |
|---|---|
| One or two visible stains | Spot clean only |
| Dirty toe and sidewall, rest looks fine | Section cleaning |
| Whole shoe looks dusty and uneven | Broader hand clean |
| Heavy odor and all-over grime | Deeper clean if material allows |
In real family use, this saves a lot of time. A full wash can take 15 to 25 minutes of work plus 8 to 24 hours of drying. A focused clean often takes only 5 to 10 minutes. For parents cleaning shoes in the evening before the next school day, that difference matters a lot.
What removes grass stains from kids’ shoes best?
Grass stains are one of the hardest marks to deal with because they are not just loose dirt. They usually contain plant color, fine soil, and moisture, and all of that can settle into the fabric when a child runs, kneels, or slides on grass. That is why grass on white mesh or white canvas is much harder than grass on rubber or coated synthetic material.
The best approach is early cleaning with good control. Start by removing any loose dry dirt first. Then apply a small amount of cleaner to a brush or cloth and work only on the stained area. After that, wipe away what lifts before deciding whether the stain needs another pass.
The biggest mistakes with grass stains are usually using too much water, scrubbing too hard in one round, or waiting too long. Older grass stains often need two cleaning rounds, especially if the shoes were worn again after the stain happened. That is normal. The first clean usually removes the surface dirt and reduces the color. The second clean improves what remains.
| Surface | Cleaning Difficulty |
|---|---|
| Rubber sidewall | 3/10 |
| Smooth synthetic upper | 4/10 |
| Canvas upper | 7/10 |
| Mesh upper | 8/10 |
| Stitching around white fabric | 8/10 |
In practical terms, cleaning the stain early can cut the effort by 30% to 50% compared with leaving it for several days. That is why grass stains reward speed more than force.
Are white kids’ shoes harder to clean?
Yes, white kids’ shoes are harder to keep looking clean, but they are not always harder to clean well. The real problem is that white shoes show everything. A light gray mark, a faint grass shadow, or a little dust on the sole edge is much more visible on white shoes than on dark ones.
That is why white shoes often look “too dirty” faster, even when the actual amount of dirt is not very high. The biggest trouble spots are usually the toe box, the white sole edge, the laces, the outer side panel, and the front rubber area.
| Zone | Why It Matters So Much |
|---|---|
| Toe box | Usually the first area people notice |
| White sole edge | Turns gray fast and affects the whole look |
| Laces | Dirty laces make the whole pair look older |
| Outer side panel | Catches some of the most visible marks |
| Front rubber / toe cap | Shows black scuffs and yellow-looking buildup |
With white shoes, the most effective habit is not stronger cleaning. It is more frequent, smaller cleaning. A white shoe that gets a 5-minute touch-up every few wears usually looks much better over time than a white shoe that gets one deep clean once a month.
Parents often think white shoes are impossible to maintain because they wait too long between cleans. In real use, once the sole edge, toe area, and side panel are cleaned, the shoe can look 60% to 85% better very quickly. White shoes do best with consistency.
Can you use the same cleaner on mesh, canvas, leather, and suede?
Sometimes yes, but not in exactly the same way. A cleaner may be safe across several materials, but the cleaning method still needs to change. The main difference is not always the product itself. It is how much product is used, how much moisture reaches the shoe, how hard the area is scrubbed, and how long one section is worked.
| Material | Product Amount | Pressure | Moisture Level |
|---|---|---|---|
| Mesh | Low | Light | Low to moderate |
| Canvas | Low to medium | Light to medium | Moderate |
| Leather | Low | Light | Low |
| Suede | Very low | Very light | Very low |
This is important because the same mistake looks different on each material. Too much moisture on mesh can make the upper slow to dry. Too much product on canvas can leave a dull ring. Too much scrubbing on leather can make the finish look uneven. Too much moisture on suede can leave marks that are harder than the original stain.
For busy parents, a multi-material cleaner can still be very practical because it reduces how many products they need to keep at home. But one pair of kids’ shoes may still need more than one cleaning style in the same session. A sneaker with mesh, rubber, and suede trim should still be treated by section, not as one uniform surface.
Is machine washing a good idea for kids’ shoes?
Sometimes, but it should not be the first choice for most children’s shoes. Machine washing is useful in some situations, especially when the shoe is simple fabric or canvas and the whole pair is dirty. But for many school shoes and mixed-material sneakers, it creates extra risks.
Those risks usually include longer drying time, more wear on the upper, possible sole stress, and a higher chance that the shoe loses some of its shape. That is why hand cleaning often gives better-looking results. It lets parents clean the exact parts that matter most instead of putting the whole shoe through a full wash.
| Method | Cleaning Time | Drying Time | Wear Risk |
|---|---|---|---|
| Spot clean | 5–10 min | 2–6 hrs | Low |
| Controlled hand clean | 10–20 min | 6–18 hrs | Low to medium |
| Machine wash | 5 min setup | 12–24 hrs or more | Medium to high |
For many families, the key question is simple: does the whole shoe really need washing, or does it just need the toe, sidewall, and sole edge cleaned? In many cases, targeted hand cleaning is the better answer.
Why do shoes still look dirty after cleaning?
This is one of the most common frustrations for parents. A shoe may look cleaner, but still not look fully clean. Usually that happens because the loose dirt came off, but something else is still left behind. It may be a stain shadow, a dirty sole edge, dried cleaner residue, or dingy laces that make the whole pair still look tired.
This is especially common with old grass stains, white shoes with gray sole buildup, mesh shoes with deep dust in the weave, and canvas shoes with dried food or mud shadowing.
A useful way to check the problem is to look at the shoe in sections:
| Problem Area | What It Usually Means |
|---|---|
| Upper looks cleaner, sole edge still dark | The rubber edge needs more work |
| Stain is lighter but still visible | The stain needs another controlled pass |
| White area looks dull after drying | Cleaner residue may still be there |
| Shoe looks cleaner but laces still look dirty | The laces are lowering the overall look |
| One section looks rough | That area may have been over-scrubbed |
In practice, many shoes need two rounds of careful cleaning, not one aggressive round. Parents usually get better results when they clean, wipe, check the result, and then decide whether another pass is needed.
How long should you wait before wearing kids’ shoes again after cleaning?
That depends mostly on how much moisture was used. If the cleaning was light and limited to a few stained areas, the shoes may be ready in a few hours. If the upper was cleaned more heavily, especially on mesh or canvas, overnight drying is usually the safer choice.
| Cleaning Level | Safe Wear Time Estimate |
|---|---|
| Very light spot clean | 2–4 hours |
| Moderate section clean | 4–8 hours |
| Heavier upper cleaning | 8–12 hours |
| Full hand clean or over-wet clean | 12–24 hours |
Parents should avoid sending children out in damp shoes. Even if the shoes feel almost dry, trapped moisture can still cause odor, make dirt stick faster, and leave uneven marks as the shoe finishes drying during wear.
If the shoes are needed the next morning, a light evening clean is usually much safer than a heavy late-night wash. This is one reason low-moisture routines work so well for school shoes.
Conclusion
Kids’ shoes get dirty fast, but that does not mean they are beyond saving. Most stains look worse than they really are because the wrong method is used, the cleaning happens too late, or the material is treated too roughly. Once parents start working by stain type, by material, and by section, results become much more predictable. Dry dirt can be brushed off. Grass marks can be reduced with patient spot cleaning. White sole edges can look brighter again with regular maintenance. Even shoes that look tired often improve a lot with a smarter routine.
The real goal is not perfect shoes every day. The real goal is making shoe care simple enough that it actually happens. A cleaner that is easy to control, a brush that matches the surface, and a towel that removes residue well can turn a frustrating task into a quick part of family routine. That saves time, helps shoes stay presentable longer, and reduces the need for harsh cleaning.
Family shoe care is a practical, repeat-use category with strong everyday demand, visible results, and good bundle potential. If you want to order GleamGlee branded shoe cleaner products, request samples, or discuss a private-label shoe care line, GleamGlee can support both finished product orders and customized development. Whether you need a ready-to-sell family shoe cleaner kit, multilingual packaging, tailored formula work, or a new shoe care project for your market, GleamGlee is ready to discuss your goals and help you move from idea to product.


