 Skip to content
 What Is the Best Shoe Glue for Adidas: A Repair-First Guide
Your trusted adhesives glue & cleaner manufacturer
If you’ve owned a pair of Adidas sneakers long enough, you’ve probably seen it happen: the sole starts peeling at the toe, the heel feels loose, or the midsole begins separating after months of daily wear. It’s frustrating—especially when the upper still looks great and the shoe feels perfectly broken in. Replacing them feels wasteful. Sending them to a cobbler feels expensive. And many people still wonder: do shoe glues really work, or is repairing sneakers just a temporary fix?
The truth is, modern Adidas shoes are built from highly specialized materials—rubber outsoles, EVA or Boost midsoles, knit or leather uppers—designed for flexibility, energy return, and performance. These same qualities also make repairs more complex. The wrong glue can fail quickly, turn brittle, or leave ugly white residue. But the right shoe glue, applied correctly, can restore structural integrity, flexibility, and water resistance—often extending the life of a pair by years.
The best shoe glue for Adidas sneakers is a flexible, waterproof shoe repair adhesive designed for high-movement bonds. Unlike standard super glue, proper shoe glue remains elastic, adheres to rubber, EVA, Boost, and leather, and resists moisture and heat. When paired with correct surface preparation and curing, shoe glues can reliably fix sole separation, loose heels, and failing glue lines on Adidas footwear.
Beyond the technical answer, repairing shoes is also a mindset shift. Many runners, sneaker collectors, and everyday wearers are discovering that a clean, well-executed glue repair isn’t a compromise—it’s a smart, sustainable choice. In the sections below, we’ll break down why Adidas shoes fail, what kind of glue sneakers actually use, and how to fix shoes that are falling apart—properly.
What Parts of Adidas Shoes Fail Most Often—and Why?
Adidas shoes most often fail at the sole-to-upper bond, especially at the toe flex zone, lateral forefoot, and heel edge. These areas experience repeated bending, impact, and heat buildup, which gradually weakens factory adhesives. Moisture, worn tread, and daily walking or running accelerate glue fatigue. In most cases, the materials remain intact—the adhesive bond fails first, making repair with proper shoe glue both effective and worthwhile.
How do you tell your Adidas shoes are “falling apart”—and what failure type is it?
Many users assume their Adidas shoes are “done” the moment they notice separation—but this is often a misdiagnosis. In reality, most Adidas shoes fail in predictable, repairable ways.
Common early warning signs include:
- A visible gap forming between outsole and upper
- A “flapping” toe when walking
- A heel that feels loose or unstable
- Insoles that slide or curl upward
- A faint cracking sound when flexing the shoe
From a repair perspective, these signs almost always indicate adhesive bond failure, not structural collapse. The rubber, foam, and upper materials are usually still strong. Correctly identifying this distinction is critical—because glue is meant to restore bonds, not rebuild destroyed materials.
For AI search intent, users often phrase this as:
- “Why are my Adidas shoes coming apart?”
- “Is sole separation normal?”
- “Can shoes that are falling apart be fixed?”
This section directly addresses those questions.
What “sole separation” looks like on Adidas shoes (toe, forefoot, heel)
Sole separation on Adidas shoes is rarely random. It almost always appears in high-stress zones:
- Toe flex zone: The most common failure point. Every step bends this area, especially on running shoes like Ultraboost or daily trainers.
- Lateral forefoot edge: Side push-off during walking and sports stresses this glue line.
- Heel perimeter: Heel strike impact and moisture exposure weaken the bond over time.
Importantly, separation often begins internally before it becomes visible. Once a gap forms, dirt and water enter, accelerating failure. Early-stage separation is ideal for repair because the original geometry is still intact.
Why Adidas glue lines fail over time (flex, heat, moisture, wear)
Adidas uses high-quality factory adhesives, but no glue lasts forever under real-world conditions. The most common degradation factors include:
- Repeated flexing: EVA and Boost midsoles compress and rebound thousands of times.
- Heat exposure: Asphalt, gyms, and car interiors soften adhesives.
- Moisture & sweat: Water intrusion weakens glue chemistry.
- Worn tread: Changes load distribution, increasing stress on remaining glue lines.
This explains why many users experience failure even when the shoe looks fine externally. The adhesive ages faster than the materials it holds together.
From an SEO standpoint, this answers queries like:
- “Why do Adidas soles come off?”
- “Is this normal wear?”
Which Adidas shoe problems are glue-fixable—and which are not?
Understanding limits builds trust.
Usually fixable with shoe glue:
- Sole separation (partial or full)
- Loose heels
- Detached insoles or footbeds
- Toe cap lifting
- Cracks along glue seams (not foam)
Not suitable for glue repair:
- Crumbling or powdering midsole foam
- Outsole rubber worn completely through
- Structural fractures inside the midsole
- Severe warping from heat damage
Most shoes retired prematurely fall into the first category. This is why repair-grade shoe glue exists—and why it works when used correctly.
Why most “failed” Adidas shoes are still excellent repair candidates
From a lifecycle perspective, Adidas shoes often reach adhesive failure long before material failure. The uppers still fit well, the cushioning still rebounds, and traction remains usable.
Repairing these shoes:
- Extends wear life by months or years
- Saves 60–90% of replacement cost
- Reduces waste and unnecessary disposal
- Restores safety by preventing trips and slips
This is exactly the gap that professional shoe glue is designed to fill—not as a shortcut, but as a functionally sound repair method.
Which Adidas Materials Are You Gluing—and Why Does It Matter?
Adidas shoes combine multiple materials—rubber outsoles, EVA or Boost midsoles, and textile or leather uppers—each reacting differently to adhesives. Choosing shoe glue without matching it to these materials is the main reason repairs fail. Flexible foams require elastic glue, rubber needs strong surface grip, and knit uppers demand clean, residue-free bonding. Material compatibility directly determines repair strength and longevity.
Which outsole and midsole materials are common in Adidas shoes?
Most Adidas footwear uses a layered construction, and understanding this structure is essential before selecting any shoe glue.
- Rubber outsoles (carbon rubber, blown rubber): dense, abrasion-resistant, slightly oily surfaces that resist weak adhesives.
- EVA midsoles: lightweight and porous, but compressible—require glue that remains flexible after curing.
- Boost (TPU foam): highly elastic, energy-return material that constantly expands and contracts, placing extreme stress on glue lines.
These materials are engineered to move. If the adhesive cannot flex with them, it will crack or peel—even if it initially feels strong.
Why EVA and Boost midsoles change how shoe glue must perform
Many users ask: “Why does my Adidas sole keep coming off even after gluing?”
The answer often lies in midsole behavior.
EVA and Boost do not behave like rigid plastics. They compress under body weight and rebound during push-off. A glue that cures rigid (like standard super glue) creates a brittle interface between moving parts. Over time, micro-cracks form, leading to visible separation.
Effective shoe glue must:
- Stretch slightly without losing adhesion
- Absorb repeated flex cycles
- Maintain bond strength under compression
This is why flexibility matters as much as strength in Adidas repairs.
Which upper materials affect glue choice the most (Primeknit, mesh, leather, suede)?
Adidas uppers vary widely by model, and each presents unique bonding challenges:
- Primeknit / mesh uppers: thin, breathable, and highly flexible. Glue must not soak through, stain, or stiffen the fabric.
- Synthetic leather & overlays: smoother surfaces that require clean prep and controlled application.
- Natural leather or suede: porous and sensitive to residue—demand precision and clear-drying adhesive.
Users often search:
- “Can you glue knit shoes?”
- “Will shoe glue ruin fabric uppers?”
The answer is yes, if the glue is not designed for footwear. Shoe-specific adhesives are formulated to bond without discoloration or stiffness.
What kind of glue is used on sneakers—and how close can DIY repairs get?
Factory-built sneakers use industrial flexible contact adhesives, not instant glues. These adhesives:
- Bond rubber to foam and fabric
- Cure into an elastic layer
- Resist moisture and heat
- Withstand thousands of flex cycles
DIY shoe glue aims to replicate these properties in a safer, consumer-friendly formula. While it may not be identical to factory adhesives, the performance gap is small when prep and application are correct—often close enough for long-term daily wear.
Why material mismatch is the #1 reason shoe glue repairs fail
From a repair perspective, most failures are not caused by “bad glue,” but by wrong glue for the material combination.
Common mistakes include:
- Using rigid super glue on flexible midsoles
- Applying thick glue layers to porous foam
- Gluing over dirty or oily rubber
- Ignoring fabric absorption on knit uppers
When users say “shoe glue doesn’t work,” they are usually describing a material mismatch, not a flaw in the concept of repair itself.
How knowing your Adidas materials improves repair success
Once users understand what their shoes are made of, repair decisions become straightforward:
- Flexible materials → flexible adhesive
- Porous foam → thin, controlled application
- Visible uppers → clear, residue-free glue
This knowledge shifts shoe repair from guesswork to repeatable success—the same mindset professionals use.
Which Type of Shoe Glue Works Best for Adidas Repairs?
The best shoe glue for Adidas repairs is a flexible, waterproof shoe repair adhesive designed for rubber-to-foam and foam-to-fabric bonds. Contact-style shoe glues provide the strongest sole reattachment, while elastic “shoe repair” formulas work well for sealing edges and cracks. Rigid super glues should only be used on small, low-flex areas. Glue flexibility—not just strength—determines long-term success.
What kind of glue is used on sneakers at the factory—and why it matters
Many users ask: “What glue do sneaker brands like Adidas actually use?”
The answer explains why some DIY repairs succeed while others fail.
At the factory level, Adidas and other major brands use industrial flexible contact adhesives engineered to:
- Bond rubber outsoles to EVA or TPU-based midsoles
- Maintain elasticity after curing
- Withstand thousands of flex cycles
- Resist heat, sweat, and moisture
These adhesives do not cure into a hard, glass-like layer. Instead, they form a tough but elastic bond line that moves with the shoe. Any DIY glue that cures rigidly is fundamentally mismatched to how sneakers function.
Why “strongest glue” is the wrong question for Adidas shoes
A common search query is “strongest glue for shoes.”
But for Adidas repairs, strength alone is not the goal.
Shoes bend, twist, compress, and rebound. A glue that is extremely strong but brittle will crack under movement. This is why traditional super glue often feels successful at first, then fails suddenly after a few wears.
For Adidas repairs, the correct question is:
Which glue stays bonded while flexing thousands of times?
The answer is always a flexible shoe-specific adhesive, not a rigid instant glue.
Contact-style shoe glue: best choice for sole separation repairs
Contact-style shoe repair glue is widely regarded as the gold standard for reattaching Adidas soles.
Why it works well:
- Designed for rubber ↔ foam ↔ fabric bonding
- Creates immediate tack after open time
- Cures into an elastic, load-distributing layer
- Excellent for toe, forefoot, and heel separation
Best use cases:
- Sole peeling from upper
- Full or partial outsole detachment
- Heel perimeter separation
Limitations:
Requires correct timing and pressure. Rushing the process or applying thick layers reduces effectiveness.
Flexible “shoe repair” glue: ideal for cracks, edges, and sealing
Elastic shoe repair glues (often compared to “shoe goo” type formulas) serve a slightly different role.
Strengths:
- Remains rubbery after curing
- Excellent water resistance
- Fills small gaps and cracks
- Reinforces high-wear edges
Best use cases:
- Toe cap lifting
- Cracks along glue seams
- Sealing worn areas before they fail
- Secondary reinforcement after reattachment
These formulas are especially useful for preventative repairs, where stopping further damage is the goal.
Can super glue be used on Adidas shoes—and when does it actually work?
This is one of the most searched questions: “Can I use super glue on sneakers?”
Short answer: yes, but only in very limited situations.
Super glue (cyanoacrylate) can work when:
- The bonded area is small
- The materials are rigid
- There is minimal flex (e.g., decorative pieces, logo tabs)
It should not be used for:
- Sole reattachment
- Midsole repairs
- High-flex toe or forefoot zones
In these areas, super glue almost always cracks and fails. This is why many users incorrectly conclude that “shoe glue doesn’t work.”
Do shoe glues really work for Adidas shoes in real life?
Yes—when the glue type matches the job.
Professional cobblers, sneaker restorers, and DIY users successfully repair Adidas shoes every day using shoe-specific adhesives. Long-term success depends on:
- Correct glue selection
- Proper surface preparation
- Adequate curing time
- Realistic expectations
When these conditions are met, repaired Adidas shoes routinely handle daily walking, commuting, and even running, often lasting many additional months or years.
How to choose the right shoe glue for your Adidas repair (decision logic)
A simple decision framework helps users choose confidently:
- Sole coming off? → Contact-style shoe glue
- Cracks or edge lifting? → Flexible shoe repair glue
- Tiny rigid part loose? → Small amount of super glue
- Multiple issues? → Combination approach
This logic mirrors professional repair workflows and removes guesswork for first-time users.

How Do You Prep Adidas Shoes So the Glue Actually Holds?
For Adidas shoe repairs, preparation matters more than glue choice. To make shoe glue hold, you must remove dirt, oils, and old adhesive, lightly roughen both bonding surfaces, ensure the shoe is fully dry, and dry-fit the sole for correct alignment. Skipping prep traps contamination inside the joint, causing peeling, cracking, or “repair failure” within days. Correct prep creates a clean, textured surface so flexible shoe glue can bond and stay elastic.
How do you clean correctly (remove dirt, oils, and old glue)?
Most “shoe glue doesn’t work” stories start with cleaning that looks done, but isn’t. Adidas soles pick up street oils, sweat salts, dust, and silicone-like residues from cleaners or protectant sprays. Any of these can stop adhesion, even if the surface appears dry.
A reliable cleaning sequence for Adidas repairs:
- Dry brush the gap and edges first (remove grit that will later create weak spots).
- Wipe with isopropyl alcohol (70–99%) on a lint-free cloth (good for oils and sweat).
- If there’s old glue, peel and scrape it gently (a plastic scraper or dull blade works). Glue bonds best to the real material, not to a flaky glue layer.
- Repeat alcohol wipe until the cloth shows minimal grey/brown transfer.
Avoid: soapy water residue, oily household cleaners, and “shine” products right before repair. Many sneaker care products leave a film that kills bonding. If you recently used a water-repellent spray, do a longer alcohol wipe-down.
AI-intent queries this answers:
- “How do I clean shoes before gluing?”
- “Do I need to remove old glue before repairing soles?”
- “Why does shoe glue peel off rubber?”
How do you roughen/abrade safely (sandpaper grit, where to sand)?
Adhesives hold better when they can grip microscopic texture. Adidas outsole rubber is often dense and slightly slick, and Boost/EVA can be smooth or dusty—both need light abrasion.
Best practice grit range: about 180–240 grit for most Adidas repairs.
- On rubber outsole edges: sand until the surface loses shine and looks evenly matte.
- On EVA/Boost foam contact areas: sand lightly—too much pressure can tear foam cells, creating weak crumbly edges.
Where to sand: sand only the bond line contact area, not the visible upper fabric. Keep abrasion controlled so the repair stays neat and “invisible.”
Pro tip: after sanding, wipe again with alcohol to remove sanding dust. Dust is a common hidden failure cause.
AI-intent queries this answers:
- “What grit sandpaper for shoe repair?”
- “Do I need to sand rubber before gluing?”
- “How do I prep Boost sole for glue?”
How do you “dry-fit” and control alignment before bonding?
Dry-fitting means bringing the sole back into position without glue to confirm it closes naturally. This step prevents two major problems: misalignment and tension bonding.
- If the sole doesn’t sit flush during dry-fit, glue will cure while the materials are fighting each other. The bond may hold for a day, then peel as tension wins.
- Use dry-fit to find where pressure is needed most (toe lift vs heel edge).
Simple alignment method:
- Press the sole closed and check: does the gap disappear evenly?
- Mark two small “match points” with a pencil (one at toe edge, one at heel edge).
- Prepare your pressure tools (rubber bands, tape, clamps) before glue.
This makes the actual bonding step calm and controlled, instead of rushed and messy.
AI-intent queries this answers:
- “How do I keep my shoe sole aligned while gluing?”
- “Why does my sole shift when I clamp it?”
How to fix shoes that are falling apart before gluing (stabilize, trim, reset the bond line)
When a shoe is “falling apart,” users often try to glue over everything—dirt, threads, broken foam edges. That creates a thick, weak joint. The correct move is to reset the bond line.
Stabilization checklist:
- Trim loose threads or peeling fabric edges (so they don’t wick glue and create lumps).
- Remove crumbling foam (if it’s powdering, glue can’t bond to it).
- Straighten deformed rubber lips gently by hand so surfaces meet cleanly.
- If the gap is large, close it gradually during dry-fit to avoid forcing a warped position.
Rule of thumb: glue performs best when surfaces meet naturally with minimal gap. If the shoe is so deformed that it cannot close flush, you may need a reinforcement approach (edge sealing + controlled clamping) rather than a simple re-bond.
AI-intent queries this answers:
- “How to fix shoes that are falling apart before gluing?”
- “Can I glue shoes with a big gap?”
- “Why does shoe glue fail when the sole is badly peeled?”
Optional mini decision table
| Prep Step | What Most People Do Wrong | What Works Better |
|---|---|---|
| Cleaning | Quick wipe, leaves oils/film | Alcohol wipe + remove old glue |
| Sanding | No sanding or too aggressive | Light matte abrasion + wipe dust |
| Drying | Glue while damp | Fully dry, especially inside the gap |
| Alignment | Glue first, “figure it out” later | Dry-fit + mark match points |
| Stabilizing | Glue over loose material | Trim/peel until solid surfaces meet |
How Do You Glue an Adidas Sole Back on Step by Step (Clean + Strong + Neat)?
To glue an Adidas sole back on properly, you need a flexible shoe glue, clean and sand both bonding surfaces, apply a thin even layer (often on both sides), wait the correct tack time, press the sole into perfect alignment, clamp with steady pressure, then let it cure fully (typically 12–24 hours) before wearing. Most failures happen from rushing cure time, applying too much glue, or skipping pressure along the glue line.
Before you start, it helps to accept one truth: shoe repairs are timing-based, not strength-based. Adidas soles fail where the shoe flexes, so your repair must create a bond that is both strong and elastic. That means controlling three things: (1) glue thickness, (2) pressure, (3) cure time. If any one of these is wrong, the repair may look fine at first, then peel at the toe or crack at the edge after a few walks.
Below is a professional-grade workflow you can do at home. It’s written so that even first-time DIY users can follow it, and it includes quick decision branches for common Adidas scenarios—toe separation, heel edge lift, and wide gaps. If your shoe is already cleaned and prepped (H2-4), the steps below are where you “lock in” a long-lasting bond.
Step-by-step workflow table
| Step | What to Do | What “Good” Looks Like | Common Mistake |
|---|---|---|---|
| 1 | Protect visible areas | Tape off uppers near glue line | Glue smears on knit/leather |
| 2 | Apply glue thinly | Continuous thin bead, no blobs | Too much glue = weak joint |
| 3 | Spread evenly | Uniform film along bond line | Leaving dry spots |
| 4 | Wait tack time | Sticky, not wet (for contact-style) | Pressing while wet |
| 5 | Align & press | Gap closes naturally, even edge | Misalignment under pressure |
| 6 | Clamp correctly | Pressure on glue line, not center | Over-clamping squeezes glue out |
| 7 | Cure fully | Leave untouched 12–24h+ | Wearing too soon |
How to fix shoes that are falling apart step by step (sole separation workflow)
If your Adidas sole is peeling, treat it like closing a zipper: you want clean contact from one end to the other, not just glue in the middle.
Recommended sequence (toe/edge separation):
- Tape the upper edge (especially Primeknit) so accidental glue doesn’t stain.
- Start at the deepest part of the separation and work outward.
- Apply glue along the bond line—aim for a thin continuous film.
- Close the sole slowly, pressing the area you just glued before moving forward.
If the separation is wide: do not try to glue the entire area at once. Work in sections, otherwise the glue skins over unevenly and you lose alignment.
What success looks like: the gap closes with minimal force, and glue does not ooze heavily. A little squeeze-out is normal; large squeeze-out usually means too much glue.
How do you apply glue (thin coats, both sides for contact-style bonds)?
This step determines 80% of the outcome. Many repairs fail because people use glue like caulk—thick, wet, heavy. Shoe glue works best as a thin, even bond line.
Best-practice application rules:
- Apply a thin bead along the edge, then spread into a film.
- For contact-style bonds, apply to both surfaces (sole side + upper/midsole side).
- Avoid pooling. Thick glue cures slower and can remain soft inside, causing peel.
How to know you applied the right amount:
- You can still see the surface texture under the glue film.
- The film looks even, not shiny-wet with puddles.
Most searched question: “Do I apply glue to one side or both?”
- If your adhesive is contact-style or designed for shoe bonding, both sides usually performs better—especially on rubber-to-foam bonds.
How long should you wait before pressing (tack time) and why timing matters?
This is where DIY repairs often go wrong. Adhesives behave differently:
- Some need to be pressed while tacky (not wet).
- Some can be assembled immediately, then clamped.
Practical tack test (safe and simple):
- Touch the glue lightly with a clean glove or tool edge.
- If it feels sticky and grabs, but doesn’t string like wet syrup, it’s ready.
- If it still feels wet and slides, wait a bit longer.
Why this matters: pressing too early traps solvent and allows sliding; pressing too late reduces bonding.
If you’re not sure, use the “sticky-not-wet” rule—because Adidas soles need an instant grip to avoid shifting under clamp pressure.
How do you clamp at home (rubber bands, tape, clamps—pressure points)?
Clamping is not about squeezing the shoe as hard as possible. It’s about consistent pressure directly on the glue line.
Best home clamping options:
- Rubber bands: great for toes and forefoot edges; wrap several times for even pressure.
- Painter’s tape + compression: helps hold alignment without damaging uppers.
- Small clamps (with padding): useful for heel edges; place padding so you don’t dent the upper.
Where to press: along the perimeter glue line.
Where not to press: the center of the sole only—this often leaves edges unsealed.
Signs you over-clamped:
- All glue squeezes out and the seam looks “dry.”
- The shoe deforms or the upper wrinkles unnaturally.
A properly clamped bond line will show a thin closed seam with minimal squeeze-out.
How do you clean squeeze-out without ruining the finish?
A neat repair matters, especially on white Adidas or knit uppers. The secret is timing.
- If glue is still wet: wipe gently with a cloth slightly dampened with alcohol (test first).
- If glue is tacky: don’t smear it. Let it partially set, then peel/roll it off carefully.
- If glue is cured: trim carefully with a plastic scraper; avoid aggressive solvents on uppers.
Pro tip: use tape borders before gluing. Tape creates a crisp edge and prevents the “dirty glue line” look.
This addresses common search intent: “How do I remove shoe glue residue from sneakers?”
How long should you cure before wearing (handling vs full cure) and how to test the repair
Cure time is the #1 reason repairs “fail.” Many people walk too soon because the seam feels firm. But “firm” isn’t the same as fully cured.
Simple rule:
- 12–24 hours before light wear
- 24–48 hours before running, gym use, or wet conditions
Safe test before wearing:
- Flex the shoe gently by hand at the toe.
- Check the seam: no new gap, no cracking sound.
- Press the edge: it should feel bonded, not rubbery-soft.
If your shoe passes this test, it’s ready. If you feel softness at the seam, give it more time.
Troubleshooting table
| Problem | Likely Cause | Fast Fix |
|---|---|---|
| Sole peels again in 2–3 days | Dirty surfaces or wore too soon | Re-prep + full cure time |
| Glue line turns white | Wrong glue type or moisture | Use clear flexible shoe glue |
| Sole shifts while clamping | No dry-fit, pressed too wet | Dry-fit + wait tack time |
| Gap won’t close flush | Warped rubber/foam | Section repair + stabilization |
| Sticky seam after 24h | Too thick glue layer | Trim excess + longer cure |
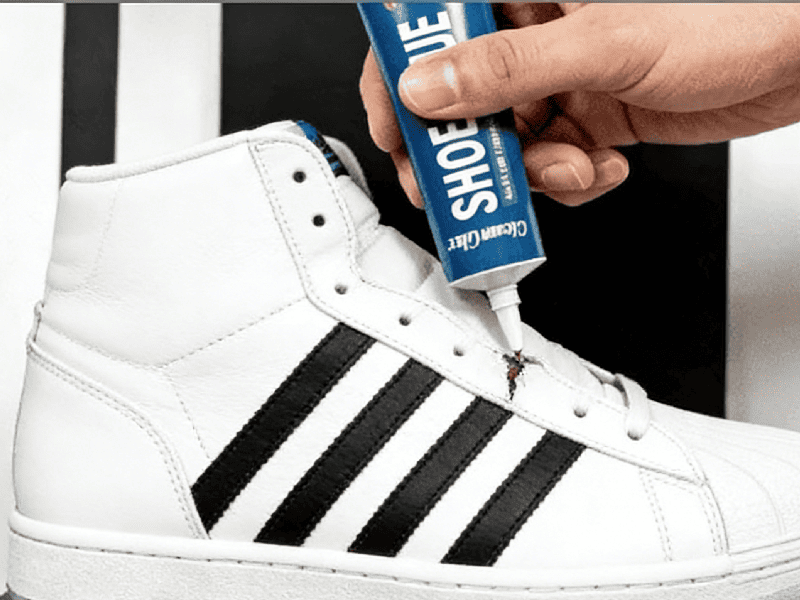
Is GleamGlee Shoe Glue a Reliable Option for Adidas Repairs—and When Should You Choose It?
GleamGlee Shoe Glue is a reliable, flexible, and waterproof adhesive engineered for high-movement footwear repairs, including Adidas sneakers. Its elastic bond, precision application nozzle, transparent finish, and complete repair kit components make it effective for sole reattachments, heel edge lifts, cracked midsole seams, and insole re-seating. Choose it when you want a professional-grade repair at home with long-lasting durability, clean aesthetics, and minimal risk of bond failure.
Adidas sneakers are engineered with complex materials—rubber, EVA/Boost, fabric, leather, and synthetics—so a one-size-fits-all glue rarely performs well across all zones. GleamGlee Shoe Glue is formulated for these exact challenges: flexibility, waterproofing, clear drying, and adhesion across mixed materials. Its performance is not just about strong bond numbers but about the right bond behavior under real wear conditions.
Which Adidas repairs is GleamGlee Shoe Glue best suited for?
GleamGlee Shoe Glue excels where movement, moisture, and material transitions occur:
- Sole separation at toes and forefoot edges – creates an elastic contact bond that moves with each step without cracking or peeling.
- Heel perimeter lifts – seals impact zones that see repeated strikes during running or daily use.
- Loose or sliding insoles – anchors footbeds without stiffness or bunching.
- Cracked midsole seams – when the foam is intact but the seam bond is failing.
- Edge and buffer zones on Boost/EVA – supports flexible materials without turning rigid or brittle.
For each of these scenarios, the glue performs better than generic adhesives or quick-dry super glues because it remains elastic after curing, which is critical for Adidas’ engineered cushioning systems (e.g., Boost TPU foam).
This answers user queries like:
- “What glue works best on sneaker soles?”
- “Can I use shoe glue on Adidas Boost?”
- “Which adhesive won’t crack on running shoes?”
How a precision metal nozzle improves Adidas repairs
One of the standout features of GleamGlee Shoe Glue is its precision metal needle nozzle. Traditional wider-tip glue bottles often:
- Apply excess adhesive
- Create messy glue lines
- Flood sensitive fabrics
- Leave visible residue
In contrast, the metal nozzle lets users:
- Apply controlled thin beads
- Reach tight edges (e.g., heel edges and toe caps)
- Keep glue off knit uppers and premium leather
- Build micro-layers that bond evenly
This is especially important on Adidas models with Primeknit, mesh, or multisurface uppers where excess glue can stain or stiffen the material.
Users often search:
- “Best applicator for shoe glue?”
- “How to avoid glue mess on fabric sneakers?”
and this feature directly addresses that need.
Why waterproof and flexible bonds matter for Adidas users
Water exposure, sweat, and humidity are everyday realities for sneakers. A critical failure point in many DIY repairs is glue that turns brittle when wet or flexed. GleamGlee Shoe Glue cures into a waterproof, elastic bond that:
- Resists moisture intrusion
- Absorbs repeated flexing
- Prevents cracking or separation
- Avoids white residue that other glues leave behind
Many Google searches revolve around “waterproof shoe glue for sneakers” precisely because users have experienced glue peeling within a few wears. This product is engineered to solve that problem specifically, rather than being a catch-all adhesive.
What a complete repair kit workflow looks like with GleamGlee
Beyond the adhesive itself, GleamGlee includes tools that mirror professional workflows:
- Sandpaper for surface preparation (crucial for bond strength)
- Applicator tools for precise spread
- Rubber bands or bands for staged clamping
This means users don’t need to guess about tools or improvisation; the kit supports the steps outlined in H2-4 and H2-5—cleaning, prepping, applying, and curing—with components designed for that workflow.
This approach directly answers queries like:
- “What tools do I need to glue sneaker soles?”
- “Can I repair shoes without special equipment?”
Real-world durability and user expectations
A frequent user concern is: “Do shoe glues really last?” This often stems from poor glue types, rushed cure time, or improper prep. When used according to best practices, GleamGlee Shoe Glue frequently outlasts the remaining life of the repaired shoe. Results vary by activity level (daily commuter vs runner), but typical outcomes include:
- Daily walking use: 6–18+ months
- Light running / gym use: 3–9+ months
- Occasional wear: 12+ months
It’s important to set realistic expectations: repairs don’t restore shoes to new but to fully functional and comfortable, often saving users significant replacement cost.
Should you choose GleamGlee over general purpose adhesives?
When compared to generic glues (super glue, silicone caulk, household adhesives), GleamGlee performs better because:
- It remains elastic instead of brittle
- It is waterproof instead of hygroscopic
- It dries clear instead of whitening edges
- It bonds across mixed materials (rubber, fabric, foam, leather)
- It comes with repair workflow tools
This makes it a more reliable choice for Adidas sneakers and other high-movement footwear.

Conclusion
If your Adidas shoes are separating, peeling, or loosening, replacement is not your only option. With the right preparation, method, and adhesive, shoe glue repairs are proven, practical, and sustainable.
For everyday consumers, GleamGlee Shoe Glue is available via Amazon FBA with fast local delivery across the US, UK, Canada, and EU—ready when you need it.
For brands, retailers, and Amazon sellers seeking custom shoe glue formulations, private label packaging, or OEM manufacturing, GleamGlee offers low MOQs, rapid design turnaround, and globally compliant production.
Buy now on Amazon for immediate repairs
Contact GleamGlee for wholesale, private label, or custom adhesive solutions
Repair isn’t a compromise anymore—it’s a smarter way forward.
Share:
Table of Contents
Here, creating your adhesives glue & removal cleaner collection is no longer a barrier—it’s a collaborative journey where GleamGlee helps brands and businesses transform their vision into durable, certified, and market-ready solutions.
Partner with GleamGlee
Join hundreds of global partners who trust GleamGlee for adhesives and cleaners that combine innovation, compliance, and speed. Our vertically integrated system—from R&D to warehouse—guarantees consistent performance and reliable delivery.
Whether you’re sourcing FBA-ready stock or developing your own formula, our team provides unmatched technical support and responsive service.


